
Situo 1 RTS II & Situo 5 RTS II Overview #
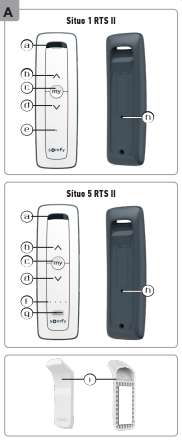
Wall Mount Recess
▲ Up / On / Open / Tilt / Increase Intensity Button
⏹️ STOP / my Button
▼ Down / Off / Close / Tilt / Decrease Intensity Button
Button Activation Indicator Light
Group Selection Indicator Lights
Group Selector Switch
PROG Button (on back)
Wall Mount Bracket
Group Selection – Situo 5 RTS II #
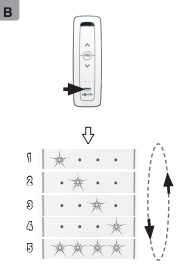
Select the group before operating:
Short press the Group Selector (7) to display the current group.
Press repeatedly to cycle through Groups 1-5.
Indicator Lights (6):
One light = Group 1-4
All lights on = Group 5 (simultaneous control of all)
Programming: Add or Remove a Remote #
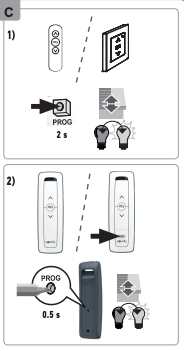
Info: For first-time setup, follow the motor or receiver’s manual to program the first remote.
Add or Remove a Situo RTS II Remote: #
On an already paired remote:
**Press and hold** the PROG button (8) for ~2 seconds until the application jogs (brief up/down movement).
On the new remote you want to add or remove:
For Situo 5 RTS II, first **select the correct group** using the Group Selector (7).
**Briefly press** the PROG button.
The application jogs again to confirm the action.
Installation Guidelines #
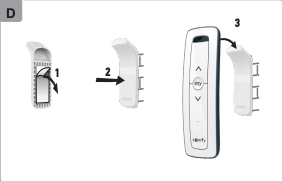
Mounting Height:
Maximum installation height: 2 meters
Radio Signal Tips #
Building materials may reduce signal range.
Situo 1 RTS II: Ideal for single-room use
Situo 5 RTS II: Designed for whole-floor coverage
Avoid installing near or on metal surfaces.



