
Troubleshooting #
#
Finding & Accessing TRO.Y #
Connection Requirements: TRO.Y 2 requires PoE (Power over Ethernet). Connect to a PoE switch or use the included PoE injector. Verify LEDs are lit on the front of the unit.
Method 1: Ping TRO.Y #
Windows: Open Command Prompt, type
ping troy, press EnterMac: Open Terminal, type
ping troy.local, press EnterIf successful, the IP address will be displayed. Enter that IP in your browser.
Method 2: UPnP Discovery (Windows) #
Open File Explorer and click Network in left panel
Look for SI_TRO.Y under “Other Devices”
Double-click to open in browser, or right-click → Properties for IP address
Method 3: ARP Command #
Type arp -a in Command Prompt/Terminal. Look for MAC address starting with 70:B3:D5 or 58:76:07 — the IP next to it is your TRO.Y.
Direct Connection (No Network): Connect directly to TRO.Y using the fallback IP: 169.254.169.254
Connect laptop directly to TRO.Y with Ethernet cable
Set your computer’s IP to 169.254.169.X (X = 1-250)
Subnet mask: 255.255.255.0
Press the Reset button on TRO.Y (red LED will flash)
Navigate to 169.254.169.254 in browser
Browser Tips #
Use Chrome for best compatibility
Clear browser cache if page won’t load
Always use TRO.Y’s Back button (not browser back) to avoid data loss
Password Locked Out? #
Press the Reset button on TRO.Y to enable security bypass mode for 5 minutes, then refresh your browser. Note: SI Support cannot reset or recover lost passwords.
TRO.Y Not Responding #
LED Status Reference #
Power LED (PWR): Solid = powered on
Network LED (NET): Blinking = network activity
Bus LEDs (1-4): Activity on RS-485 ports
Helen LED: Zigbee coordinator activity
Troubleshooting Steps #
Power cycle TRO.Y – disconnect PoE for 30 seconds, reconnect
Check PoE source – try a different PoE port or injector
Check network cable – try a different cable
Factory reset – press and hold Reset button until all LEDs turn off
Button Operation:
Short press: Security bypass (5 min GUI access)
Long press (until LEDs off): Factory reset – erases all settings
Configuring Network Settings #
Recommendation: If using 3rd party control systems, it is recommended to set TRO.Y to Static IP.
Setting Static IP #
Go to System Settings at top of screen
Turn DHCP OFF
Enter Static IP, Subnet Mask, and Gateway
Scroll down and click Restart
Best Practice: If using Static IP, also reserve the MAC address in your router settings for stability. TRO.Y MAC addresses start with 70:B3:D5 or 58:76:07.
Updating TRO.Y Firmware #
Critical: Do NOT power off TRO.Y or leave the GUI while firmware is updating!
Firmware Update Steps #
Go to System Settings at top of screen
Scroll to bottom and click Show next to Firmware Updates
Click Choose File and select the firmware file
Press the Reset button on TRO.Y (red LED should flash)
Click Submit to start upload
Wait for “result”: “good” in Results box
Click System Restart button
If Firmware Update Fails: Press the Reset button again, then press Submit again.
Zigbee Mesh Network Troubleshooting #
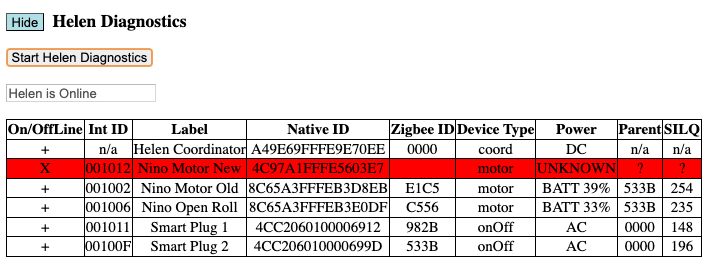
Helen Diagnostics Video #
Zigbee Mesh Networking & RF Issues #
Zigbee mesh design, interference diagnosis, and spectrum analysis are covered in depth in the dedicated guides:
Motor Not Discovering #
Discovery Steps #
Go to Integration Table
Click Start Wired Device Discovery
Devices will appear as they’re found
Click Stop Wired Device Discovery when done
Click Accept Edits to save to browser
Click Commit Integration Table to save to TRO.Y
Wiring Checklist #
Verify proper termination at both ends of bus
Check for loose connections
Use twisted pair cables (CrestNet, Lutron, or Somfy wire preferred)
Max cable length: 300 feet total
Check motor has power
Isolate Wiring Issues:
Temporary cable — run a new cable across the floor to bypass existing wiring
Direct connection — plug the shade directly into the Janus
Swap locations — if possible, swap the problem shade with a working shade at a different location
If the shade works with temporary wiring or at a different location, the original wiring is likely the issue.
Best Practice: Divide shades into 4 segments (one per TRO.Y bus port) for best performance. Max 64 shades per port, 256 total per TRO.Y.
Motor Not Responding to Commands #
Troubleshooting Steps #
Check motor power – is the motor powered?
Check Integration Table – is motor showing online?
Use Test button in Device Table to jog
Check for address conflicts – each motor needs unique ID
Check motor limits are set correctly
Common Causes #
Motor limits not set (motor won’t move past limits)
Address conflict with another device
Wiring issue on bus line
Motor power issue
Motor Issues (Aging/Encoder Problems) #
Motors may develop encoder or limit issues that cause them to move only in small increments or not move at all.
Symptoms #
Motor only moves in small increments (jogging slightly then stopping)
Motor doesn’t move at all when commanded
Motor responds to commands but travel is very limited
Limits display as 65535 (indicates encoder/limit memory corruption)
Step 1: Try Adjusting Limits #
Go to Integration Table → Device Table
Click Config on the affected motor
Click Limits button
Check current limit values — if either shows 65535, this indicates corruption
Try clicking Adjust next to Upper Limit
Use UP/DOWN controls to move shade
Click Set to save new limit
Repeat for Lower Limit
Step 2: Factory Reset the Motor #
If adjusting limits doesn’t help, or limits still show 65535:
Go to Integration Table → Device Table
Click Config on the motor
Click Limits button
Click Factory Reset button
Confirm the reset when prompted
Wait for motor to reset (may take 30-60 seconds)
Re-set both upper and lower limits after reset
Test motor operation
Important: Factory Reset Erases All Settings
Factory reset will erase upper and lower limits, intermediate positions (favorite positions), and motor address (will need to re-discover). You will need to re-configure the motor after reset.
Intermittent Communication #
Systematic Troubleshooting #
Identify problem motors using Diagnostics Table
Isolate Janus units – connect each one individually to TRO.Y bus ports (don’t daisy chain)
Narrow down faulty motor – disconnect all motors, reconnect one at a time
Inspect wiring once fault is located
Wiring Checks #
Proper termination at both ends
No sharp bends in cables
Proper grounding – no ground loops
Continuity test – check for shorts or broken wires
Cable length – max 300 feet
Pro Tip: Instead of daisy-chaining Janus units, connect each one individually to TRO.Y bus ports. This makes troubleshooting much easier.
Motor Rotation Direction Wrong #
If the motor is moving in the wrong direction (up command moves down, or vice versa), you can reverse the rotation in TRO.Y.
Reverse Motor Rotation #
Go to the Integration Table
Click Config next to the motor
In the Motor Settings, press the “Direction” button to alternate between Clockwise and Counter-Clockwise
Press the “Back” button to leave the Configuration Mode
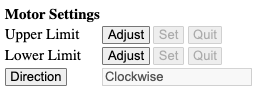
After Changing Rotation: You may need to re-set your limits after changing the rotation direction, as the up/down reference points will swap.
RTS / RF Troubleshooting (Pegasus) #
RTS operates on 433.42 MHz frequency.
Range Issues #
Typical RTS Range #
Indoors: ~30 feet (varies by obstacles)
Outdoors: Up to 60 feet in ideal conditions
Range Troubleshooting #
Check remote batteries – weak battery = short range
Test closer – does it work at short distance?
Check for interference – metal, thick walls, other RF devices
Reposition antenna – extend fully, position vertically
Try different remote – rule out faulty transmitter
Common Interference Sources #
Metal objects (cabinets, HVAC ducts)
Thick walls (concrete, brick)
WiFi routers, baby monitors, cordless phones
Wireless security cameras
Extend Range: If range is insufficient, a Pegasus Smart Repeater can extend the signal. Install it halfway between transmitter and motor.
Pairing Motor to Pegasus #
RF Motor Table Pairing #
Make sure remote is paired to motor and limits are set
In Device Table, click Config on Pegasus
Click RF Motor Table
Put motor in pairing mode (see below)
Click RF Pair for desired channel – motor will jog
Click RF Test to confirm
Label the channel and click Save
Putting Motors in Pairing Mode #
Somfy 30 Series (LV/Wirefree): Hold Program button on remote until jog, then hold Motor Head button until jog
Somfy 50 Series (LV): Hold Program button on remote until jog
SI KAOS: Hold STOP button on remote for 5 seconds until jog
Alpha: Tap RED button on motor head – jog, then UP+DOWN quickly, then STOP 8 times – jog
Learning a Remote to Pegasus #
Compatibility Modes #
Select the correct mode in Pegasus Config:
Somfy: Somfy/Olibra remotes
Alpha: Alpha remotes
SI KAOS: SI KAOS remotes
Lutron: Lutron Pico remotes
Learning Remote Steps #
In Device Table, click Config on Pegasus
Click RF Remote Table
Click Learn (button turns yellow)
Press program button on remote
Remote ID will appear when learned
Select target for the remote
Click Send Target to Device
Remote Program Buttons #
Somfy: Press program button on back of remote
Alpha: UP+DOWN together, then STOP 8 times quickly
SI KAOS: Hold UP button for 7 seconds
Lutron Pico: Hold any button for 7 seconds
Ghost Signals (Motors Moving Without Command) #
Possible Causes #
Nearby devices on 433 MHz (car remotes, baby monitors)
Other RTS motors with same address
Stuck button on remote
Third-party automation triggering schedules
Voltage spikes on power line
Troubleshooting Steps #
Power cycle motor – disconnect for 30 seconds
Clear programming – perform full reset on motor
Reprogram with single trusted remote
Isolate interference – turn off nearby RF devices
Check automation – review schedules in TRO.Y, Bond, or control system
Remove batteries from unused remotes
Use RF Scanner: An RF scanner can detect unknown signals around 433 MHz. Monitor for spikes when ghost signals occur.
Integration Troubleshooting #
Most Integrations Require Telnet Setup First: Control4, Crestron, Bond, Savant, URC, and most other systems require Telnet/JSON Server to be configured in TRO.Y before integration. Josh AI and Lutron do NOT require Telnet setup.
Telnet Connection Limit: TRO.Y only supports 1 Telnet connection at a time. If using Bond Bridge Pro with another control system, integrate Bond into TRO.Y and use a 3rd party driver to control Bond.
Telnet/JSON Server Setup #
Recommendation: Use Static IP or MAC reservation on TRO.Y and 3rd party processor for stability.
Telnet Setup Steps #
Click Integration Settings
Click Show on Telnet/JSON Server Settings
Select TCP
Set Telnet port (default: 23)
Enter Username and Password
Click Submit
Restart TRO.Y
Verify Connection: When connected, TRO.Y Dashboard will show “Good Connection” in System Status under Telnet Server.
Control4 Issues #
Common Problems #
Can’t discover devices: Verify Telnet credentials match between TRO.Y and C4 driver
No 2-way feedback: Run Measure Travel Time action on each blind driver
Connection drops: Check for IP changes; use Static IP or DHCP reservation
Crestron Issues #
Common Problems #
64 shade limit: Crestron Home extension supports maximum 64 shades per TRO.Y. For larger projects, use SIMPL programming with Telnet API.
Extension not connecting: Verify TRO.Y IP, username, and password are correct
Shades not showing: Ensure shades are committed to Integration Table in TRO.Y
Josh AI Issues #
Josh AI uses auto-discovery to find TRO.Y on your network. No Telnet/JSON setup is needed.
Important: Currently Josh AI will not import groups from TRO.Y, and RTS motors connected via Pegasus.
If TRO.Y Not Auto-Discovered #
Go to System Setup → Configure Devices
Click Add Integration
Search for and select the Shade Innovations logo
Enter TRO.Y IP address, press Reset button, click Next
If still not connecting, check network settings and power cycle both devices
Bond Bridge Pro Issues #
Setup Steps #
Open the Bond app → My Devices → Select Bond → Advanced Settings → Network Info (note IP)
Open browser and enter Bond’s IP followed by /troy (e.g., http://192.168.1.100/troy)
Enter the TRO.Y IP address and click Save
In TRO.Y, enable Telnet/JSON Server with username and password
Reboot both TRO.Y and Bond Bridge Pro
Lutron Issues #
Compatible Systems Only: TRO.Y integrates with QSC, RadioRA 2, RadioRA 2 Select, and Caseta Pro. NOT compatible with QSX or RadioRA 3.
Setup Requirements #
Enable Telnet on Lutron: In Lutron app → Tools → Advanced → Integration → Enable Telnet Support
Configure TRO.Y Telnet Client: Integration Settings → Telnet Client Settings → Enable → Enter Lutron processor IP, Port 23, credentials (default: lutron / integration)
Configure Telnet Client Table for button mappings
General Integration Troubleshooting #
Verify network settings – Both devices on same network/VLAN
Power cycle both devices after configuration changes
Check firewall rules – Port 23 (Telnet) must be open
Confirm TRO.Y firmware is current
Test Telnet connection using a terminal application (PuTTY, Terminal)



