
Operating and Care of Your Screen #
Operation of the screen systems should only be performed by responsible parties.
Always check the path of the Solo 3 screen before operating to ensure that the path is clear of furniture or obstacles that could prevent full operation.
Monitor the Solo 3 screen for smooth operation through its entire range.
Operating a Solo 3 screen unattended may lead to damage from obstructions or other causes.
Fabric maintenance and cleaning – Solo 3 screen fabric is subject to debris under normal use or in storage, requiring occasional maintenance and cleaning.
While fading and wear over time are normal, debris could accelerate this wear.
Screen fabrics can be cleaned with water and a mild soap.
Scrubbing with a bristle brush or pad is not recommended.
RTS Control via Pegasus 375 Only #
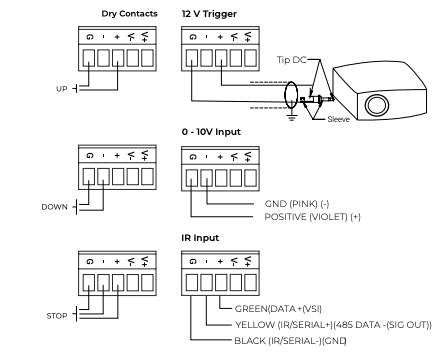
This article explains how to control an RTS screen using the GPIO inputs on the Pegasus device. Control options include IR, 12V trigger, or contact closure, depending on your system configuration.
Programming an RTS Motor #
You can control the RTS motor using GPI/O inputs or 485 commands.
Power Up Pegasus:
Use the Terminal Block or 485 Bus to supply power.
Make sure the Local LED (red) is ON.Put the Motor in Learn Mode:
With a remote: Press and hold Up + Down until the motor jogs once.
Without a remote: Press and hold the programming button on the motor head until it jogs once.
Note: Some RTS motors have a yellow LED that will start flashing in learn mode.
TIP: TIPTip: You can also push and hold the programming button on the back of the remote until the shade jogs.
Program the Motor to Pegasus:
Press the PROG button on Pegasus.
The motor will jog once, confirming it’s been paired.
GPI/O and Dry Contact Pinouts #
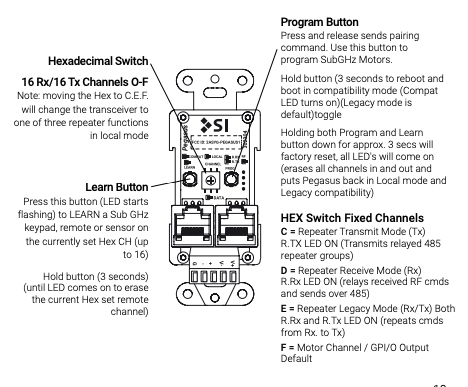
Pegasus Button Guide #
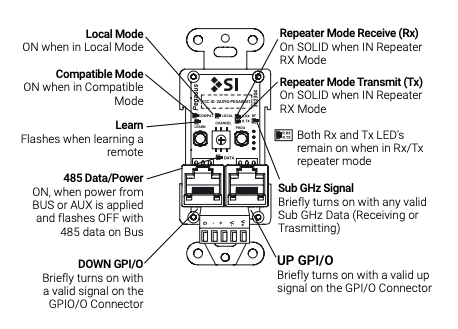
LED Details #
Servicing the Screen 375 Only #
By removing the cover during installation, inspection of the roll and screen material are possible.
Servicing Notes: #
Depending on the mounting, removal and reinstallation of the screen may be required to access the end cap locking screw.
Before removing the tube, ensure all wireless battery screens are put to sleep.
A best practice is to remove the screen from the brackets to minimize risk to the screen during servicing; place the screen on a clean, flat surface.
Beware of obstructions when removing cover; if there is an obstruction, unlatch the levers, disconnect wiring, and remove screen off the brackets to service, laying on a clean, flat surface.
Step 1: Removing the Fascia #
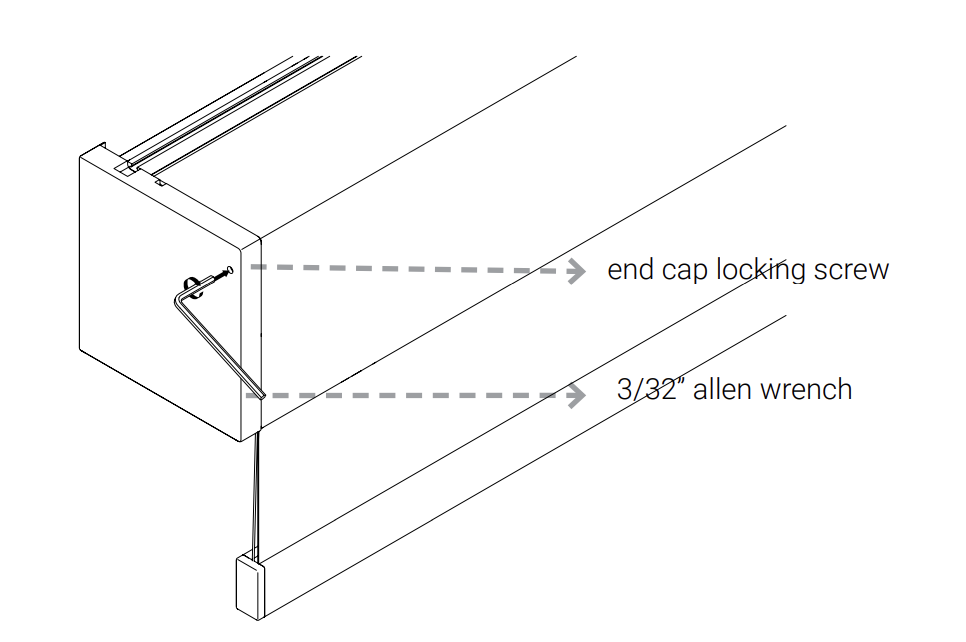
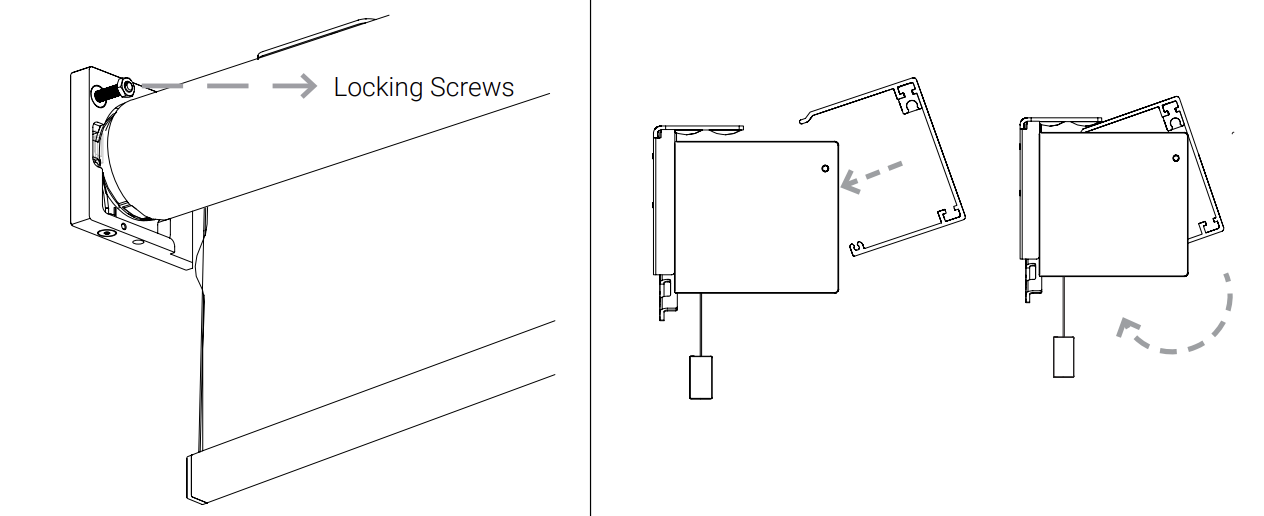
To service the Solo 3, begin by loosening the end cap-locking screw on each end cap.
To unlatch the cassette face to access the motor and screen material, hold the end caps level and push upwards on each side of the cassette face.
Unless two installers are available to each unlatch one side of the cassette face, unlatching one side at a time is recommended.
The cassette face can be felt and heard disconnecting from the locking screw.
DANGER: WARNINGLocking Screws are reverse thread
CLOCKWISE = LOOSEN
COUNTER-CLOCKWISE = TIGHTEN
Step 2: Removing the Fascia #
Drop the screen to lower limit to reduce the diameter of the roll, lessening the chance of screen material interference when removing the cover.
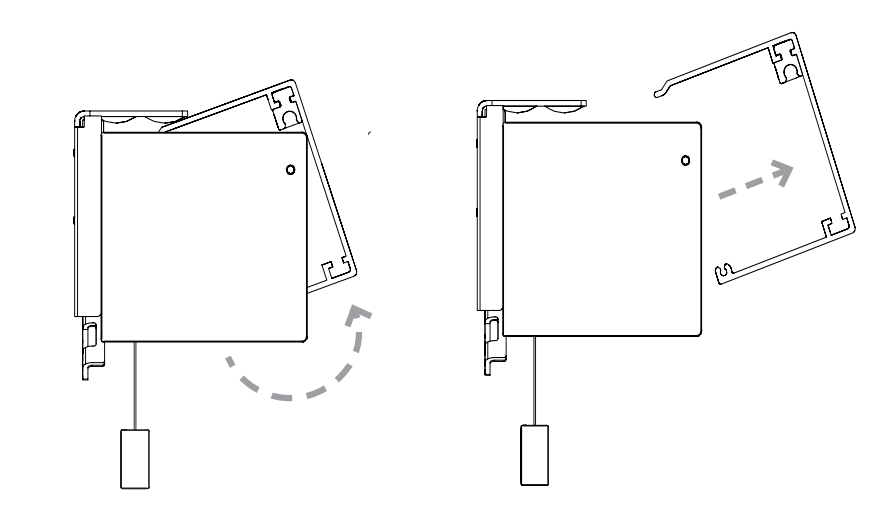
To remove the cover, pull the cover towards yourself, rotating upwards slightly.
Step 3: Inspecting the Roll #
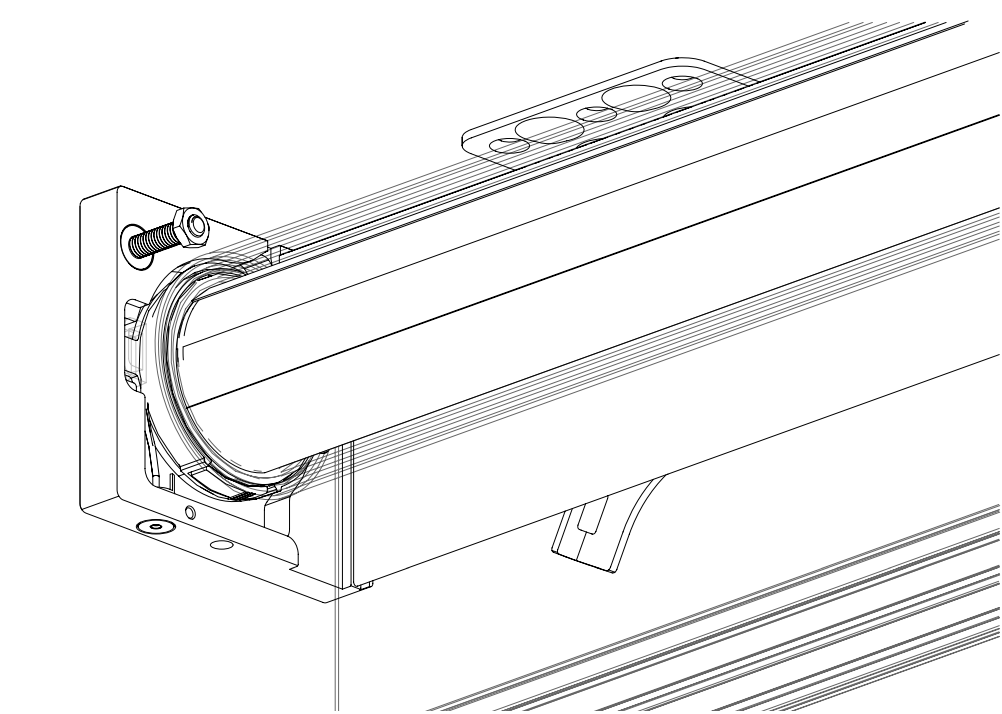
Inspection of the roll and access to the motor and screen material are now available with the cover removed.
Step 4: Tube Removal #
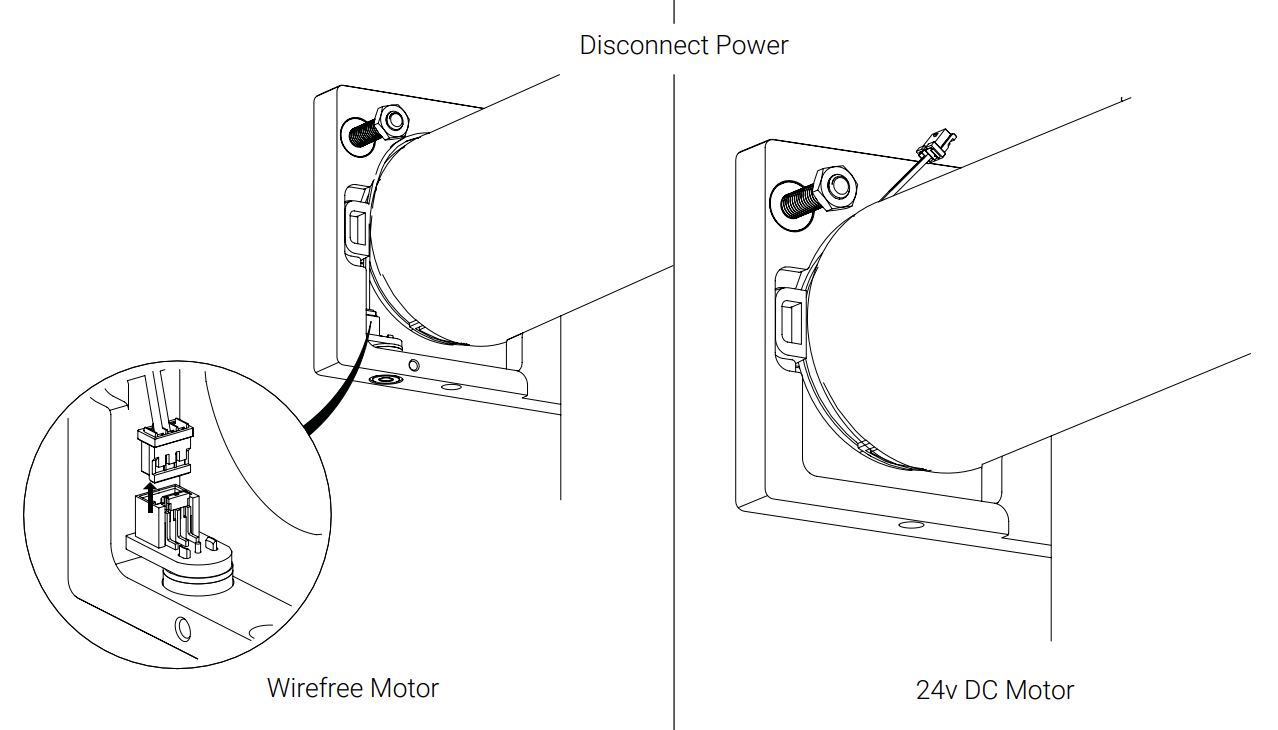
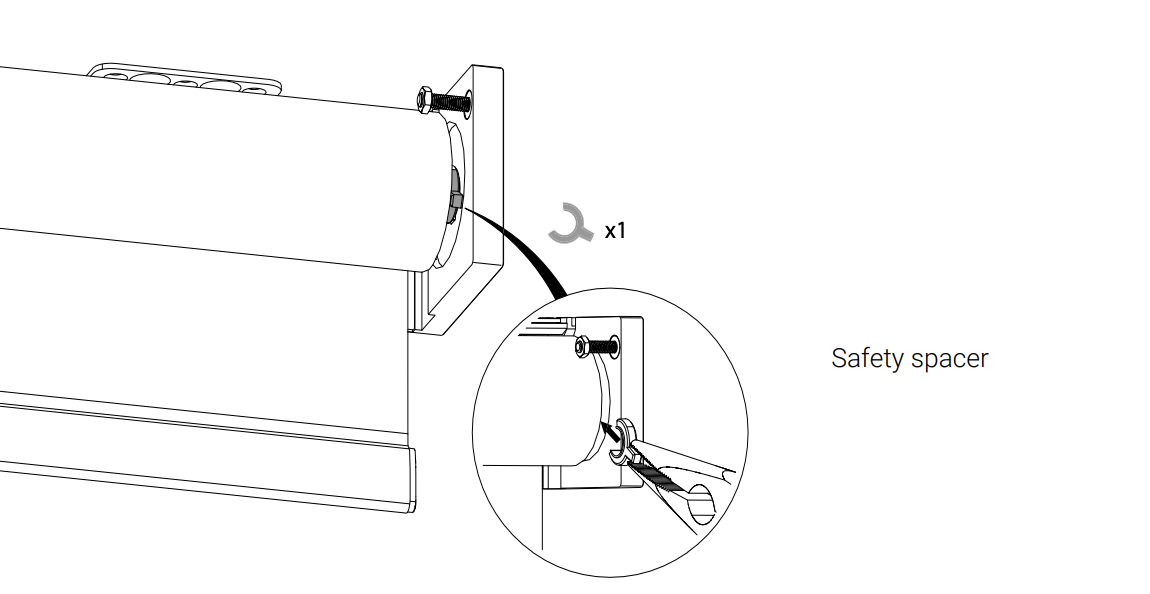
Disconnect power pulling the cable to the side of the roll, then disconnect the safety spacer with needle-nose pliers as shown below.
Retain the safety spacer for reinstallation after service completion.
Step 5: Tube Removal #
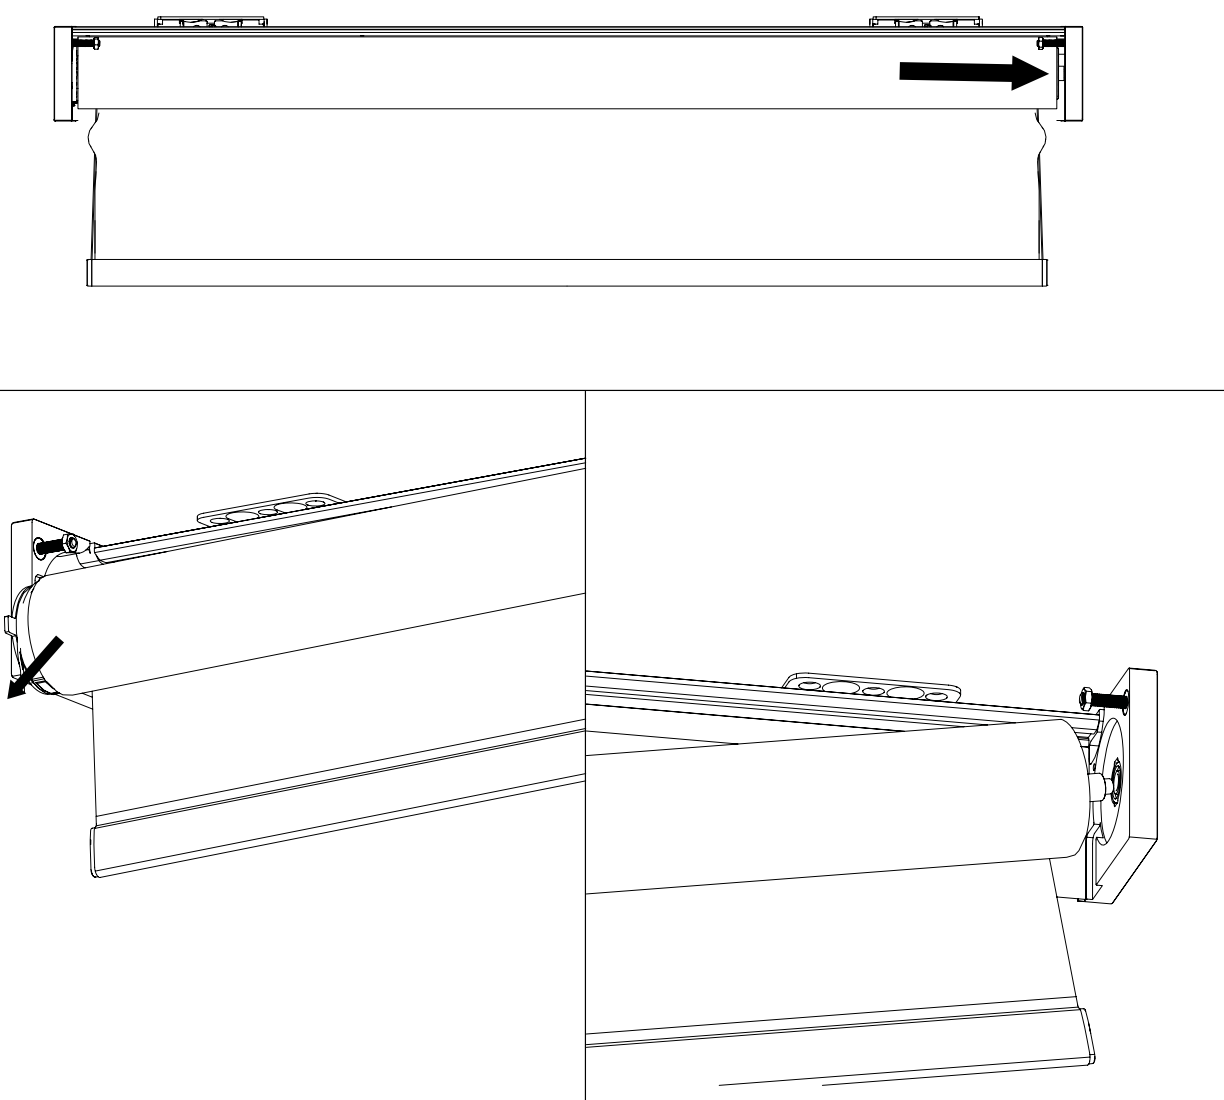
To remove the material tube from the cassette, locate the motor side of the material tube; push toward the opposite, idler side.
The idler spring will depress and disengage, allowing disengagement of the motor (connector) side from the end caps.
Once the motor side clears the end cap, pull the tube assembly away from the idler to complete removal.
Step 6: Tube Installation #
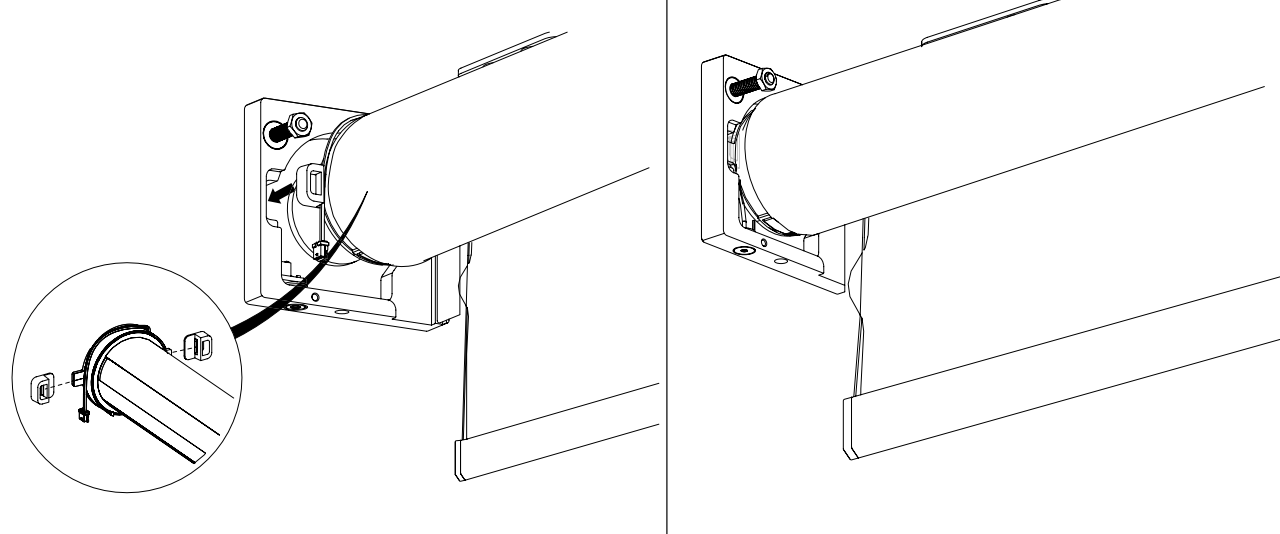
Once servicing is complete, reinstall the material roll by seating the motor head into the motor end cap.
To ensure correct fit of the motor head, pay particular attention that the rubber noise isolators are fully seated in their corresponding end cap recesses.
Step 7: Tube Installation #
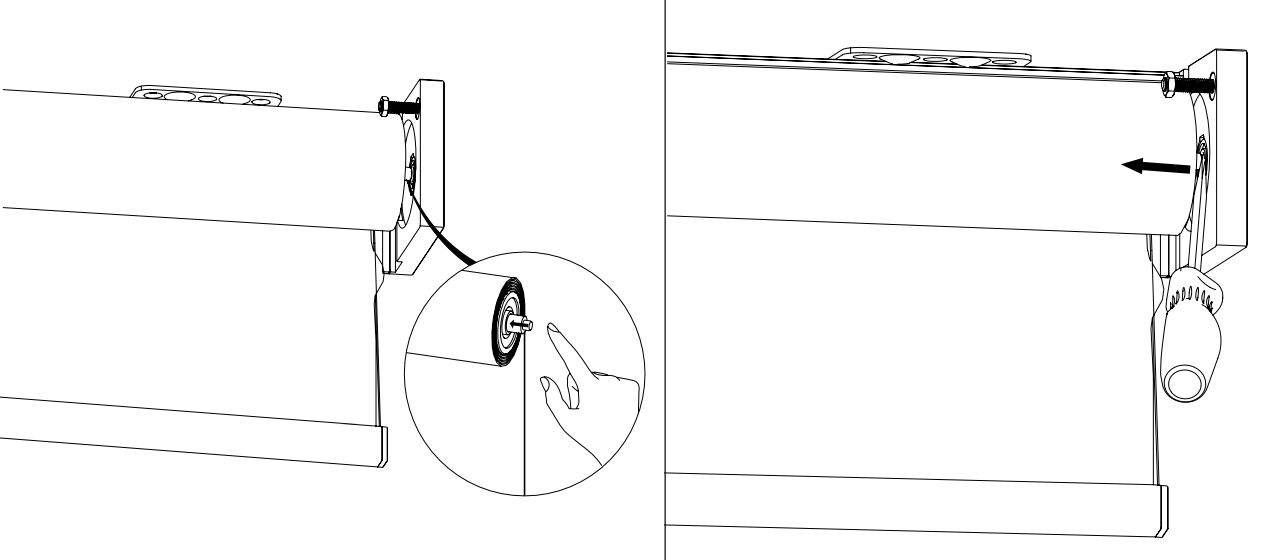
Fully depress the spring-loaded idler; pivot the tube until the idler is in-line with the idler bearing.
The idler can be released once it has cleared the edge of the end cap.
Reverse roll screen end caps have additional channels; should the idler engage one of these channels, use a screw driver to depress the idler and shift into the correct bearing.
Step 8: Tube Installation #
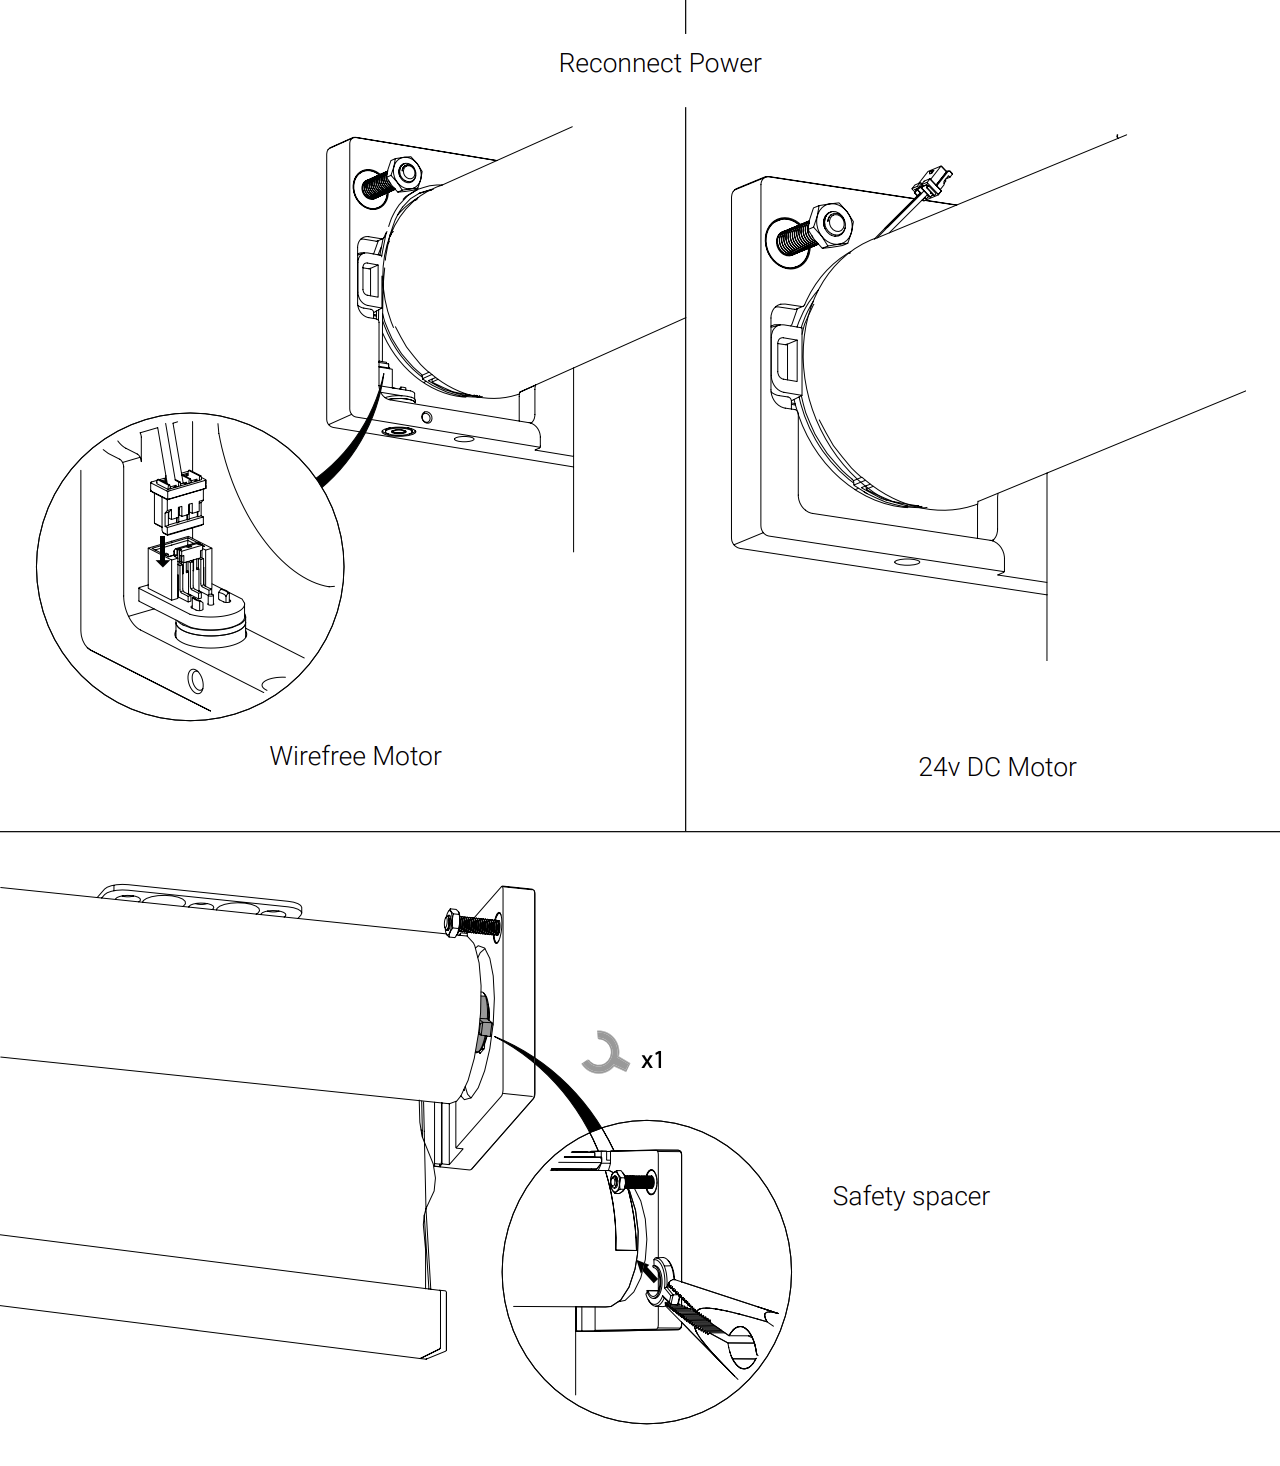
Reconnect power and the safety spacer with needle-nose pliers, as seen below.
Reinstall the Red safety spacer on the idler.
Step 9: Fascia Installation #
Shift brackets into the latched position to ensure stability.
Ensure the locking screw nut is fully disengaged, allowing for cassette engagement.
Reinsert the cover by positioning straight-on, then rotating downwards to engage with the locking screws.
The locking screws will “click” once they have engaged and the cassette face will align with the end cap.
Step 10: Fascia Installation #
Tighten the locking screws until snug, closing any gap between the end cap and the cassette, locking the cover in place.
DANGER: WARNINGLocking Screws are reverse thread
CLOCKWISE = LOOSEN
COUNTER-CLOCKWISE = TIGHTEN
Step 11: Re-Install the Screen #
Re-mount the screen to the wall brackets following the installation steps above.
Tube Leveling 375 Only #
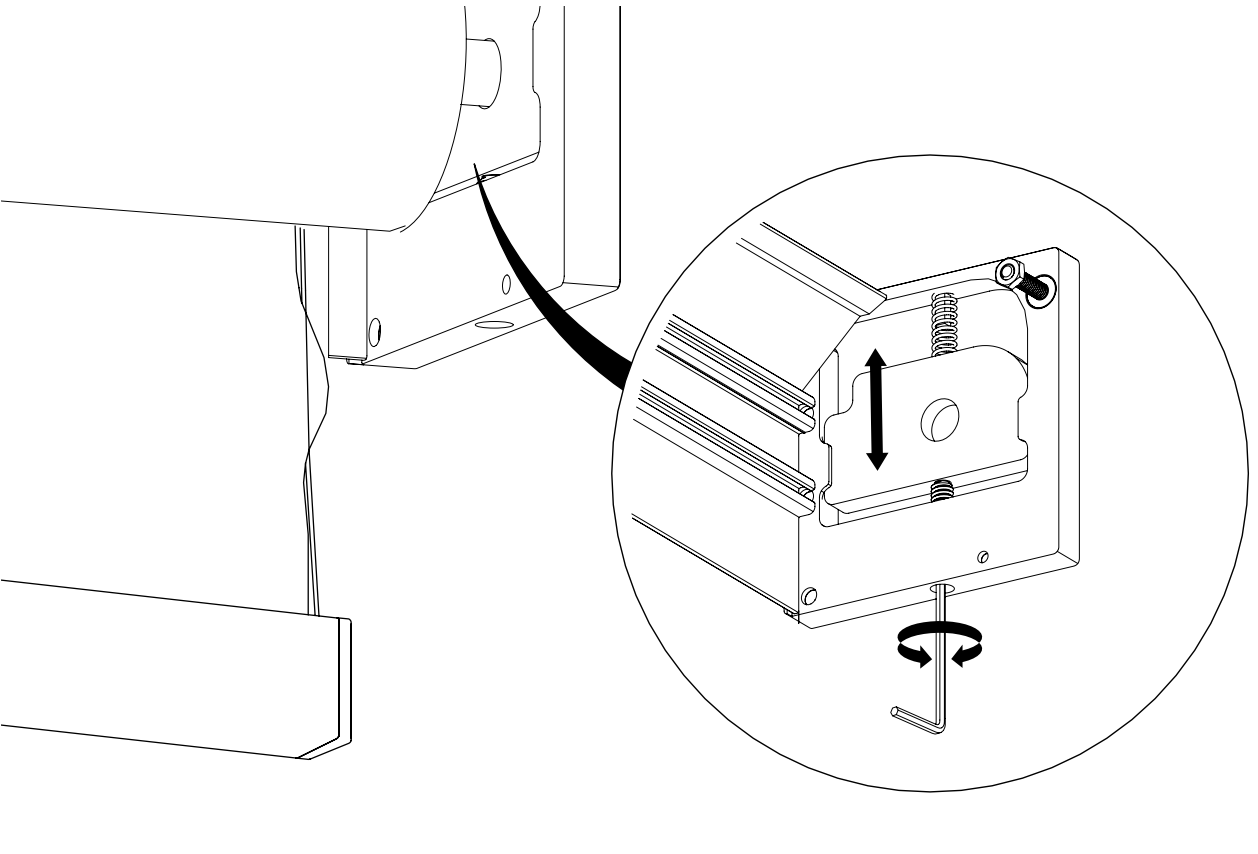
To level Solo 3 375 models, note that the idler bearing is positioned on a spring loaded plate that moves up and down.
To level this model, set the plate to the appropriate position and tighten using the hole at the bottom of the end cap.
IR HEX Codes #
UP:
0000 006c 0000 000c 0006 011b 0006 011b 0006 00bb 0006 00bb 0006 00bb 0006 00bb 0006 00bb 0006 00bb 0006 00bb 0006 00bb 0006 011b 0006 08a4
STOP:
0000 006c 0000 000c 0006 011b 0006 011b 0006 00bb 0006 00bb 0006 00bb 0006 00bb 0006 00bb 0006 00bb 0006 00bb 0006 011b 0006 011b 0006 08a4
DOWN:
0000 006c 0000 000c 0006 011b 0006 011b 0006 00bb 0006 00bb 0006 00bb 0006 00bb 0006 00bb 0006 00bb 0006 00bb 0006 011b 0006 00bb 0006 08a4
Screen Cleaning #
DANGER: WARNINGNever use abrasive scrub pads, oil-based solvents, or concentrated detergents to clean screen material.
TIP: TIPAlways test cleaning solutions in a small inconspicuous area to check for compatibility.
INFO: NOTE”Soapy water” – Diluted solution of clean water (preferably distilled) and a mild dish washing detergent.
Maestro White #
Remove light dust by using a bristled attachment with a vacuum cleaner, or compressed air. Light stains can be removed with a microfiber towel and soapy water, or with a clean white pencil eraser.
Slate, Pure White, PureGray, and 360 #
Gently wipe screen material using a microfiber towel and distilled water.
Do not scrub the material excessively.
For stains or smudges, use a microfiber towel with a diluted degreaser solution (1:20 dilution recommended) or lukewarm soapy water.
Black Diamond #
Gently wipe screen material with “Whoosh” Screen Cleaner and a microfiber towel.
FlexGlass #
Remove dust and fingerprints by using a microfiber towel with a diluted glass cleaner solution (1:10 dilution recommended) or soapy water.
Wrinkle & Wave Correction / Troubleshooting #
Issue: Wrinkles or Waves in Screen Surface #
Wrinkles, waves, or distortions in the screen surface can result from improper installation, uneven tension, shipping shifts, or environmental factors. Follow the steps below to identify and correct the issue.
Tools Required #
Allen wrench (included with screen)
Soft microfiber cloth
Laser or bubble level
Heat gun or hair dryer (for impressions only, not wrinkles)
Clean gloves (optional to avoid marks)
1. Confirm Proper Level Installation #
Symptom: Horizontal or diagonal waves across the screen
Solution:
Use a level to check the case and mounting brackets. The screen must be installed perfectly level to maintain even fabric tension.
If not level:
Loosen the mounting brackets.
Adjust as needed and re-tighten.
Cycle the screen up and down several times.
2. Let the Screen Hang Unused #
Symptom: Vertical or compression wrinkles (from storage or shipping)
Solution:
Leave the screen fully deployed (down) for 24-48 hours.
Ensure room temperature is 70-75°F (21-24°C).
Gravity and ambient heat may allow the material to relax on its own.
3. Perform Warm Relaxation (Optional Use of Heat) #
Symptom: Persistent creases or minor impressions
Solution:
Gently warm the back side of the material with a hair dryer or heat gun on a low setting while keeping the screen fully extended.
Always keep the heat source at least 12 inches away.
Move continuously – do not overheat or concentrate heat in one area.
Let the screen cool in the deployed position.
WARNING: Never apply heat directly to the screen surface. Always test a small area first.
4. Utilize the “Manual Stretch” Technique #
Symptom: Stubborn waves or wrinkles that persist after standard relaxation
Solution:
With the screen fully extended, gently grasp the bottom bar and apply slight downward and outward tension to the screen material.
Hold this position for several seconds to encourage the material to stretch and relax.
Repeat this process across different sections of the screen as needed.
5. Inspect and Adjust Tension Cords (For Shorter Widths) #
Symptom: Edge curling or uneven screen tension
Solution:
Solo 3 screen materials are tensioned internally. If edge curl is visible:
Contact SI Tech Support to determine if a fabric or cord replacement is needed.
Do not attempt to disassemble the cassette.
6. Evaluate Environmental Conditions #
Symptom: Reoccurring waves or tension inconsistency
Solution:
Ensure that the screen is installed in a space with controlled humidity and temperature.
Avoid positioning near direct heat sources, HVAC vents, or high humidity areas.
Additional Notes #
Wrinkles caused by improper shipping or long-term storage typically improve with time and proper hanging.
Permanent damage due to impact or mis-installation may require a fabric replacement. Contact SI for warranty evaluation.



