
Step 1: DIFFERENTIATE YOUR SHADE #
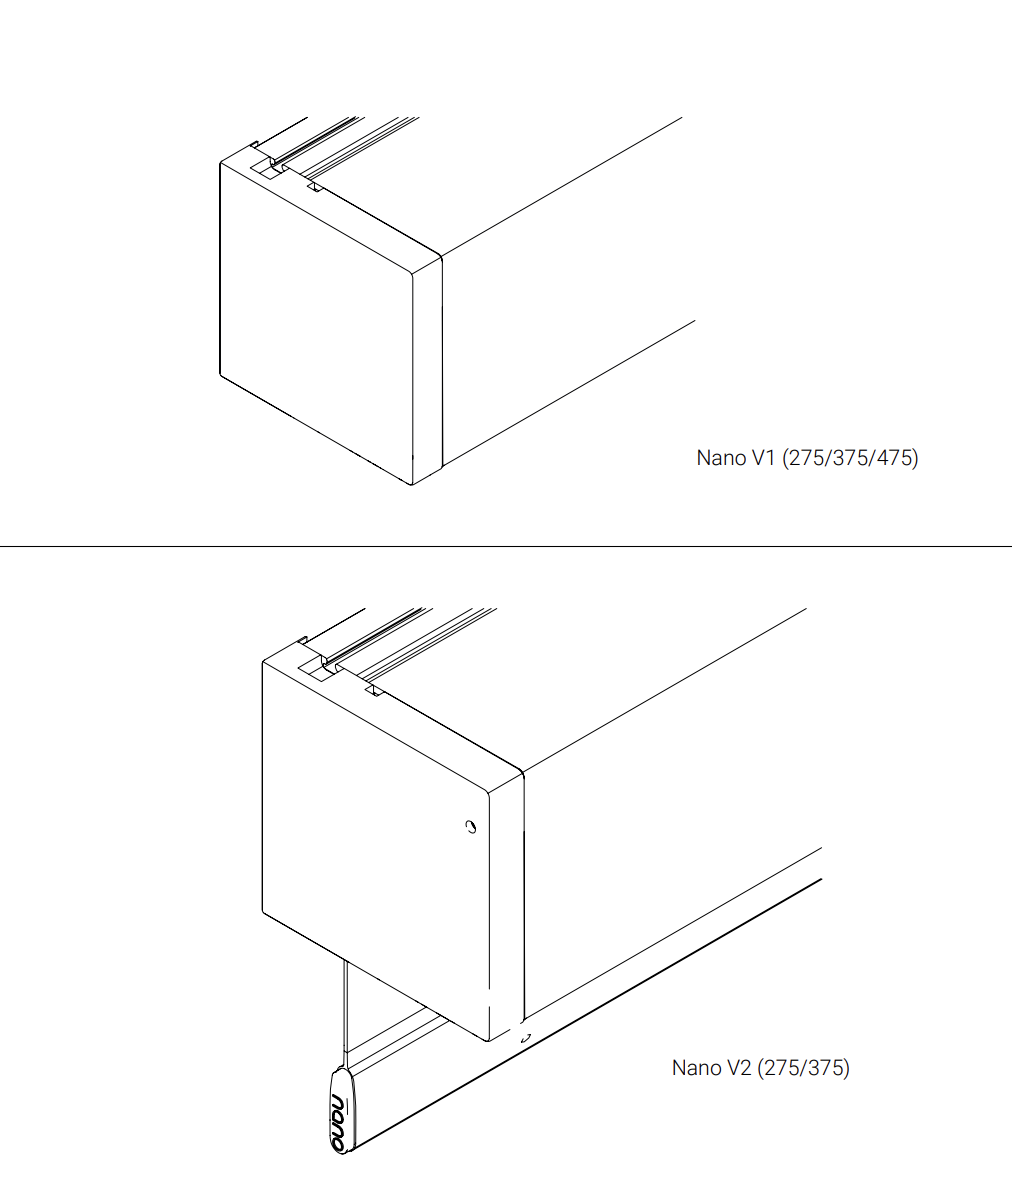
Determine the Nano model (V1 or V2) shown by the hole of the end caps (refer to the illustration below).
If the shade system does have a hole (Nano V2), follow these instructions for guidance on accessing the inside of the shade; motors, material tubes, and fabric may serviced at this time.
Step 2: SERVICING NANO V2 BOX – INSPECTING THE ROLL #
By removing the cover during installation, inspection of the roll and tracking the fabric are possible.
A best practice is to remove the shade from the levers to minimize risk to the shade during servicing; place the shade on a clean, flat surface.
Inside mount may cause obstruction when removing cover; if there is an obstruction, unlatch the levers, disconnect wiring, and remove shades off the brackets to service, laying on a clean, flat surface.
Depending on the mounting, removal and reinstallation of the shade may be required to access the endcap locking screw.
Before removing the tube, ensure all wireless battery shades are put to sleep.
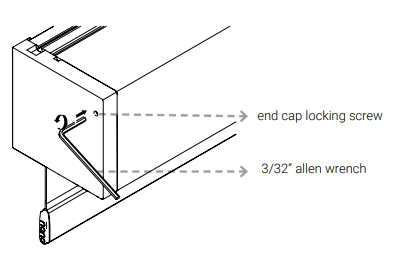
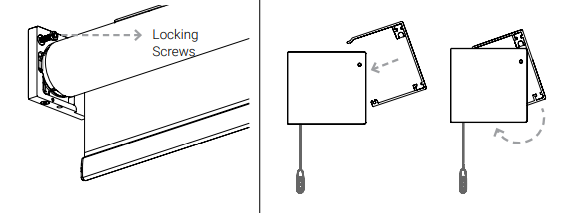
To service the Nano 2, begin by loosening the end cap-locking screw on each end cap.
To unlatch the cassette face and access the motor and fabric, hold the end caps level and push upwards on each side of the cassette face.
Unless two installers are available to each unlatch one side of the cassette face, unlatching one side at a time is recommended.
The cassette face can be felt and heard disconnecting from the locking screw.
These screws are reverse thread, so clockwise will loosen an counter clockwise will tighten.
Step 3: SERVICING NANO V2 BOX – INSPECTING THE ROLL #
When working with a Standard roll (fabric falls closest to window), drop the shade to lower limit to reduce diameter of roll, lessening the chance of fabric interference when removing the cover.
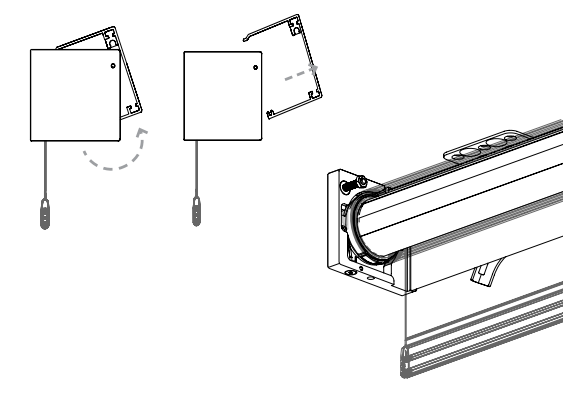
To remove the cover, pull the cover towards yourself, rotating upwards slightly.
Inspection of the roll, access to the motor, and tracking of fabric are now available with the cover removed.
Step 4: SERVICING NANO V2 BOX – TUBE REMOVAL #
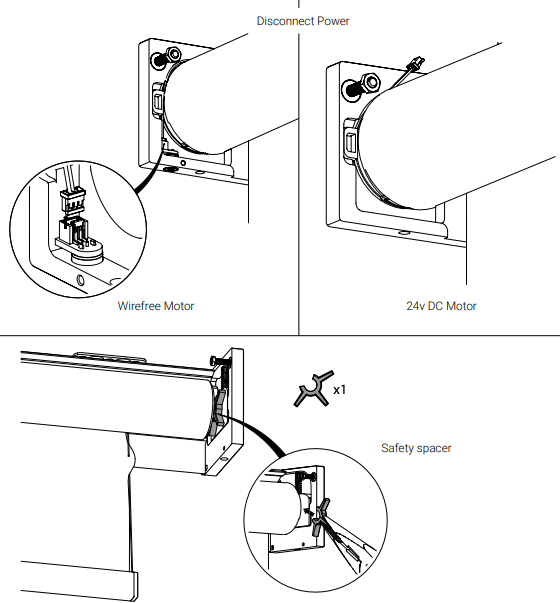
Disconnect power and the safety spacer as shown below.
Retain the safety spacer for reinstallation after service completion.
Step 5: SERVICING NANO V2 BOX – TUBE REMOVAL #
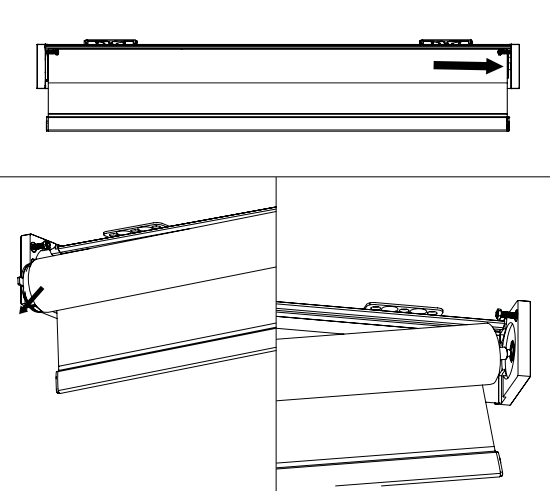
Fabric tube removal from the cassette: Locate the motor side of the fabric tube; push toward the opposite, idler side.
The idler spring will depress and disengage, allowing disengagement of the motor side from the end caps.
Once the motor side clears the end cap, pull the tube assembly away from the idler to complete removal.
At least two people are required to safely perform tube removal for larger shades.
Step 6: SERVICING NANO V2 BOX – TUBE INSTALLATION #
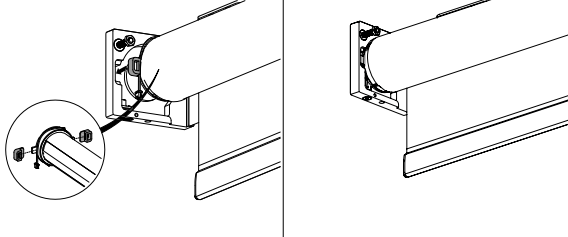
To reinstall the fabric tube, begin by seating the motor head into the motor end cap.
To ensure correct fit of the motor head, pay particular attention that the rubber noise isolators are fully seated in their corresponding end cap recesses.
Step 7: SERVICING NANO V2 BOX – TUBE INSTALLATION #
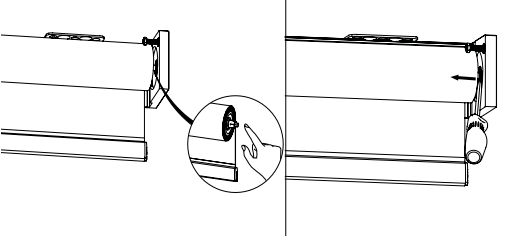
Fully depress the spring-loaded idler; pivot the tube until the idler is in-line with the idler bearing.
The idler can be released once it has cleared the edge of the end cap.
Reverse roll shade end caps have additional channels; should the idler engage one of these channels, use a screw driver to depress the idler and shift into the correct bearing.
Step 8: SERVICING NANO V2 BOX – TUBE INSTALLATION #
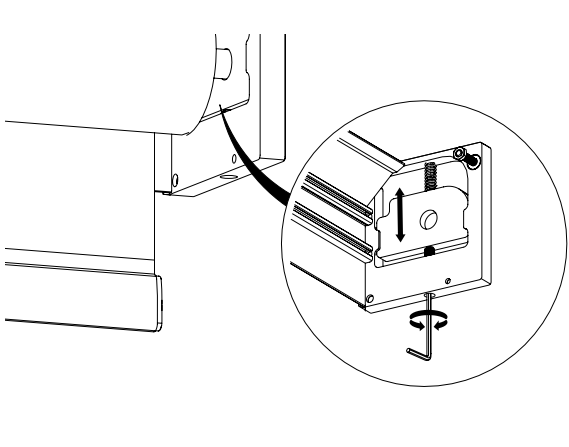
To level Nano V2 375 models, note that the idler bearing is positioned on a spring loaded plate that moves up and down.
To level this model, set the plate to the appropriate position and tighten using the hole at the bottom of the end cap.
Step 9: SERVICING NANO V2 BOX – TUBE INSTALLATION #
Reconnect power and the safety spacer as seen below.
Step 10: SERVICING NANO V2 BOX – TUBE INSTALLATION #
Ensure the locking screw nut is fully disengaged, allowing for cassette engagement.
Reinsert the cover by positioning straight-on, then rotating downwards to engage with the locking screws.
The locking screws will “click” once they have engaged and the cassette face will align with the end cap.
Step 11: SERVICING NANO V2 BOX – TUBE INSTALLATION #
Before performing this step, shift brackets into the latched position to ensure stability if the shade is installed in a window.
Tighten the locking screws until snug, closing any gap between the end cap and the cassette, locking the cover in place.
These screws are reverse thread, so clockwise will loosen an counter clockwise will tighten.
Step 12: SERVICING NANO V2 BOX – RE-HANG THE SHADE With the new Nano V2 box installed, re-hang the shade onto the brackets. 1. Align the shade’s mounting points with the installed brackets. 2. Hook the shade onto the brackets and confirm it is fully seated. 3. Verify the shade hangs level before proceeding. #
Re-hang your shade



