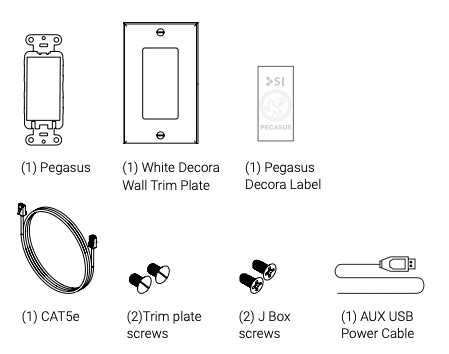
Note: These instructions are for using the Pegasus in “Standalone” mode.
Pegasus is a versatile device that can control RTS motors, act as a smart repeater, learn remotes and sensors, and bridge between RTS and RS-485 systems. Use the sections below to configure Pegasus for your specific application.
Button Guide #
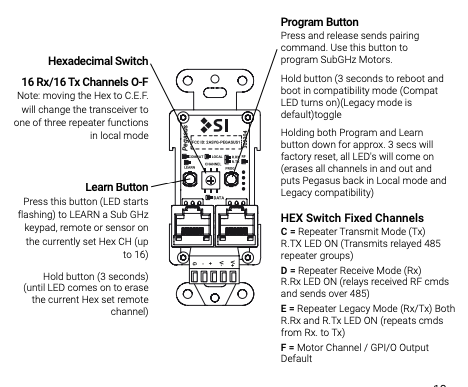
LED Details #
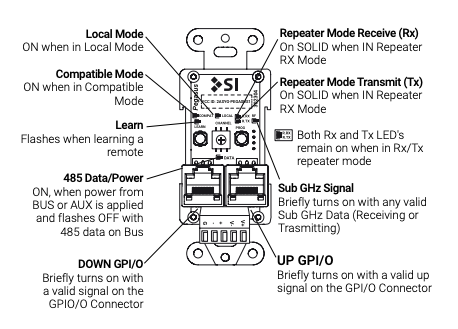
Programming an RTS Motor #
You can control the RTS motor using GPI/O inputs or 485 commands.
Power up Pegasus – Use the Terminal Block or 485 Bus to supply power. Make sure the Local LED (red) is ON.
Put the motor in learn mode
With a remote: Press and hold Up + Down until the motor jogs once.
Without a remote: Press and hold the programming button on the motor head until it jogs once.
Tip: You can also push and hold the programming button on the back of the remote until the shade jogs.
Note: Some RTS motors have a yellow LED that will start flashing in learn mode.
Program the motor to Pegasus – Press the PROG button on Pegasus. The motor will jog once, confirming it’s been paired.
#
RTS Smart Repeater Setup #
Any valid RTS signal received will be retransmitted automatically.
Power up Pegasus – Use the Terminal Block or 485 Bus for power. Confirm the Local LED (red) is ON.
Set channel – Turn the HEX switch to Channel E.
Verify signal – Make sure both the R.RX and R.TX LEDs turn ON and stay lit.
Learning a Remote, Keypad, or Sensor #
Power the device – Use the Terminal Block or 485 Bus for power.
Check LEDs
Compat LED should be OFF
Local LED (red) should be ON
Set channel – Turn the HEX dial (0-F) to the channel you want to use for learning.
Start learning mode – Press the Learn button – the Learn LED will start flashing.
Pair the device
Press the program button on the remote, keypad, or sensor.
If it transmits successfully, the RF LED will light up and the Learn LED will stop flashing.
Note: The program button is usually on the back. You may need to remove the cover to access it.
Test the connection – Connect a 485 motor to one of the 485 ports to test the paired device.
Note: Pegasus can be plugged into a Janus, Suite 16 or Data Hub to control a RS-485 motor
To learn more devices: Repeat steps 3-6 for each new device – up to 16 devices total.
Learning Pico Remotes to Control a RS-485 Motor #
Power up Pegasus – Use the Terminal Block or 485 Bus to power the unit.
Check LEDs
Make sure the Local LED (red) is ON.
If the Compat LED is already ON, skip the next step.
Enable compatibility mode (if needed)
Press and hold the PROG button for 3 seconds.
LEDs will flash, and the Compat LED will turn ON.
Select channel – Turn the HEX dial (0-F) to the channel you want to use.
Enter learning mode – Press the Learn button – the Learn LED will begin flashing.
Pair a remote, keypad, or sensor
On the device, hold any button for about 7 seconds.
When the Learn LED stops flashing, the device is paired.
Test the connection – Make sure a 485 motor is powered and connected to one of the 485 ports.
Note: Pegasus can be plugged into a Janus, Suite 16 or Data Hub to control a RS-485 motor
Use the paired remote/device to test operation.
To learn more devices: Repeat steps 4-7 for each device (up to 16 total).
RTS to 485 Smart Receiver Setup #
Any valid RTS signal received will be converted and sent over the 485 bus – allowing another Pegasus (set up as an RTS Smart Transmitter) to retransmit up to 4000′ away.
Power up Pegasus – Use the Terminal Block or 485 Bus. Confirm the Local LED (red) is ON.
Set channel – Turn the HEX switch to Channel D.
Verify LED – Ensure the R.RX LED is ON and steady.
Connect data cable – Plug a CAT 5e or better (24AWG) cable into one of the 485 data ports.
485 to RTS Smart Transmitter Setup #
Any valid 485 Smart Receiver group message will be converted and transmitted as an RTS signal.
Power up Pegasus – Use the Terminal Block or 485 Bus. Confirm the Local LED (red) is ON.
Set channel – Turn the HEX switch to Channel C.
Verify LED – Make sure the R.TX LED is ON and steady.
Connect data cable – Plug a CAT 5e or better (24AWG) cable into one of the 485 data ports.
Factory Reset #
Press and hold – Press and hold both the Learn and Program buttons.
Wait for confirmation – Hold for about 3 seconds until all LEDs turn on.
This will:
Erase all stored remotes and motors
Reset modulation to Legacy
Return Pegasus to Local mode
IR Hex Codes #
UP:
0000 006c 0000 000c 0006 011b 0006 011b 0006 00bb 0006 00bb 0006 00bb 0006 00bb 0006 00bb 0006 00bb 0006 00bb 0006 00bb 0006 011b 0006 08a4STOP:
0000 006c 0000 000c 0006 011b 0006 011b 0006 00bb 0006 00bb 0006 00bb 0006 00bb 0006 00bb 0006 00bb 0006 00bb 0006 011b 0006 011b 0006 08a4DOWN:
0000 006c 0000 000c 0006 011b 0006 011b 0006 00bb 0006 00bb 0006 00bb 0006 00bb 0006 00bb 0006 00bb 0006 00bb 0006 011b 0006 00bb 0006 08a4Pinouts #
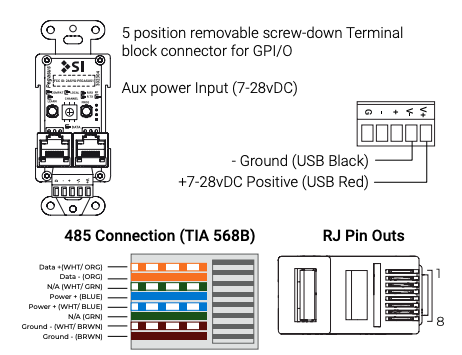
GPI/O and Dry Contact Pinouts #
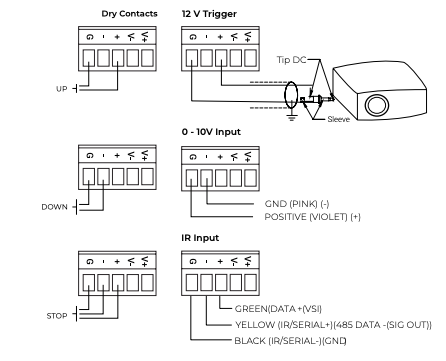
RJ45 and Power Pinouts #
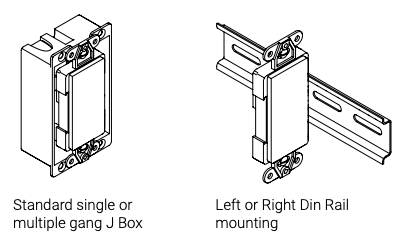
Mounting Options #
Warning: Do not mount Pegasus in a metal J box
Parts in the Box #