
Step 1: Identify Your Motor Type #
CRITICAL: Before troubleshooting ANY motor issue, you MUST identify which motor type you have. Each motor has different programming procedures.
The easiest way to identify your motor is by looking at your remote:
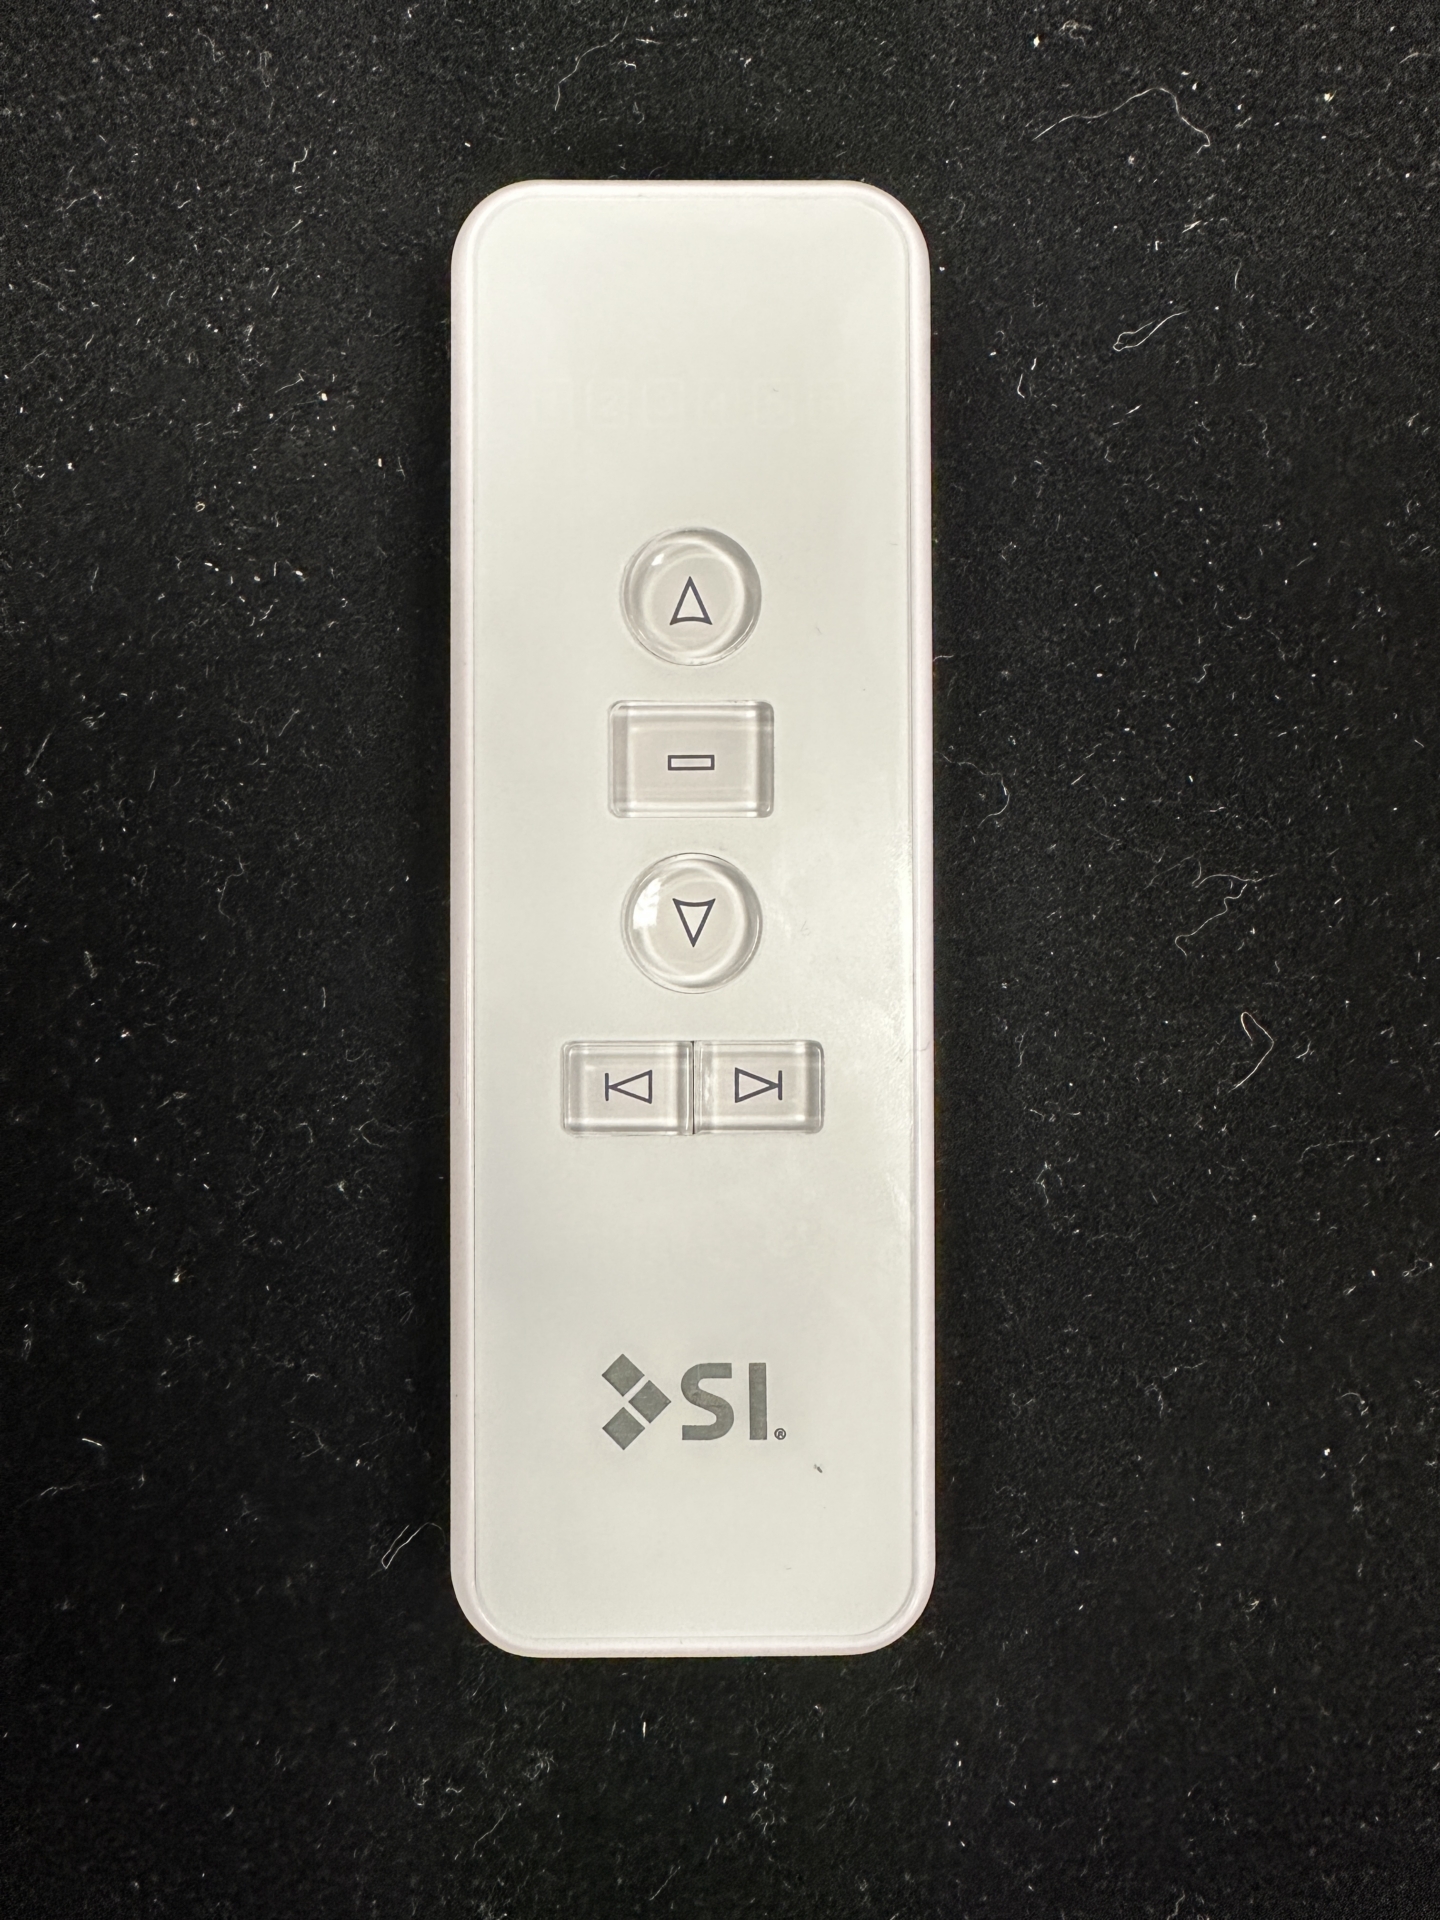
SI KAOS Motor #
Simple 3-button remote with programming button on the back
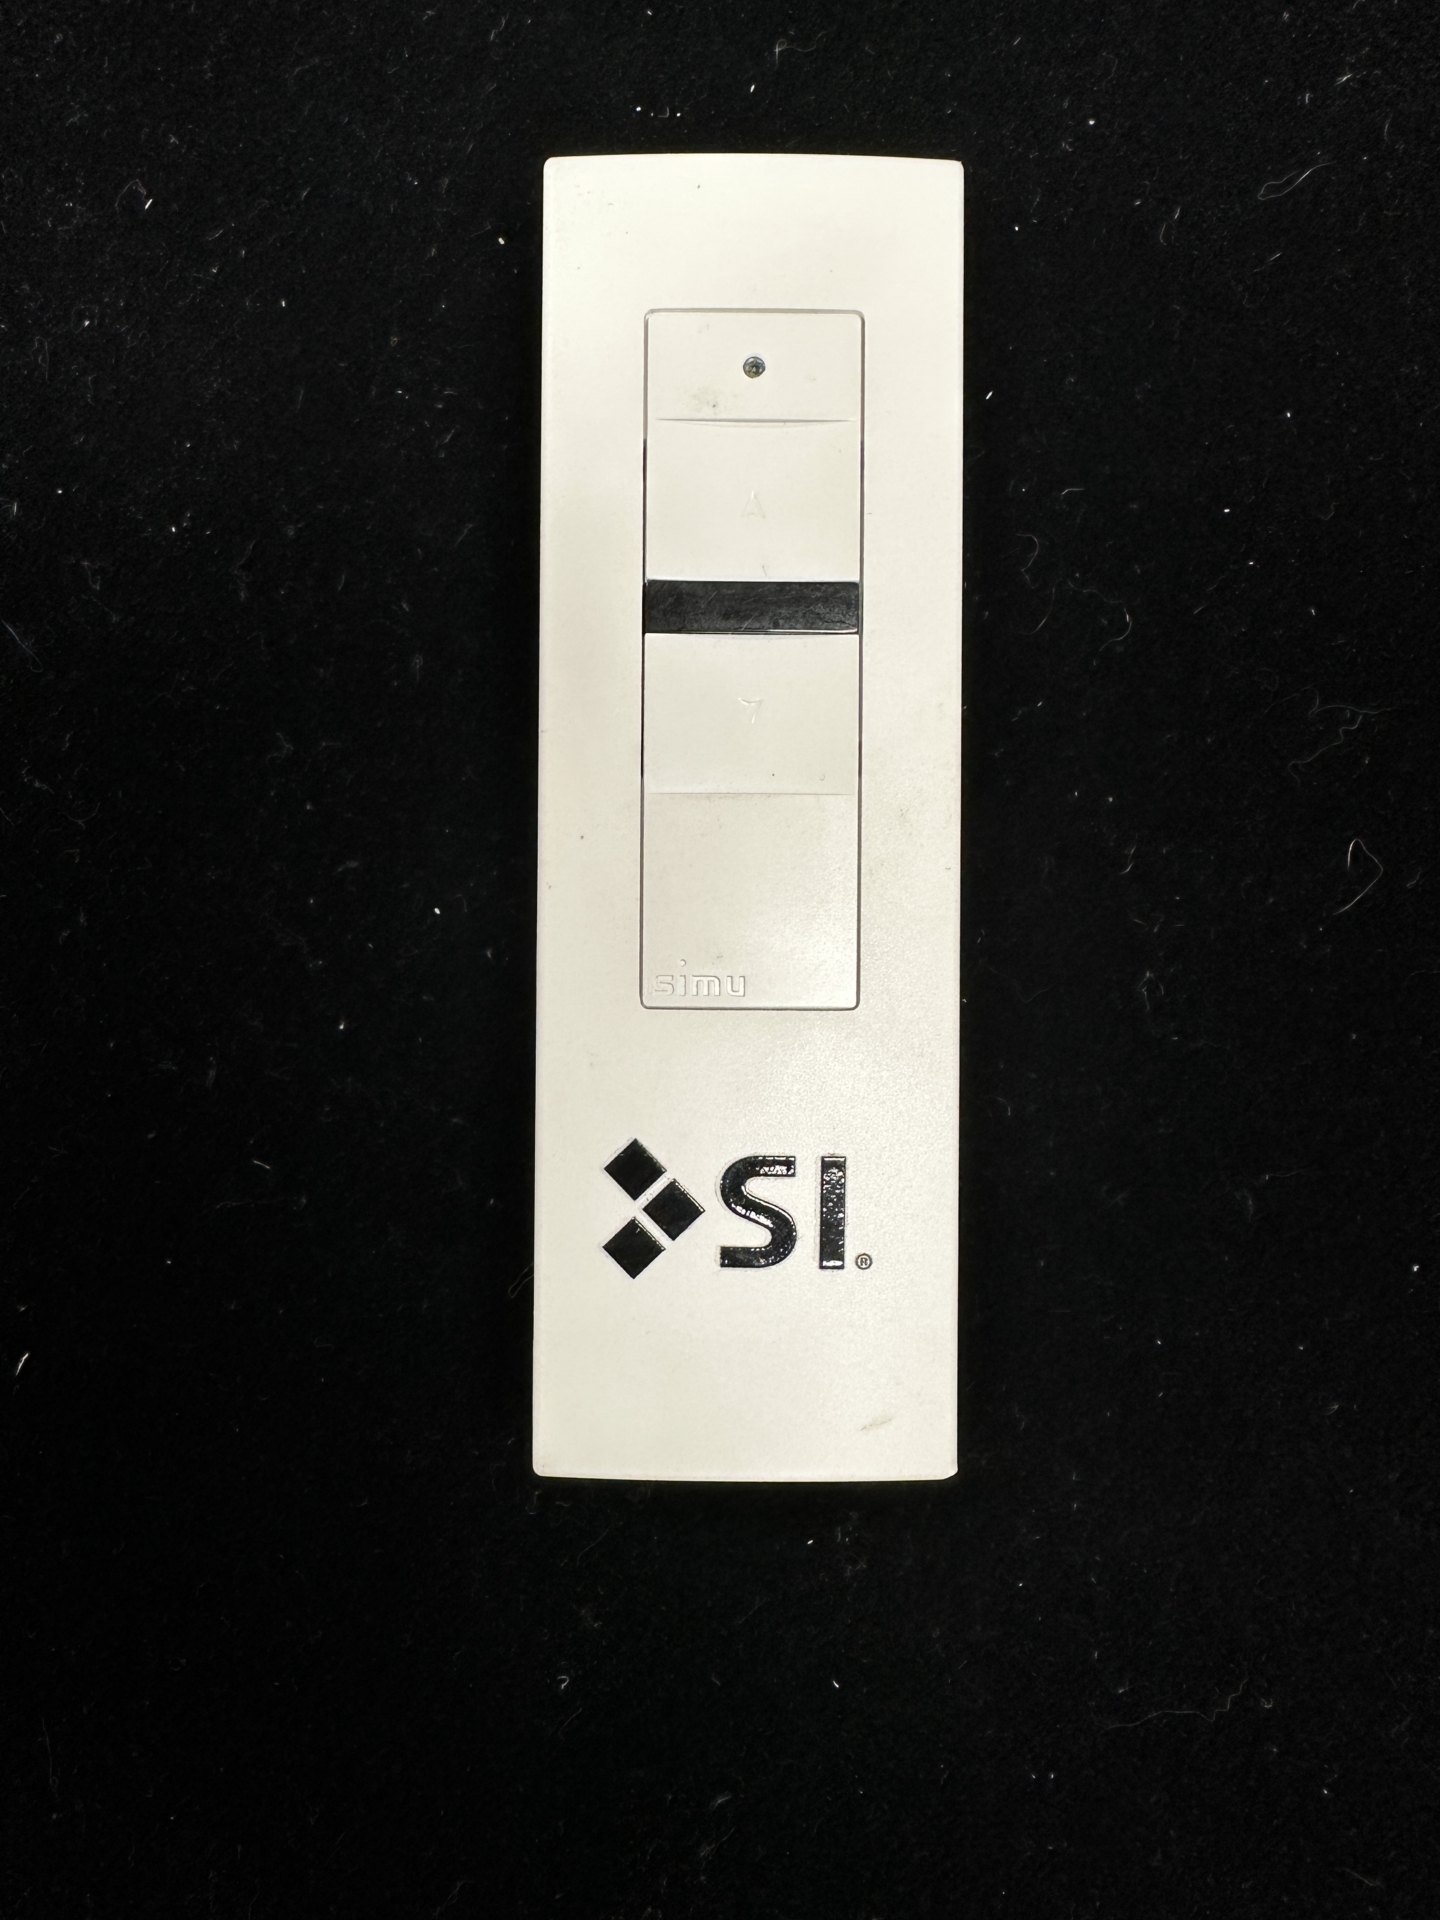
Somfy Motor #
Simu remote with black Stop button and programming button on the back
Note: All KAOS shades ship with remotes unpaired and no limits set. Initial setup requires pairing the remote and setting both upper and lower limits.
SI KAOS Motor Troubleshooting #
Pairing a Remote to SI KAOS Motor #
Shipping State: KAOS shades with SI KAOS motors ship with remotes unpaired and no limits set. You must pair the remote first, then set limits.
New Installation — Pairing First Remote
Step 1: Unplug the motor from power
Step 2: Press and hold the UP button on the remote for 3 seconds
Step 3: While holding UP, plug in the motor
Step 4: The motor will jog once (now in programming mode)
Step 5: Quickly press the UP button — motor jogs. Remote is now paired!
Adding an Additional Remote #
Step 1: On the original working remote, hold the STOP button until the shade jogs
Step 2: On the new remote, quickly press the UP button
Step 3: The shade will jog — new remote is paired
Setting Motor Limits (SI KAOS) #
Setting the Upper Limit #
Step 1: Tap the Programming button on the back of the remote — motor jogs
Step 2: Press UP to enter upper limit setting mode
Step 3: Use UP/DOWN buttons to position the shade (tap for small moves, hold 3 sec for continuous)
Step 4: Tap the Programming button again — motor jogs, upper limit saved
Setting the Lower Limit #
Step 1: Tap the Programming button — motor jogs
Step 2: Press DOWN to enter lower limit setting mode
Step 3: Position the shade at desired lower limit
Step 4: Tap the Programming button — motor jogs, lower limit saved
Important: Do NOT set an intermediate/favorite position as your upper or lower limit — this can cause the shade to travel beyond the limits and damage the system.
Shade Only Moves in Small Increments (SI KAOS) #
This usually means one of two things:
1. Continuous Mode is disabled — motor requires hold to move
2. No limits are set — motor is in programming mode
Try This First — Toggle Continuous Mode
Step 1: Press and HOLD the STOP button for 5 seconds until the shade jogs
Step 2: TAP the STOP button — the shade will jog again
Step 3: The motor should now move to its limits with a single tap
Shade Moves Wrong Direction (SI KAOS) #
To Reverse Motor Direction
Step 1: Press and HOLD the STOP button for 5 seconds until the shade jogs (Programming Mode)
Step 2: Tap the DOWN button
Step 3: The motor will jog, confirming the direction change
Tip: Repeat this process to toggle back to the original direction if needed.
Shade Stops and Reverses on Its Own (SI KAOS) #
This is the Obstacle Detection feature The motor senses resistance and reverses as a safety feature. This can be triggered by actual obstructions OR by sensitivity being too high. Check for Physical Issues First
1. Check for any obstructions in the shade’s path
2. Verify the fabric isn’t catching or binding
3. Make sure the shade is level in its tracks
4. Clean and lubricate inner track with silicone-based lubricant Adjust Obstacle Detection Sensitivity (Range: 1-5)
Step 1: Hold UP + DOWN for 5 seconds — motor jogs
Step 2: To decrease sensitivity: Press STOP + DOWN
Step 3: To increase sensitivity: Press STOP + UP
Step 4: Hold STOP for 2 seconds — motor jogs, setting confirmed
Factory Reset (SI KAOS Motor) #
Warning: Factory reset will erase all limits and unpair all remotes from the motor. You’ll need to re-pair and set limits after.
Standard SI KAOS Motor — Factory Reset #
Step 1: Press and HOLD the STOP button for 5 seconds until the shade jogs (Programming Mode)
Step 2: Hold the Programming button on the back of the remote for 7 seconds
Step 3: The motor will jog briefly after ~1 second Step 4: Continue holding — after 7 seconds the motor jogs again
Step 5: Factory settings are restored. Now pair remote and set limits.
NEW SI-50nm Motor — Factory Reset #
The SI-50nm motor has a Programming/Pairing Button on the motor (located on the antenna side of the cassette).
1. Hold the Programming button on the motor for 7 seconds
2. The motor will jog after ~1 second
3. Continue holding — after 7 seconds the motor jogs again
4. Factory settings are restored
Somfy Motor Troubleshooting #
Pairing Remote & Setting Limits (Somfy) #
Best Practice: Only have one shade powered during setup to avoid accidentally pairing multiple shades.
Complete Setup Process
Step 1: Apply power to the shade
Step 2: Hold UP + DOWN until shade jogs — remote is paired
Step 3: Check motor direction (UP should raise, DOWN should lower). If wrong, hold MY/STOP until jog
Step 4: Move shade to desired upper limit
Step 5: Press MY/STOP + DOWN together — shade will start moving down
(May take a few tries — tap quickly or hold 1-2 seconds)
Step 6: Press MY/STOP when near lower limit to stop
Step 7: Position shade at desired lower limit
Step 8: Press MY/STOP + UP together — shade will start moving up
Step 9: Press MY/STOP to stop between limits
Step 10: Hold MY/STOP until jog — exits programming
Step 11: Tap Programming Button on back — jog confirms limits saved
Important: Complete this process start to finish without interruptions. The button combinations may take several attempts.
Shade Only Moves in Small Increments (Somfy) #
What this means The motor is in Programming Mode — either limits were never set, or the motor was accidentally put into limit-adjust mode.
If Shade Was Working Before
Step 1: Press and hold MY/STOP until the shade jogs
Step 2: Tap the Programming Button on back of remote
Step 3: Shade should jog and return to User Mode
Shade Moves Wrong Direction (Somfy) #
Important — Factory Reset Required: If limits have already been set, the motor must be factory reset to change motor rotation. Direction can only be set during the initial limit setting process.
During Initial Setup Only (No Limits Set) Press and hold MY/STOP until the shade jogs once. Direction is now reversed. Then continue with limit setting.
Shade Stops and Reverses on Its Own (Somfy) #
This is Obstacle Detection The motor senses resistance during downward movement and reverses. Can be triggered even without physical obstructions. Common Causes • Tube deflection on long/wide shades
• Tracks spaced too far apart or too close
• Light debris or friction in the track
• Shade not fully seated in tracks
Disable Obstacle Detection #
Step 1: Move shade to halfway position #
Step 2: Press MY/STOP + UP briefly, then HOLD until shade jogs
(If shade moves up, buttons weren’t pressed simultaneously) #
Step 3: Press UP, UP quickly within 2 seconds — shade jogs slowly #
Step 4: Hold MY/STOP until jog to confirm and exit #
Test if it worked: Apply pressure to the weight bar as it moves down. If it still stops and reverses, obstacle detection was NOT disabled — repeat the process.
Factory Reset — 2-10-2 Method (Somfy) #
Warning: Factory resets can be difficult and may require many attempts. This will erase all limits and remote pairings.
Critical — Reset Will Not Work in Programming Mode: The motor must be in User Mode for factory reset to work. If the shade only moves in small increments, it’s in Programming Mode and the reset will fail.
Before Resetting — Exit Programming Mode First
Step 1: Press and hold MY/STOP until the shade jogs
Step 2: Tap the Programming Button on back of remote — shade should jog again
Step 3: Test: Tap UP or DOWN — shade should move continuously, not in small increments
Step 4: If still incremental, repeat steps 1-2 or wait ~2 minutes for automatic recovery
2-10-2 Reset Process #
Step 1: Start with power ON #
Step 2: Remove power for 2 seconds #
Step 3: Re-apply power for 10 seconds #
Step 4: Remove power for 2 seconds #
Step 5: Re-apply power — shade will begin to move #
Step 6: When it stops, hold the Programming Button until shade jogs TWICE
(Don’t release until TWO jogs or restart the process) #
Tips:
• Performing reset at the breaker is often easier than unplugging at the junction
• A successful reset produces a quick jog — if shade moves more, reset didn’t take
• Adjust your timing/cadence if it doesn’t work on first try
Physical & Installation Issues #
Shade Won’t Fully Raise or Lower #
Possible Cause Motor programming limits are off or not set Solution Reset the motor and reprogram upper/lower limits using the appropriate motor guide above.
Tip: Test the limits multiple times after programming to ensure consistent operation.
Telescoping or Weight Bar is not level #
Possible Cause Fabric roll has telescoped Cassette or brackets are not level Weight Bar not in Tracks/Tracks are not installed Tracks are too close together, or too far apart Solution Fix telescoped fabric roll
Warning: This will require 3 people, one on each side, and someone operating the remote.
Step 1: Remove the weight bar from the tracks
Step 2: Unroll the shade all the way to the tube
Step 3: Verify the fabric is centered on the tube
Step 4: With someone on each side, slowly roll up the shade while applying downward pressure as the shades roll up guiding the keder to stack evenly.
The first 3 FULL wraps are the most Important
Step 5: Continue to roll the shade UP while applying pressure and keeping the keder aligned on both sides
Step 6: Install the weight bar into the tracks
Step 7: Cycle the shade 2-3 times 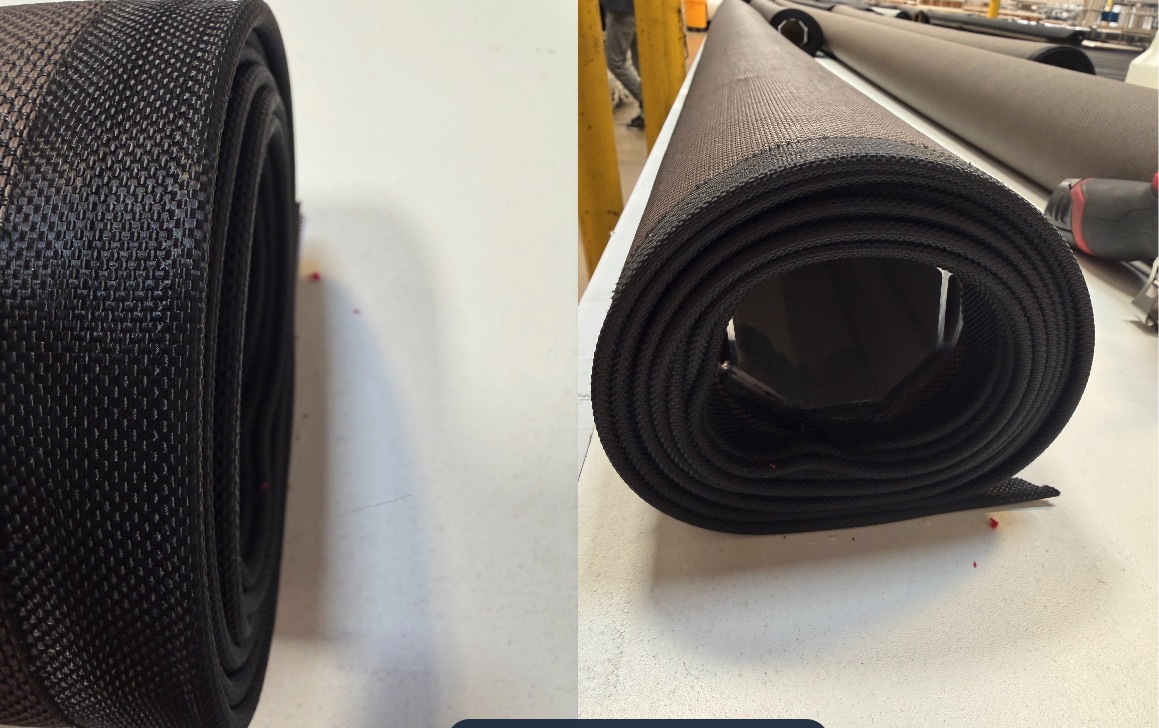
GOOD – Proper alignment
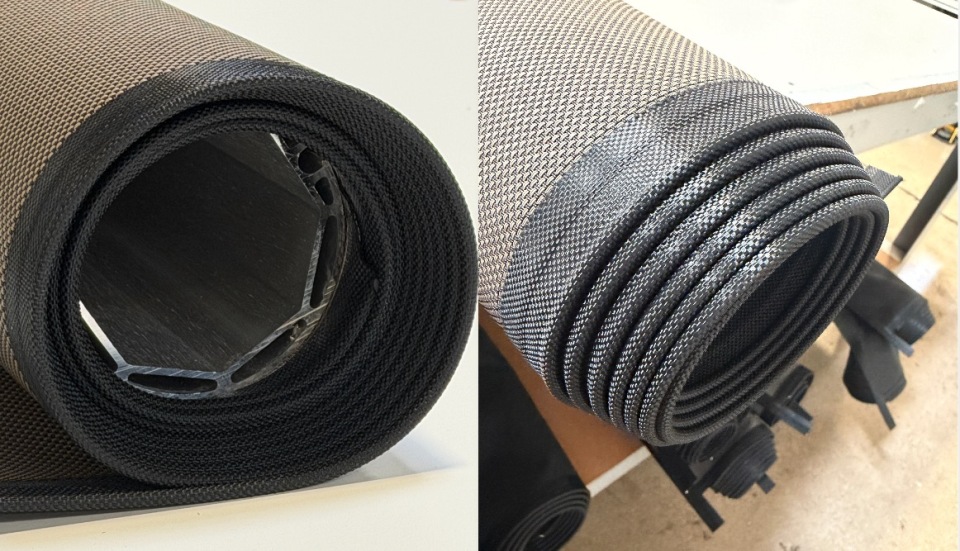
WRONG – Telescoped fabric
Solution Re-level the cassette and verify bracket positions 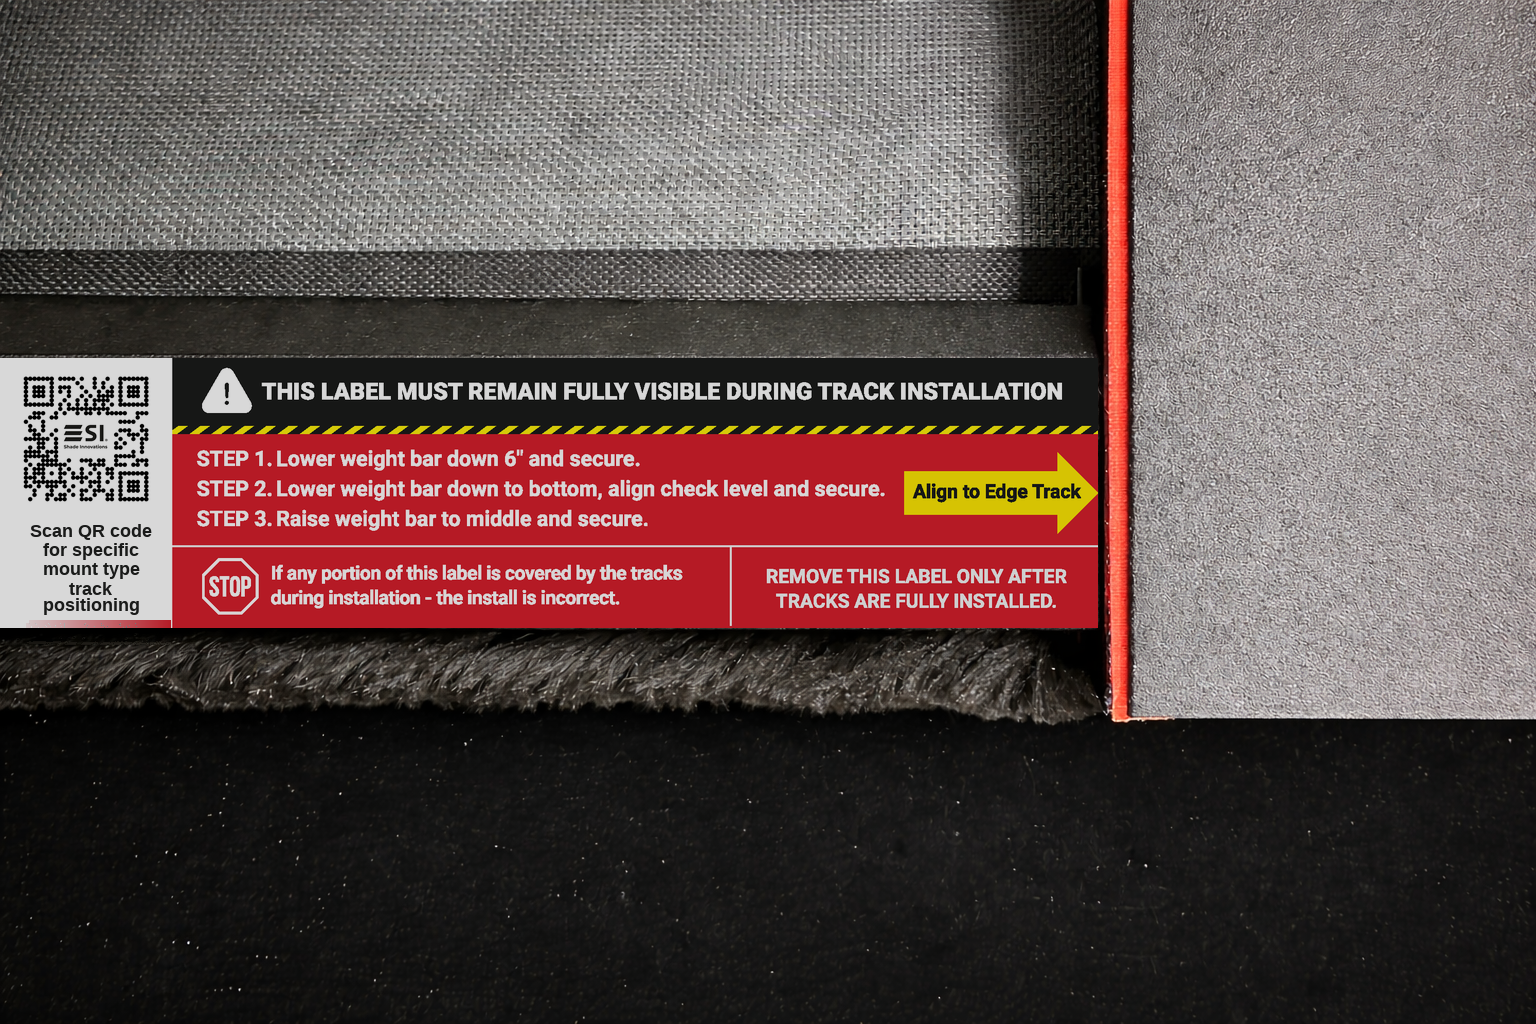 Solution Verify fabric is centered on the tube – the 45 degree cut in the fabric should align with the end of the tube
Tip: This is also a good time to verify the Tube itself is level. Fabric will slide easily within the tube.
Weight Bar binding or noise coming from the tracks #
Note: This section applies to Pre-Onyx KAOS shades with guide wheels. Newer Onyx models use a different track system.
Possible Cause Improper Guide Wheel positioning/alignment Guide Wheels not spinning freely Tracks are not plum or properly aligned Inner Track is dirty
Warning: Never force a shade if tracks are binding. This can damage the fabric or motor. Always identify and fix the root cause first.
Solution Adjust the guide wheels for proper placement within the track Step 1: Visually inspect the guide wheels in the track 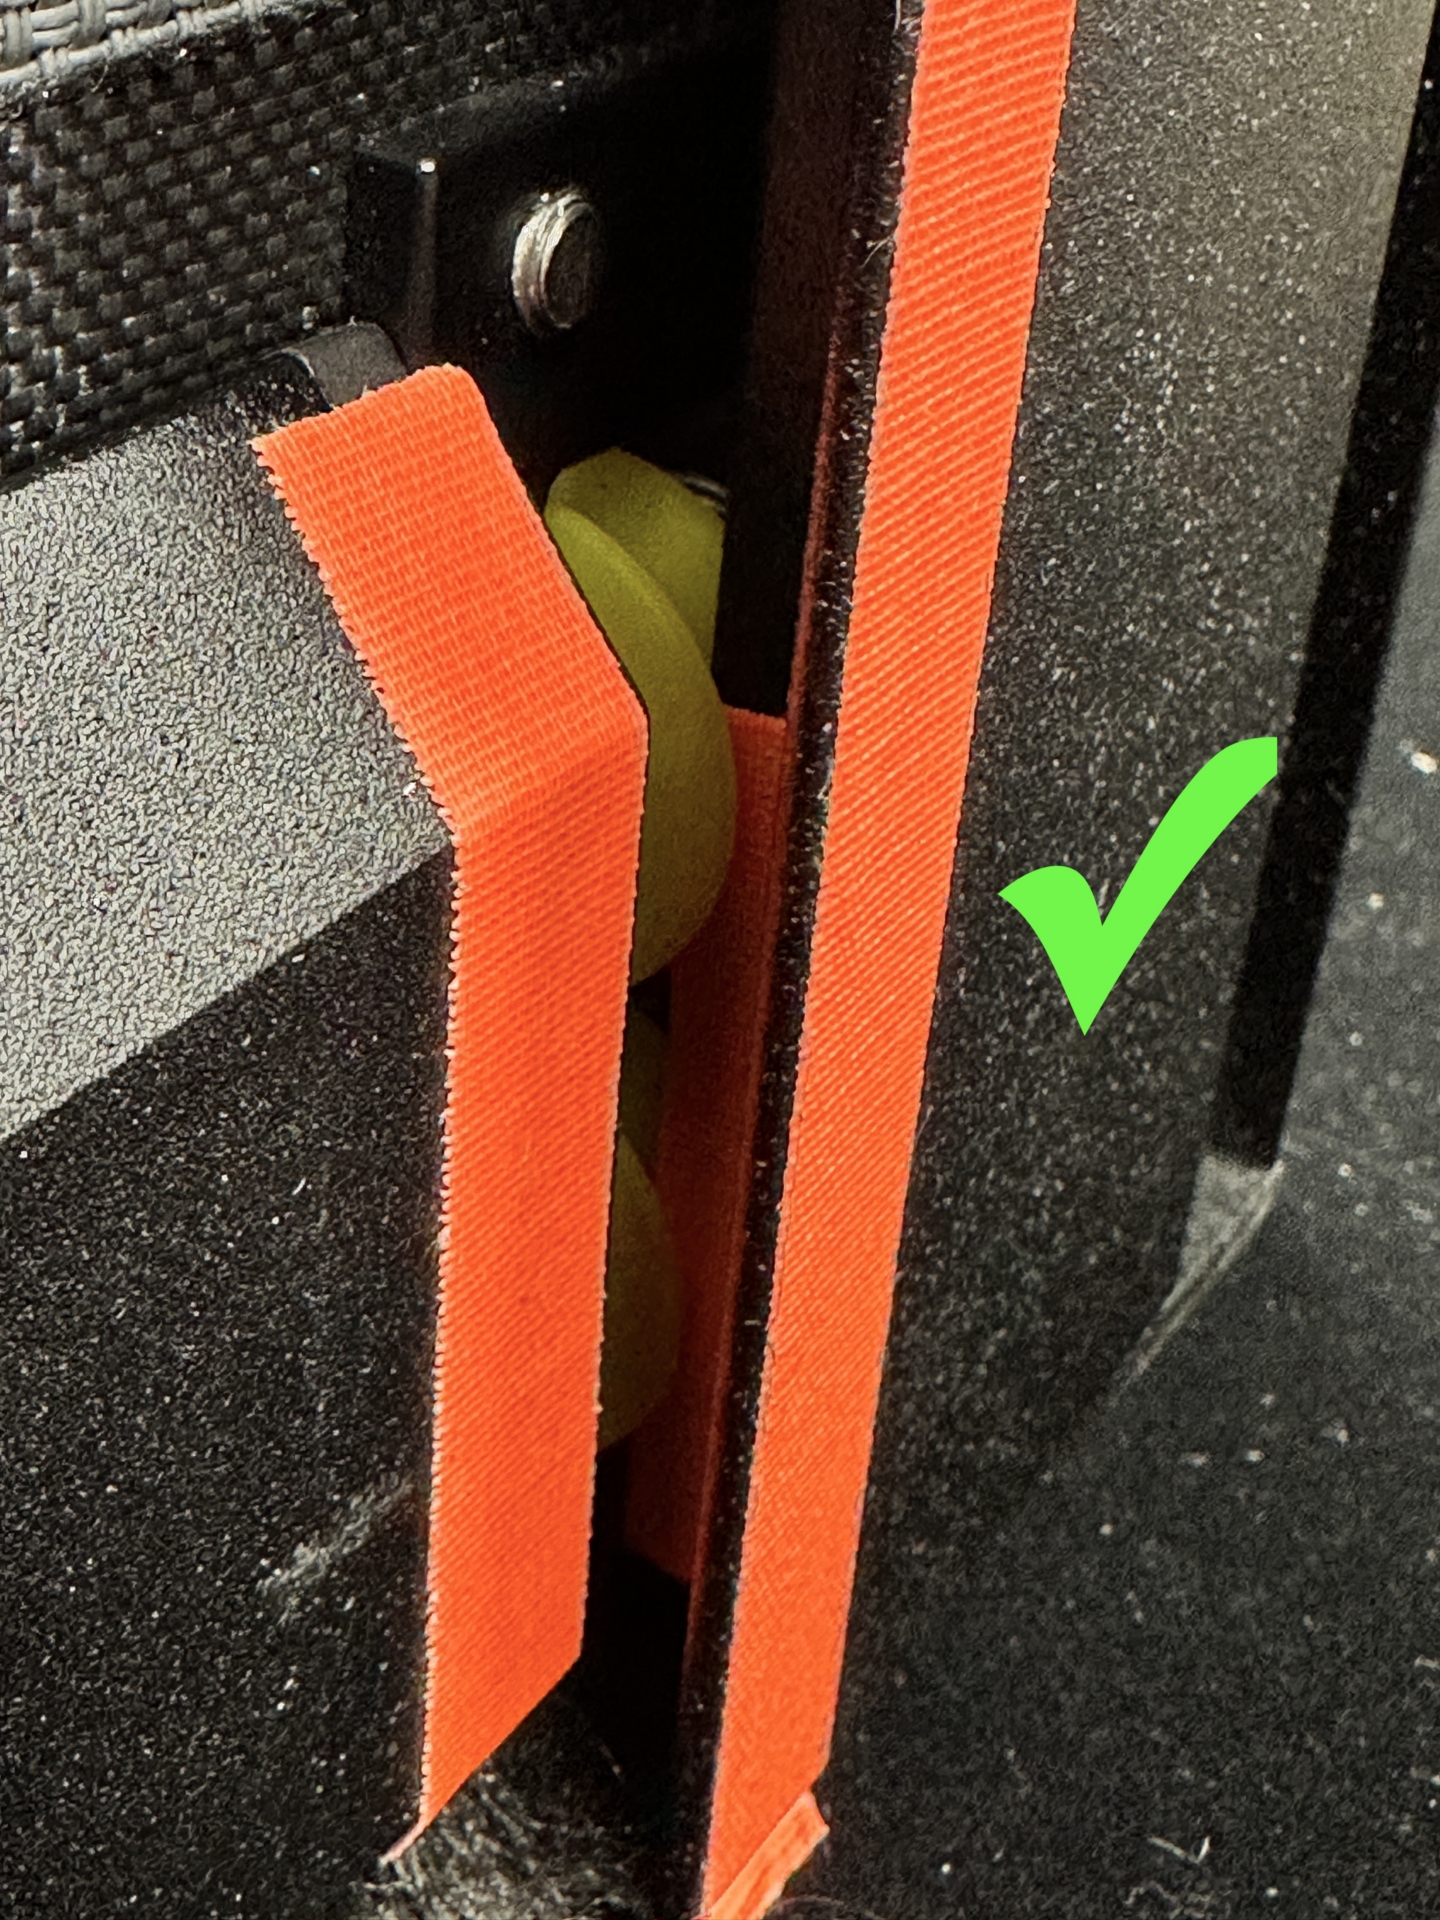
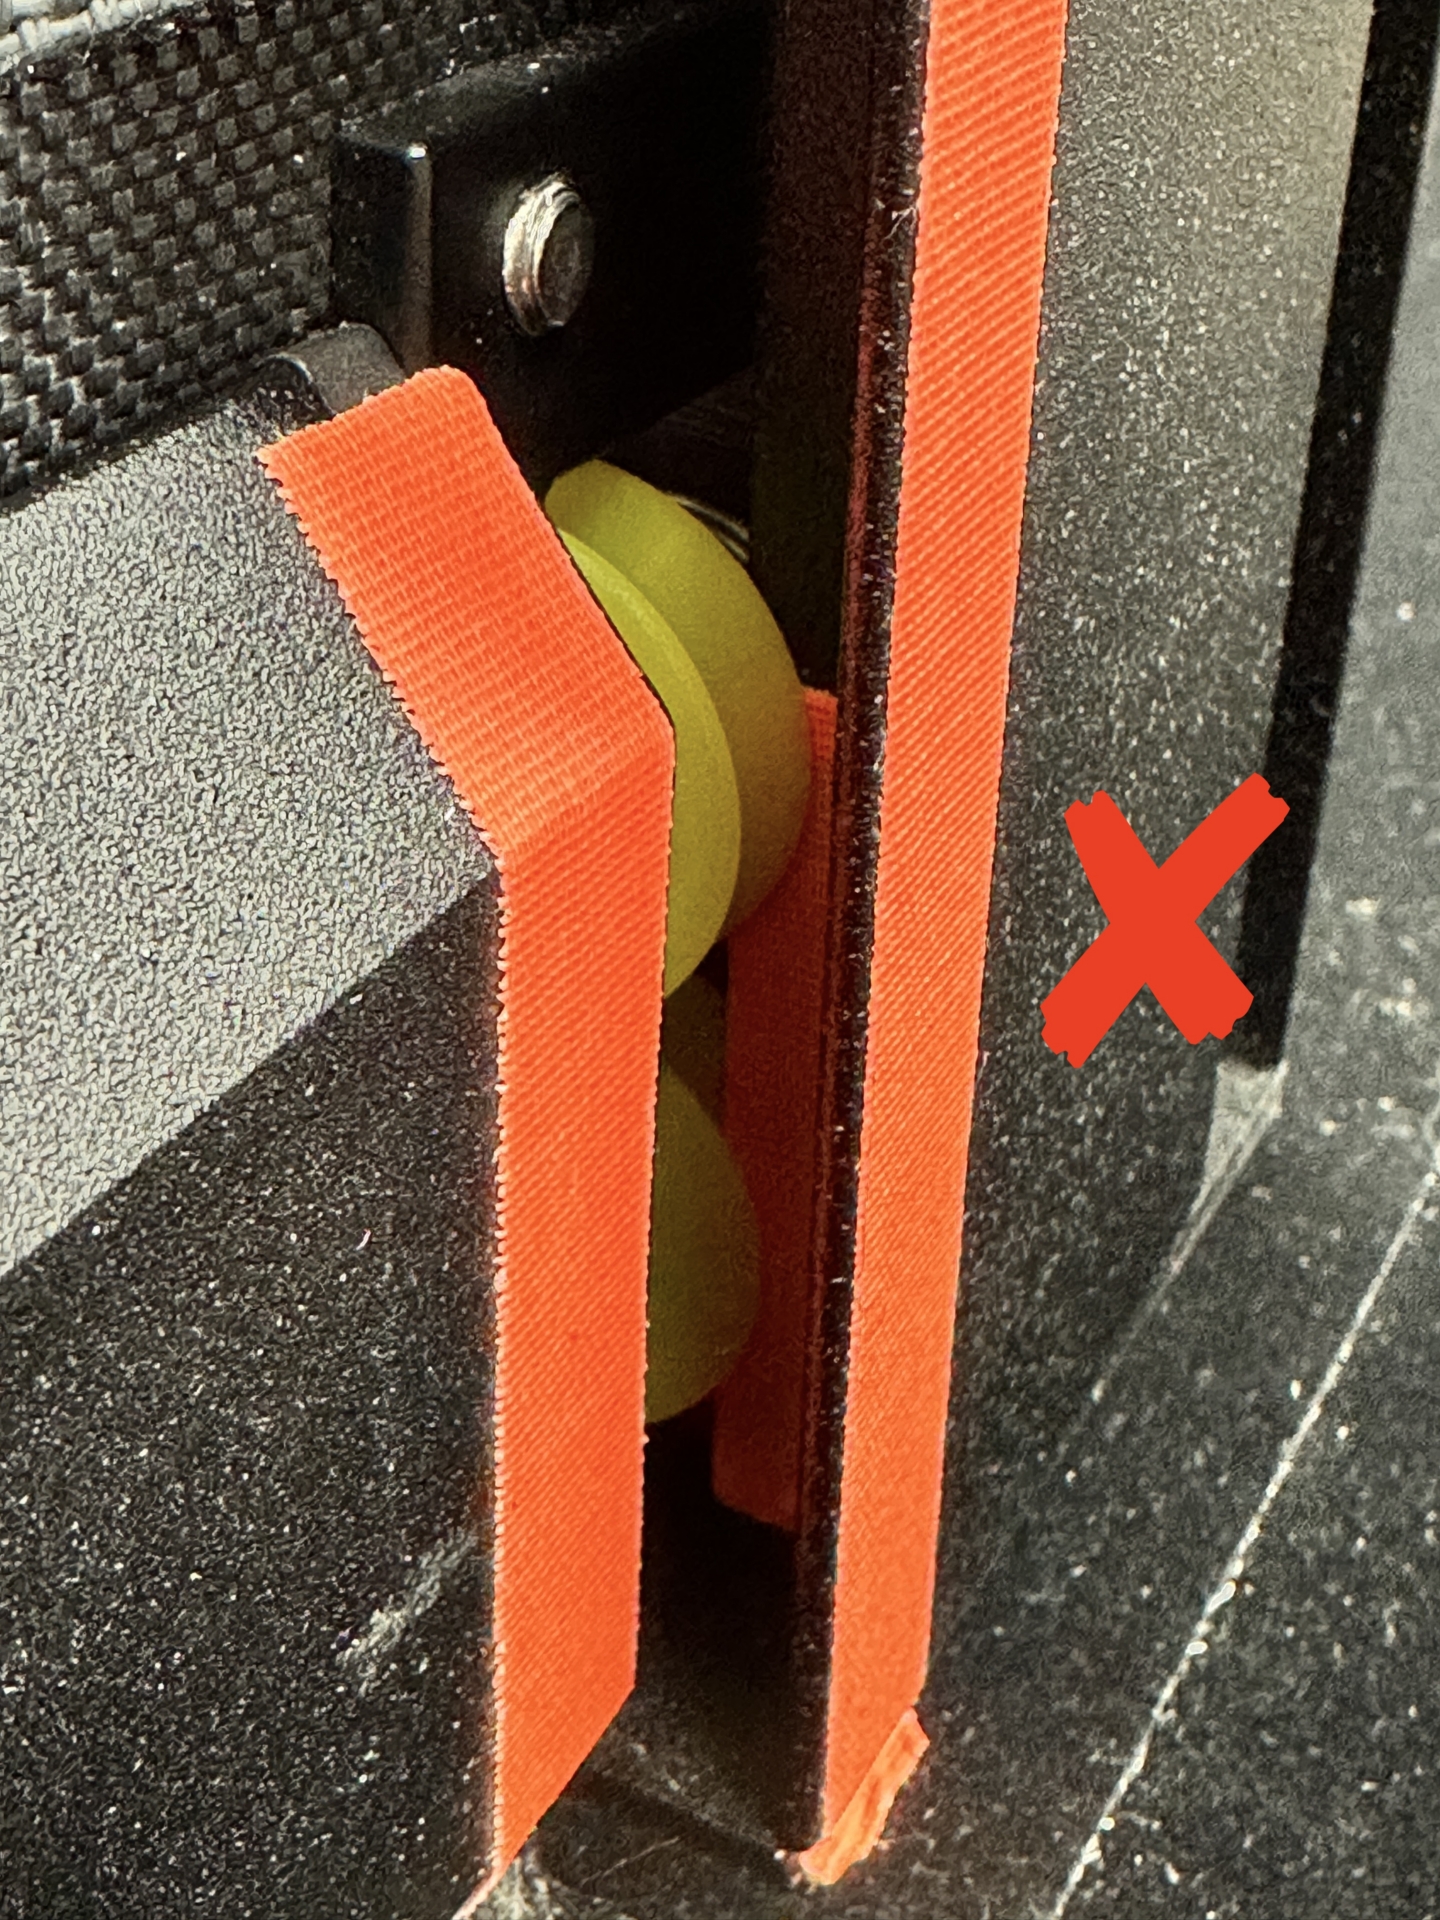
Step 2: Make sure the Guide Wheels are spinning freely
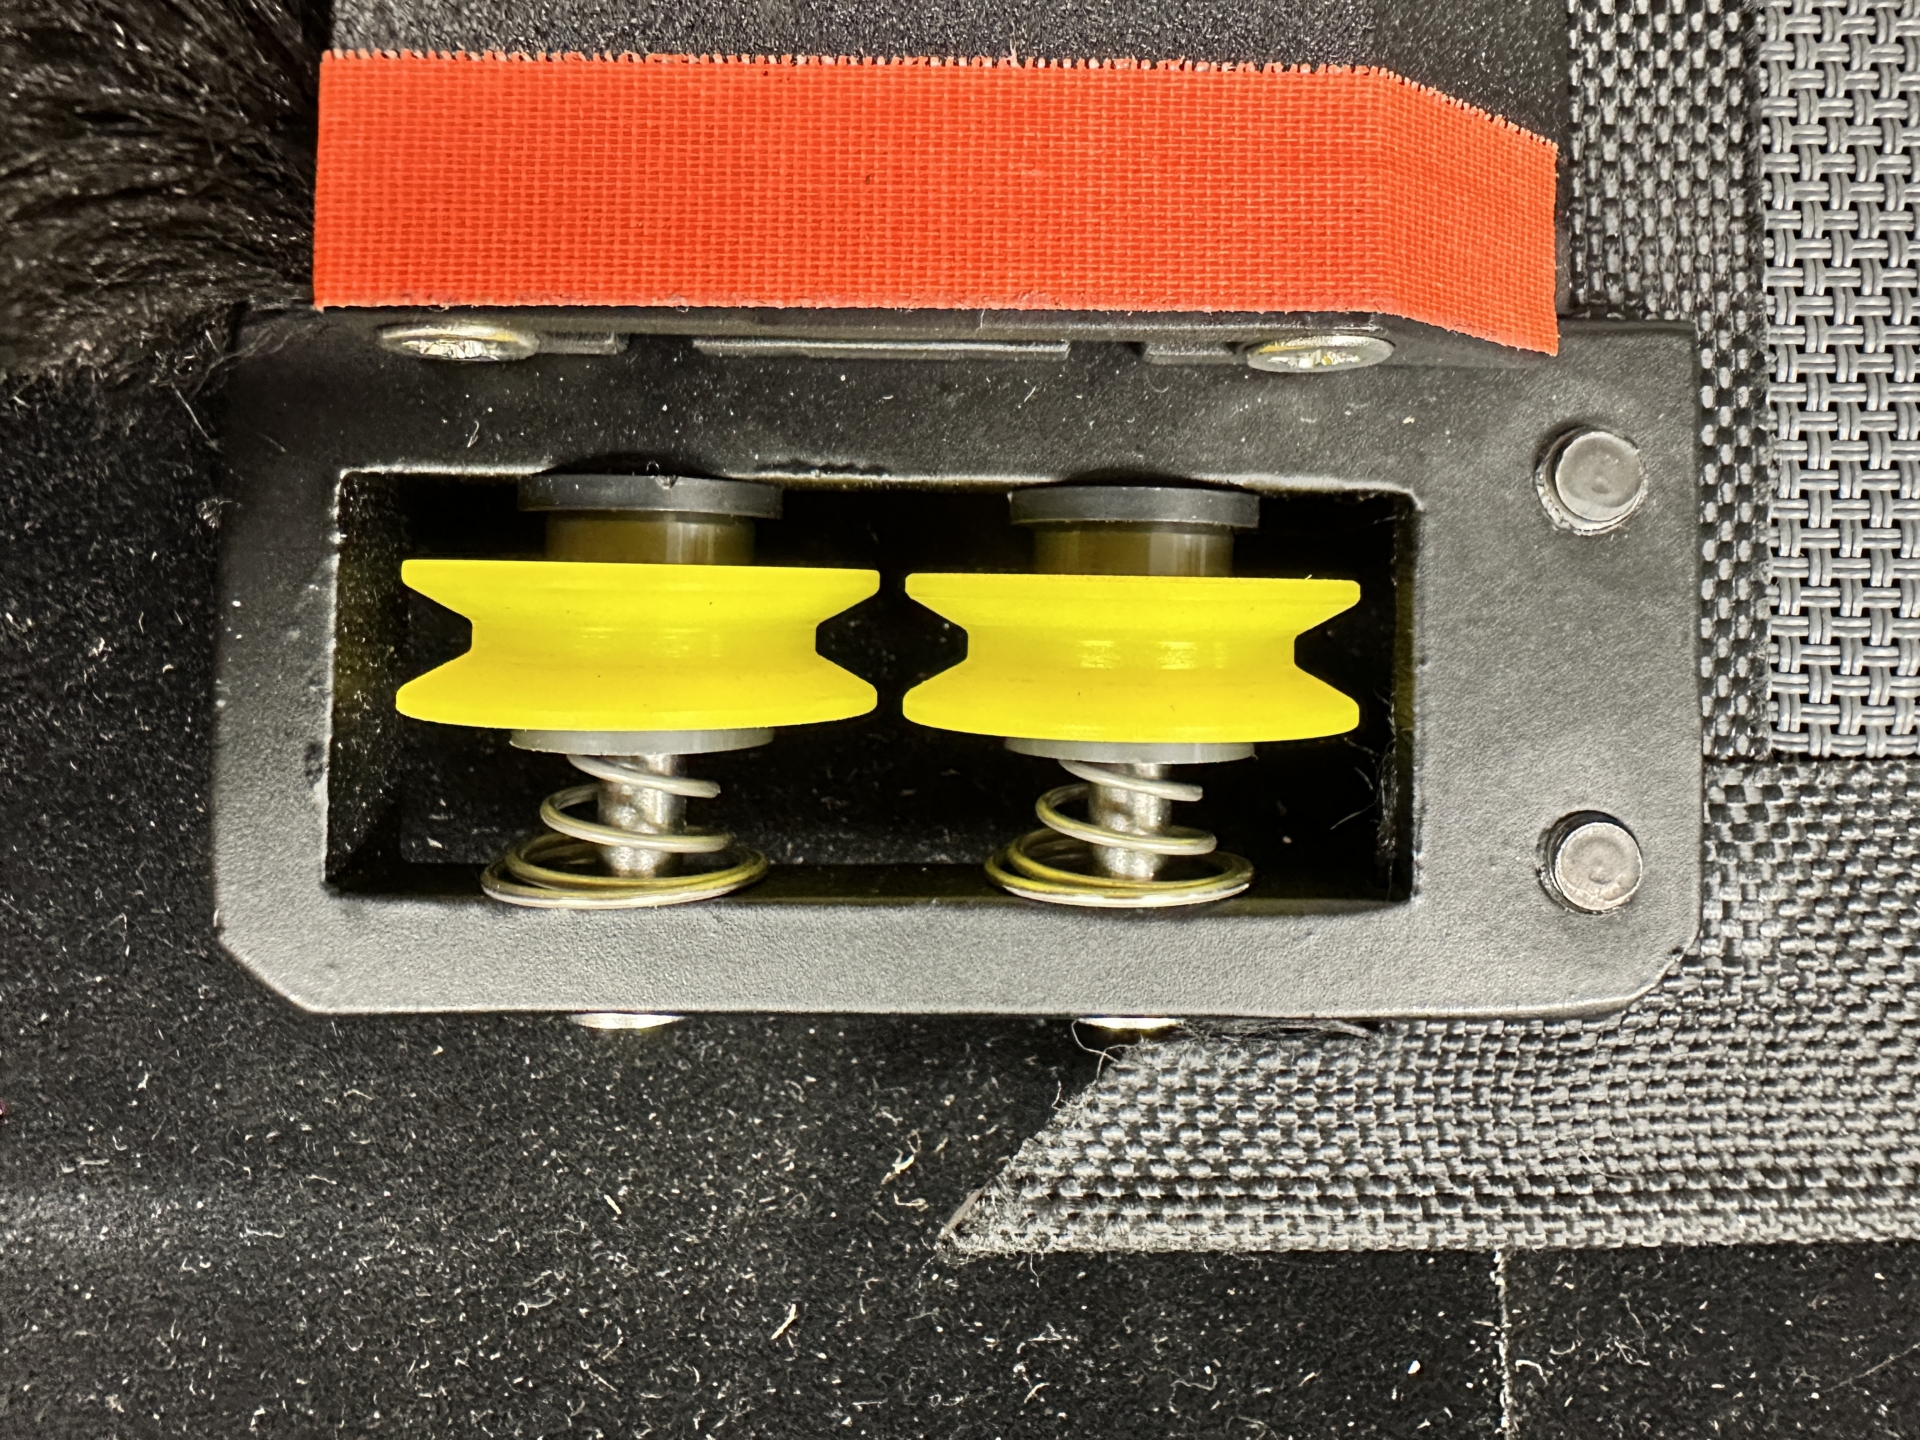
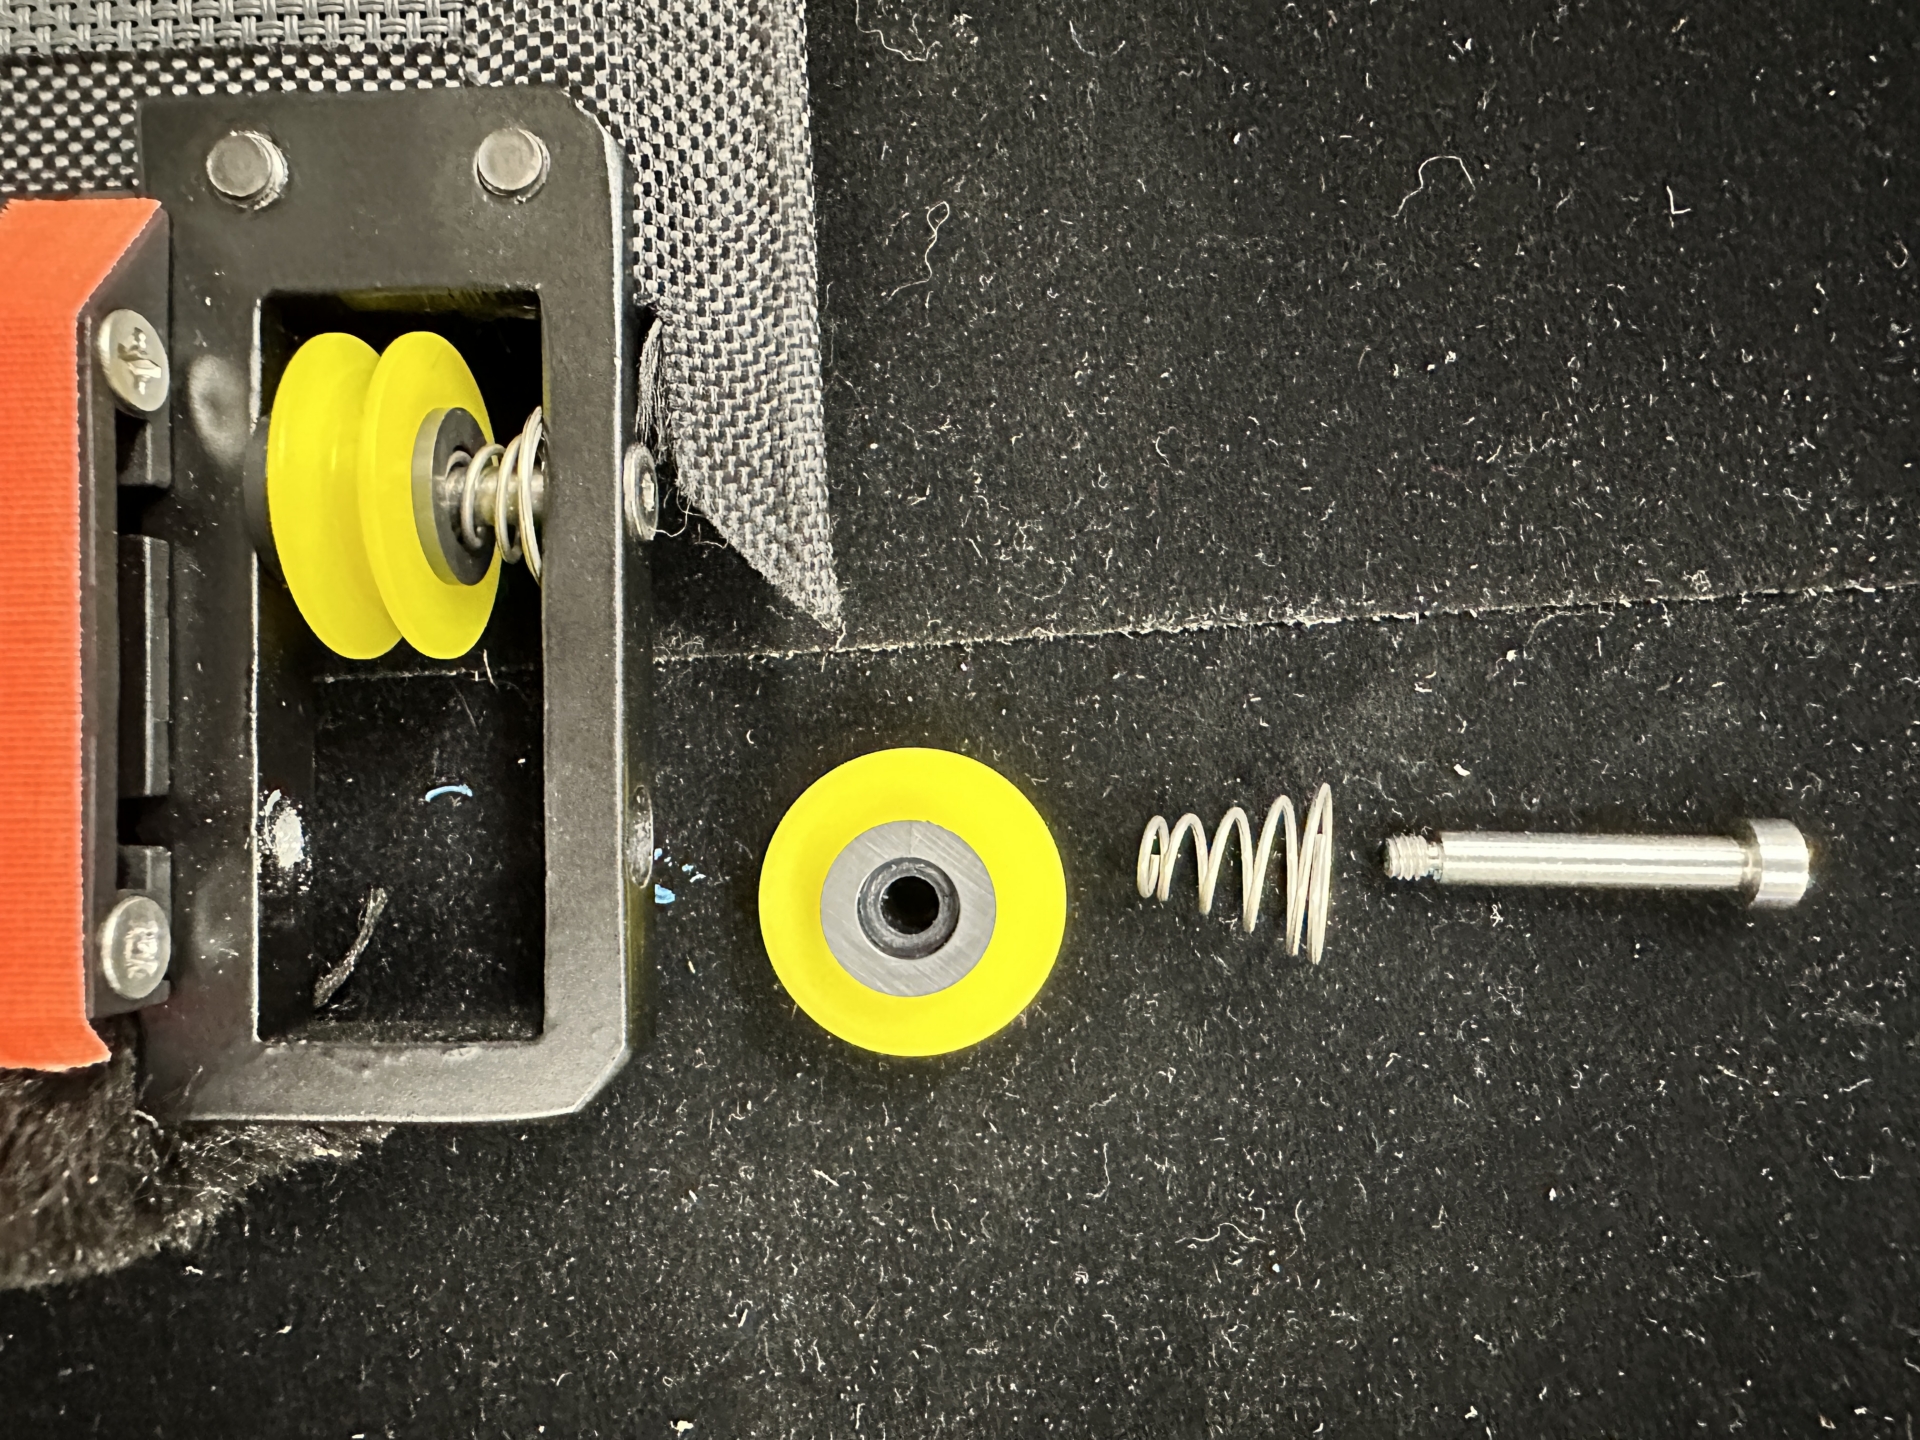
Step 3: Test shade operation and fine-tune as needed Solution
Track alignment and positioning #
Step 1: Remove any screws securing the tracks to the U-Channels
Step 2: Cycle the shade 2 to 3 times with the tracks “floating” in the U-Channels. This will help align the tracks in the optimal distance
Step 3: Make sure the tracks are plum/level
Solution Track cleaning and maintenance #
Step 1: Make sure the length of the inner track is clean and free of debris.
Step 2: Use a can of compressed air to blow out any dust, dirt, or debris that may have accumulated.
Step 3: Use a Silicone based lubricant on the Keder for smoother operation.
Tip: This should be done every 6 months to a year as basic maintenance.
Warning: Only use a Silicone based lube on the Fabric/Tracks, and a Dry Lithium/Graphite lubricant on any other moving parts. DO NOT use WD-40.
Wrinkles in the Fabric #
Possible Cause Fabric not properly tensioned during installation Fabric misaligned on the roller tube Shade stored in cold conditions before installation Solution Natural outdoor conditioning and sun exposure
Tip: Outdoor materials often self-correct wrinkles through natural sun exposure and temperature cycling over 1-3 weeks.
Step 1: Operate the shade daily, extending it during peak sun hours to allow natural heating
Step 2: Leave shade extended during warm, sunny days to let solar heat naturally relax the material
Step 3: Cycle the shade multiple times during temperature changes (morning/evening) to help work out creases Solution
Steam treatment for stubborn wrinkles #
Step 1: With shade fully extended, use a garment steamer, holding it 6-8 inches away from the material
Step 2: Work systematically across wrinkled areas, allowing steam to penetrate while gently stretching the material
Step 3: Allow material to dry while maintaining tension, then cycle the shade several times
Prevention Tip: When possible, install shades during warmer weather and allow the material to acclimate to outdoor conditions gradually.
Frequently Asked Questions #
What is the warranty on KAOS outdoor shades?
KAOS outdoor shades come with a comprehensive 5-year limited warranty. For complete warranty details, coverage information, and terms, please see the warranty page on our website.
How do I clean my KAOS shade fabric?
For routine cleaning, use a soft brush or vacuum with a brush attachment to remove dust and debris. For deeper cleaning, use mild soap and water with a soft cloth or sponge. Avoid harsh chemicals, abrasive cleaners, or pressure washers. Allow the fabric to dry completely before retracting the shade.
Can I integrate my KAOS shade with a smart home system?
Yes! KAOS shades with Somfy motors can be integrated with various smart home systems including Control4, Crestron, Savant, and others. Contact your dealer or Screen Innovations Technical Support for integration options specific to your system.
Why does my remote ship unpaired from the factory?
All KAOS shades ship with remotes unpaired and no limits set for safety during shipping and to ensure proper on-site configuration. This prevents accidental motor operation during transport and allows the installer to properly set up the shade for the specific installation environment.
How often should I perform maintenance on my KAOS shade?
We recommend periodic visual inspection of the tracks, fabric, and mounting hardware. Clean the tracks and lubricate moving parts annually or as needed based on environmental conditions. In dusty or coastal environments, more frequent maintenance may be beneficial.
Can I add more remotes to control my shade?
Yes, multiple remotes can be paired to control a single shade. Follow the same pairing procedure for each additional remote. Each motor can typically store multiple remote pairings.



