Warning: Never connect Line-Voltage to Fontus!
Warning: Always disconnect Fontus when programming a motor!
About the FONTUS #
What is FONTUS? #
FONTUS is a versatile 485 control interface that can be used in two key ways:
To transmit power and data over two-conductor wire
As a standalone 485 motor controller
What Can FONTUS Do? #
FONTUS receives commands from third-party systems (such as control systems, projectors, or keypads) and translates them into 485 commands for controlling Screen Innovations motorized products.
Supported Input Types:
12V Trigger (latched, 7-12V)
Contact Closure (relay or dry contact)
Infrared (IR)
FONTUS Keypad
Compatible Products #
FONTUS can control nearly all 485 motorized products from Screen Innovations, including:
3/5 Motorized Screens
Solo 2 / Solo Pro 2
Nano Shades
Zen Shades
Veil
Powering FONTUS #
FONTUS is an actively powered device, requiring 7-28V DC regardless of application.
Power Options: #
Janus Power System
Included 24V Wall Adapter (in FONTUS kits)
Third-party 24V DC power supplies
Application Notes: #
Line Voltage Setup:
The 24V power supply powers FONTUS only.
The motor is powered separately via line voltage.
Low Voltage Setup:
The 24V power supply powers both FONTUS and the motor.
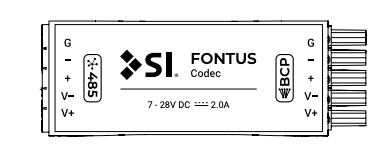
FONTUS Pinouts #

FONTUS Specifications #
Inputs / Outputs #
BCP: Inverted Header (Connector Side)
485: Standard Header (Connector Side)
Power Input: 7V – 28V DC
Dimensions #
Inches: 0.86″ L x 2.42″ W
Millimeters: 22 mm x 62 mm
Max Wiring Distance #
18/2 cable: Up to 150 ft
16/2 cable: Up to 60 ft
Key Features #
Plug-and-play – no programming required
Full 2-way 485 control (with additional codec)
12V trigger input – ideal for projector integration
Dry contact input – compatible with any control system
IR input – works with included IR receiver and remote (in 1-Motor Control Kit)
Low-voltage power input – accepts any 7V-28V DC source
Connectors fully compatible with all Screen Innovations 485 screens
Changing your FONTUS from White to Black #
Remove the 485 connector.
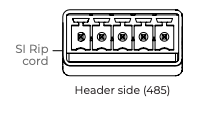
Locate the SI Rip cord hidden under the terminal block.
Find a small cut in the heat shrink near the bottom right corner, beneath the terminal block.
Position the SI Rip cord in the cut. While holding the codec firmly, slowly pull the Rip cord toward the BCP side to begin tearing the white heat shrink.
Peel away the remaining white heat shrink, exposing the black layer underneath.
FONTUS Power Options #
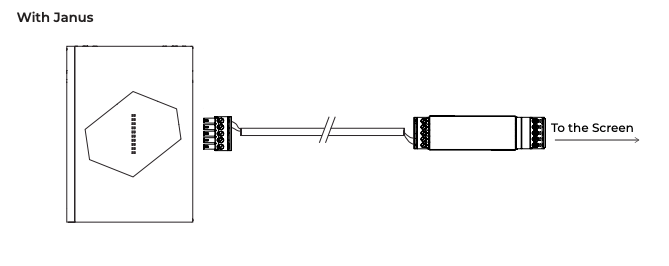
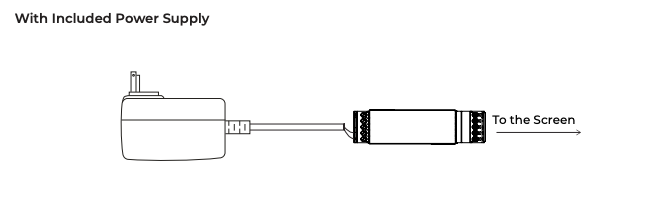
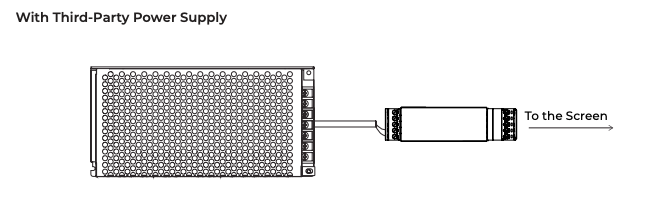
FONTUS Control Connections #
Line Voltage – 12V Trigger #
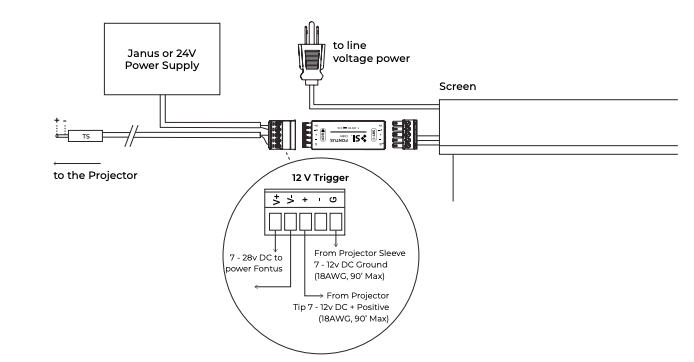
Line Voltage – Contact Closure (Relay/Dry Contact) #
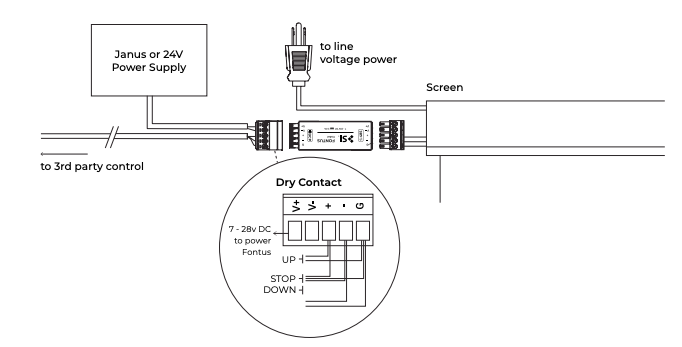
Line Voltage – IR #
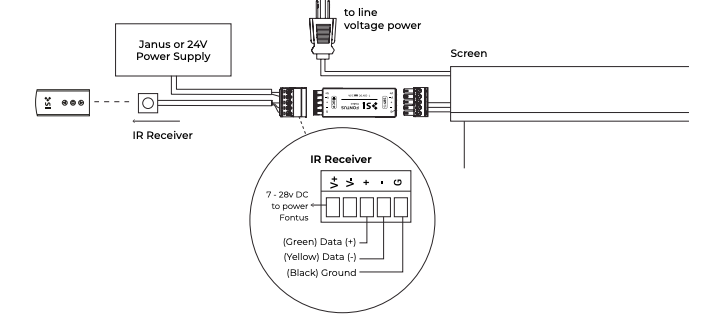
Line Voltage – Keypad #
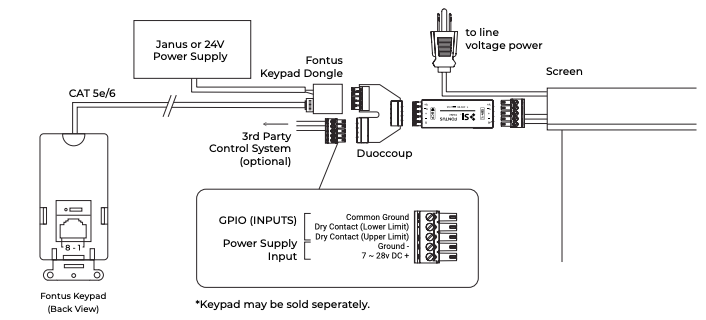
Warning: This keypad looks similar to the 485 and RTS versions SI offers, however it has a different wiring pinout and cannot be programmed. It is only a Dry Contact keypad.
Warning: When using a FONTUS keypad, IR and 12V Trigger control is not available!
Low Voltage – 12V Trigger #
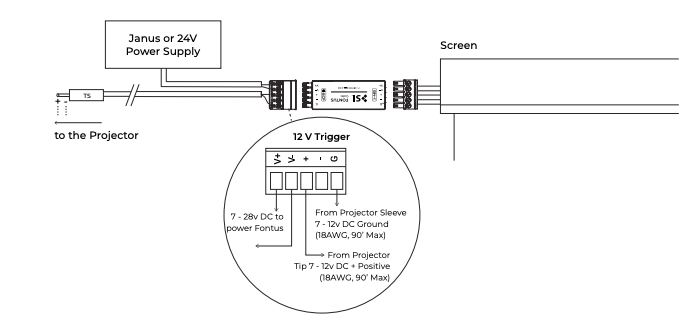
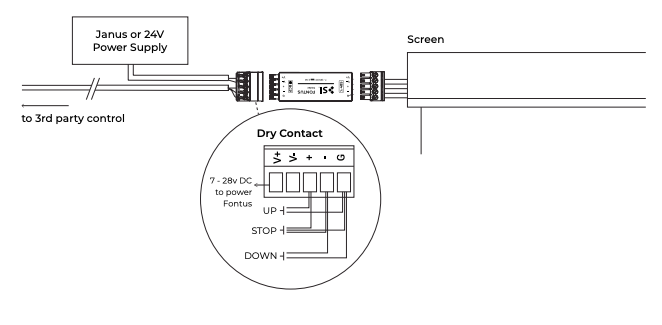
Low Voltage – Contact Closure (Relay/Dry Contact) #
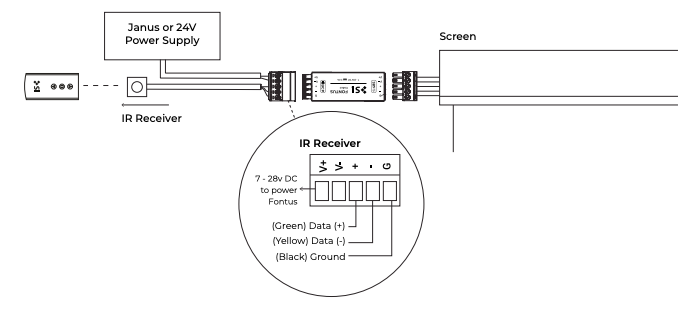
Low Voltage – IR #
Low Voltage – Keypad #
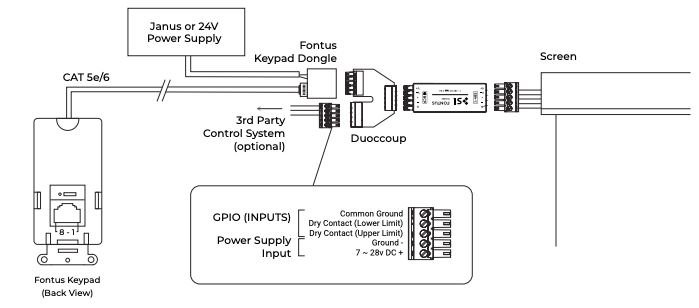
Warning: This keypad looks similar to the 485 and RTS versions SI offers, however it has a different wiring pinout and cannot be programmed. It is only a Dry Contact keypad.
Warning: When using a FONTUS keypad, IR and 12V Trigger control is not available!
IR Hex Codes #
Tip: Third-party IR universal control systems can be used to control the screen. Commands can be learned from the SI IR remote or entered using these hex codes:
UP:
0000 006c 0000 000c 0006 011b 0006 011b 0006 00bb 0006 00bb 0006 00bb 0006 00bb 0006 00bb 0006 00bb 0006 00bb 0006 00bb 0006 011b 0006 08a4
STOP:
0000 006c 0000 000c 0006 011b 0006 011b 0006 00bb 0006 00bb 0006 00bb 0006 00bb 0006 00bb 0006 00bb 0006 00bb 0006 011b 0006 011b 0006 08a4
DOWN:
0000 006c 0000 000c 0006 011b 0006 011b 0006 00bb 0006 00bb 0006 00bb 0006 00bb 0006 00bb 0006 00bb 0006 00bb 0006 011b 0006 00bb 0006 08a4
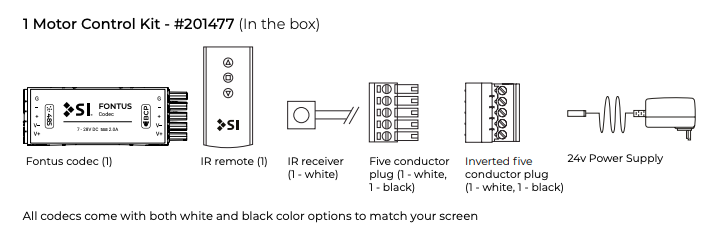
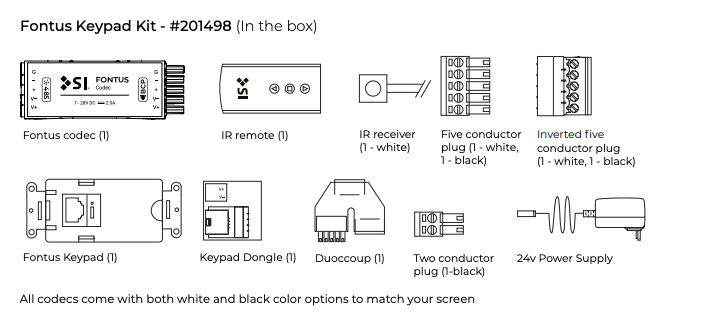
Parts in the Box #