
Projector Placement #
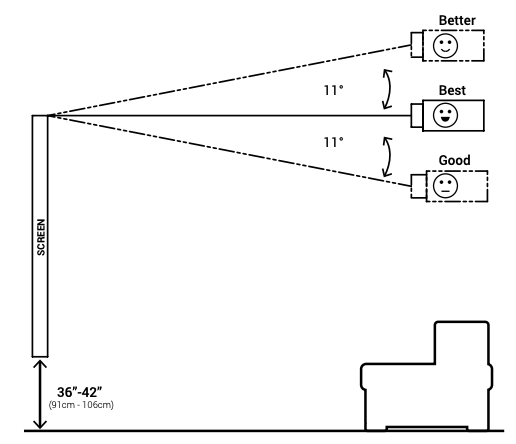
Before beginning frame assembly, plan your projector placement. Mount the projector lens level with the top or bottom of the screen. Do NOT angle the projector or use keystone correction.
Standard Frame Assembly (up to 120″) #
Step 1: Prepare Your Workspace #
Clear a clean, flat area large enough for the full frame. Use a drop cloth or soft surface to prevent scratches.
Step 2: Identify Frame Sections #
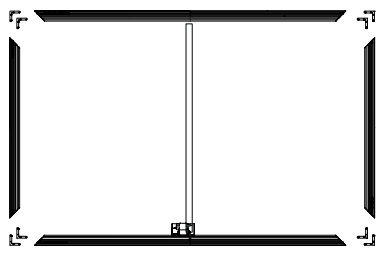
Lay out all labeled frame pieces. Ensure the LED hole faces down during assembly.
Step 2b: Slide the channel nuts for the Backer, if using AT Material, into the top Horizontal frame parts. #
WARNING: The LED hole must face down during assembly.
WARNING: If using AT or Maestro material, ensure the channel nuts are installed in the inner channel BEFORE proceeding.
Step 3: Insert Corner Brackets #
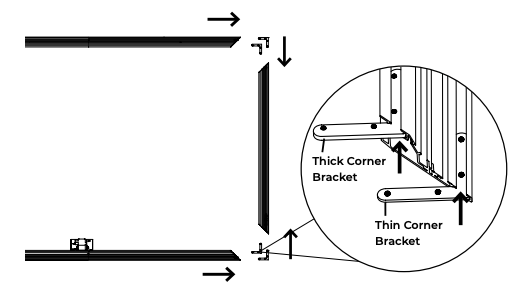
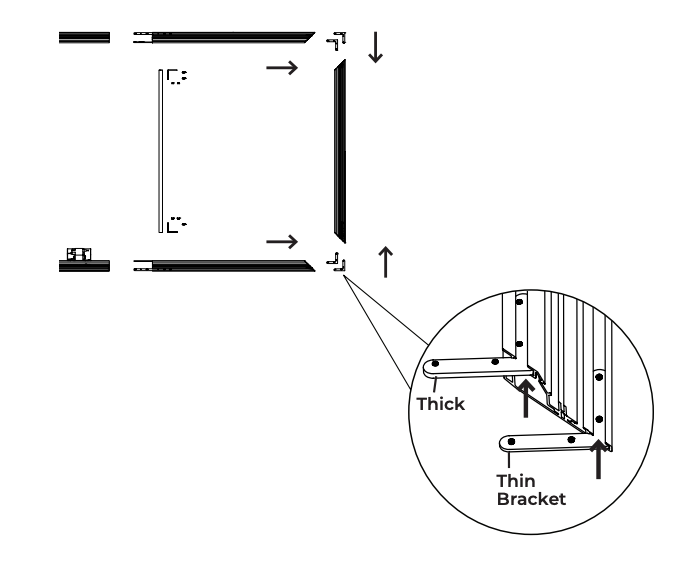
Insert the thin bracket tab into the outer channel and the thick bracket tab into the inner channel.
Step 4: Align Frame Corners #
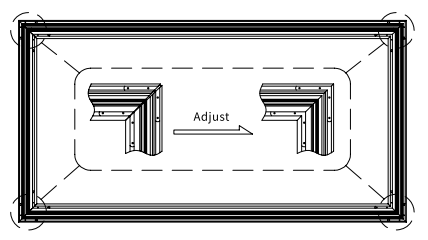
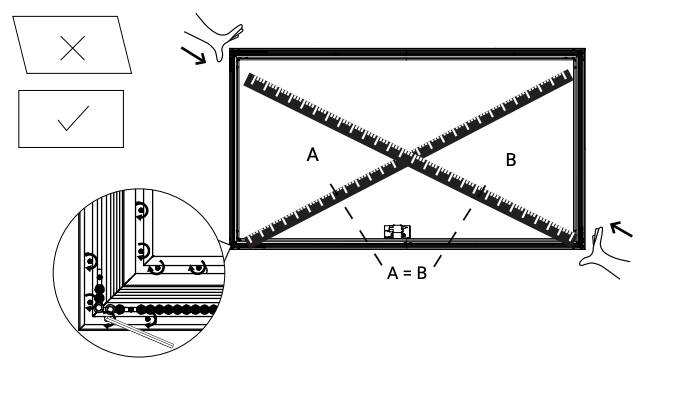
Ensure corners are flush and at 90 degrees. Loosely tighten the set screws.
Step 5: Square the Frame #
Measure diagonals A and B corner-to-corner. They must be within 1/8″ of each other. Once square, fully tighten all set screws.
Split Frame Assembly (120″ and above) #
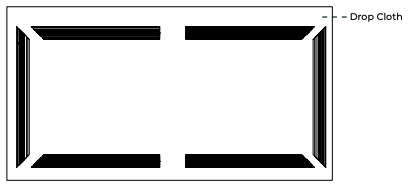
Step 1: Prepare your Workspace #
Clear a clean, flat area. Use a drop cloth or soft surface.
Step 2: Identify Frame Sections #
Lay out all frame pieces with the LED hole facing down.
Step 2b: Slide the channel nuts for the Backer, if using AT Material, into the top Horizontal frame parts. #
Step 3: Insert Corner Brackets #
Insert corner brackets — thin tab in outer channel, thick tab in inner channel.
Step 4: Assemble Horizontal Frame Sections #
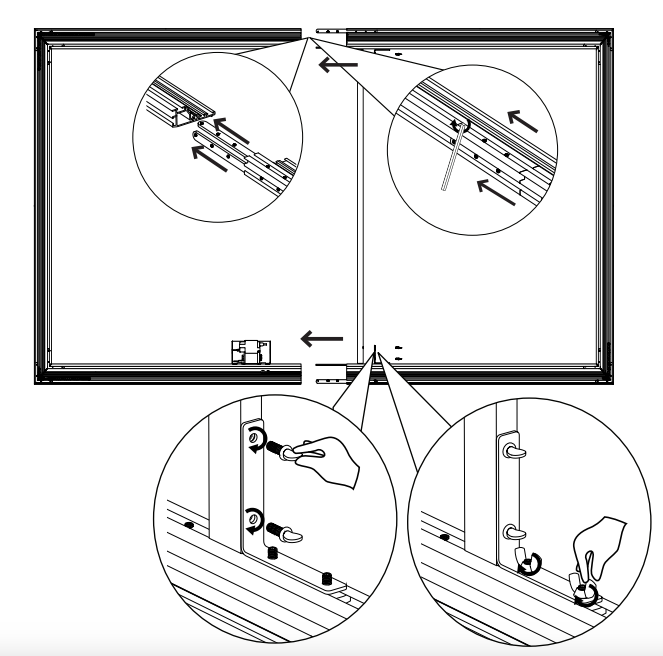
Connect horizontal frame pieces using splice plates and countersunk screws. Secure splice bars from the back with set screws.
Step 5: Install Vertical Support Bar #
Attach the vertical support bar using the included “L” brackets.
TIP: The support bar can be positioned off-center to accommodate a speaker or outlet behind the screen.
Step 6: Align Frame Corners #
Ensure all corners are flush and at 90 degrees. Loosely tighten.
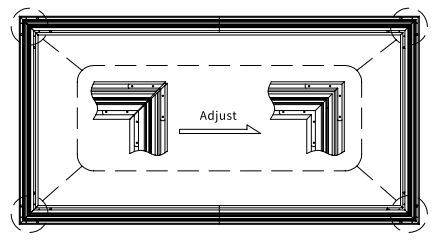
Step 7: Square the Frame #
Measure diagonals corner-to-corner. Must be within 1/8″. Fully tighten once square.
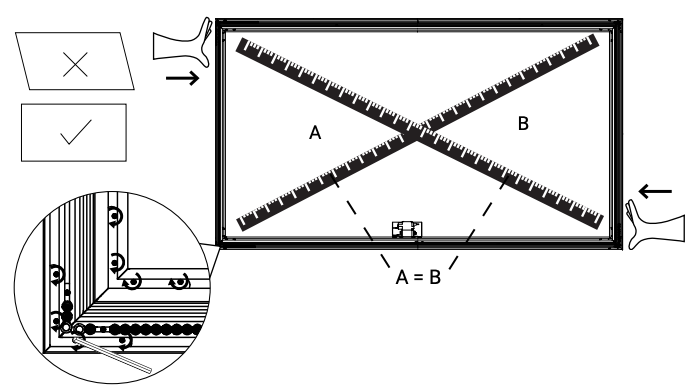
LED Kit Installation #
Step 1: Prepare for Zigbee #
A Philips Hue Hub is required to control the LED lighting. Set up the Hue Hub and app before powering on the LEDs for the first time.
Step 2: Mount LED Controller #
The LED controller mounts to the pre-installed nuts on the frame. Secure with the included screws.
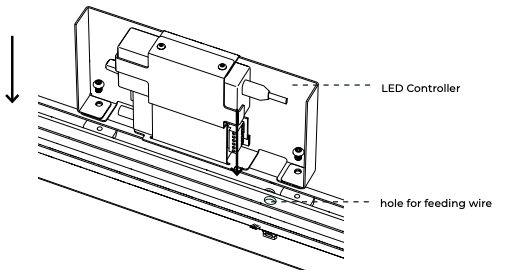
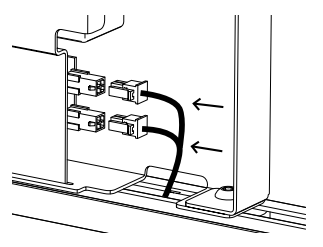
Step 3: Install LED Strips #
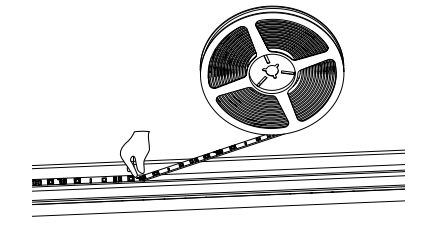
Route the LED strips around the frame channel. Do not kink or fold the strips. Use the included foam pieces at corners. Peel the adhesive backing and press firmly into place.
Step 4: Cut LED Strips to Length #
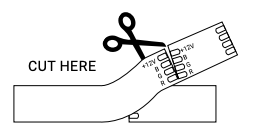
If the LED strip is too long, cut only at the copper pad marked “CUT HERE”. Do not cut anywhere else or the strip will not function.
Material Installation #
Step 1: Prepare Work Area #
Police the area for any debris that could damage the material. Lay foam sheeting on the floor beneath the frame. Wear clean gloves when handling screen material.
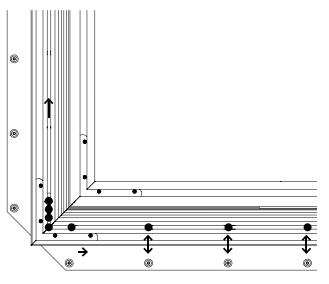
Step 2: Remove Post Retention Bumpers & Distribute Snaps #
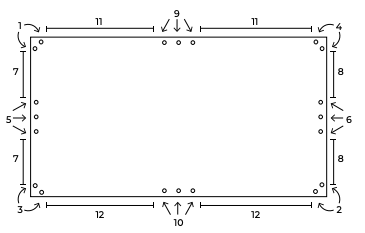
Remove any post retention bumpers from the frame channel. Distribute the snaps evenly — you should have the same number of snaps as holes in the screen material.
Step 3: Lay Frame onto Material #
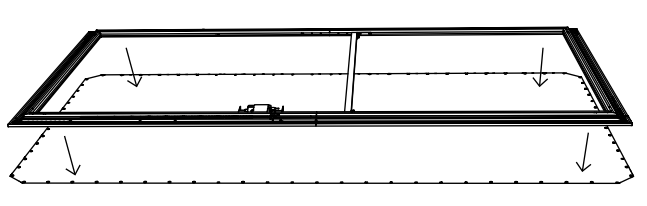
With 2 or more people, carefully lay the frame onto the screen material. Center the frame and keep everything flat.
Step 4: Attach Material with Snaps #
Follow the snap attachment sequence diagram. Press each snap firmly through the material grommet and into the frame channel until it clicks into place.
Black Backer AT Section #
Step 1: Prepare Screen #
AT (acoustically transparent) materials come with a separate black backer.
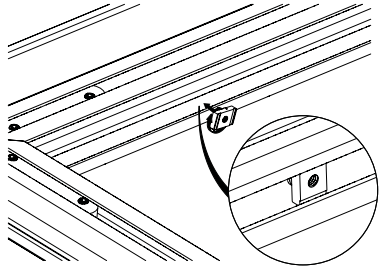
Step 2: Install Channel Nuts #
Insert channel nuts into the inner frame channel for the thumb screws.
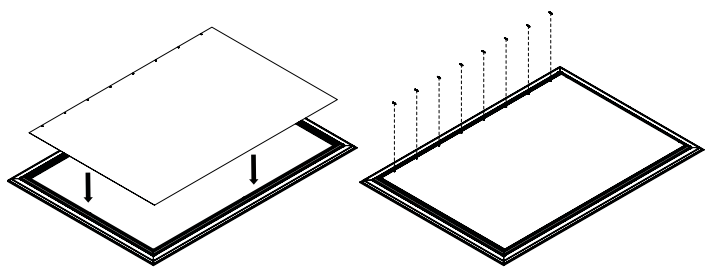
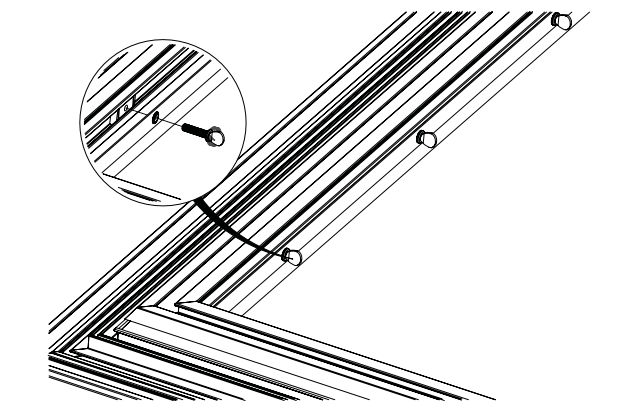
Step 3: Attach Black Backer #
Align the black backer grommets with the channel nuts. Secure with thumb screws.
Trim Installation #
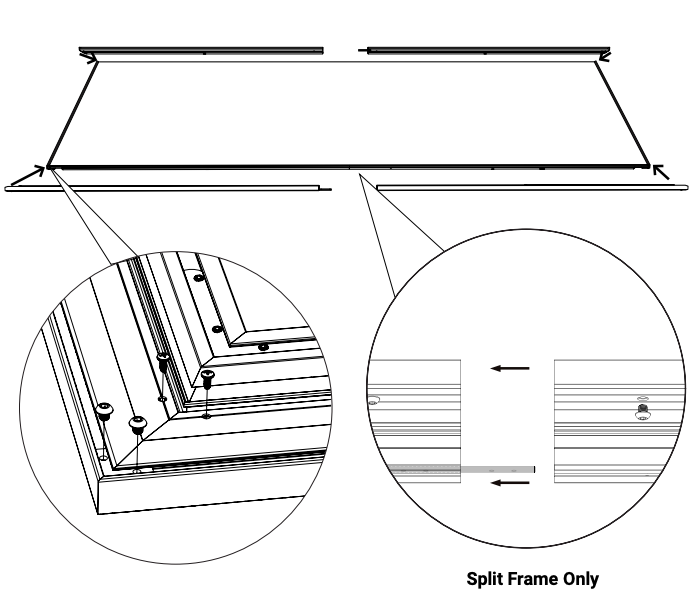
IMPORTANT (Split Frame Only): Before installing horizontal trim on split frames, splice them together using the included trim splice bars.
Step 1: Install Trim Pieces #
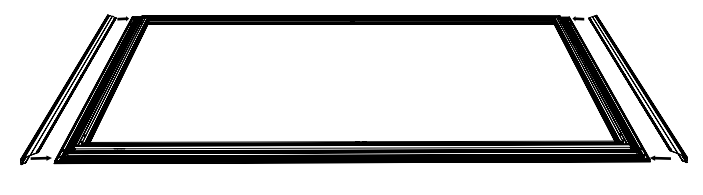
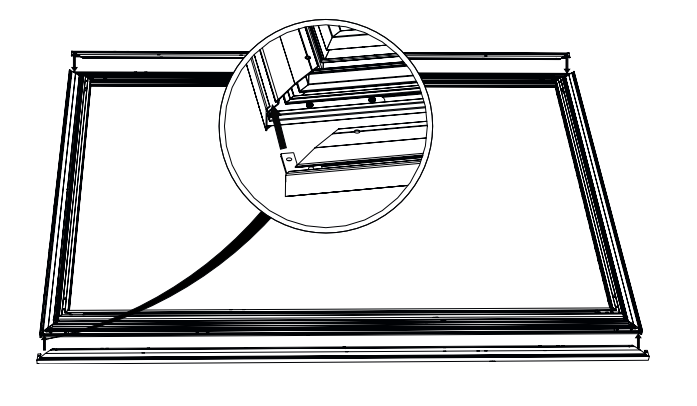
Install the vertical trim pieces first, then the horizontal trim pieces. The horizontal trim includes 4 corner brackets that connect to the vertical pieces.
Step 2: Secure Corners #
At each corner, install the set screws. Use two 1/4-20 x 1/4″ screws per corner to lock the trim pieces together.
Step 3: Join Horizontal Trim (Split Frame Only) #
For split frames: join the horizontal trim sections at the splice point using four 1/4-20 x 1/4″ screws.
Mounting #
Step 1: Install Mounting Brackets #
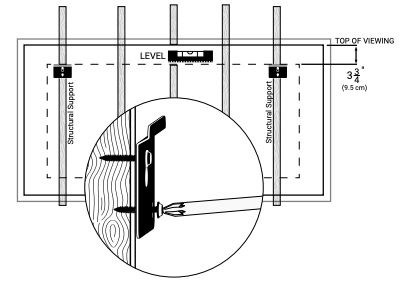
All screen sizes use only 2 mounting brackets. Position them approximately 6 inches to 1/3 of the screen width from each edge. Secure to wall studs or use appropriate anchors.
Step 2: Prepare for LED Power #
Before mounting, pull the bottom of the frame away slightly to manage LED power cables. Route cables to your power source location.
Step 3: Mount the Screen #
With 2 or more people, hang the screen on the wall brackets. Verify the screen is level and secure all fasteners.
Flown Kit (Optional) #
Step 1: Determine Mounting Locations #
Position ceiling mounts approximately 6 inches to 1/3 of the screen width from each edge, matching the screen bracket locations.
Step 2: Anchor Ceiling Mounts #
Secure ceiling mounts to joists, beams, or other structural support. The mounts must support the full weight of the assembled screen.
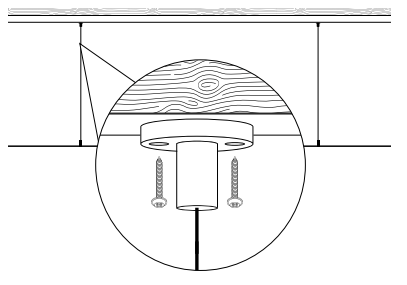
Step 3: Feed Suspension Cables #
Thread the suspension cables through the Griplock mechanism on each ceiling mount.
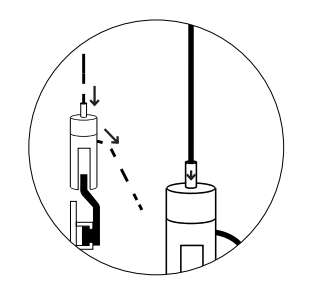
Step 4: Adjust Height and Leveling #
Pull the cable through the Griplock to raise the screen. Press the release button to lower. Adjust both sides until the screen is level at the desired height.



