Installation Guide #
Please ensure that the upper and lower mounting brackets are installed at the correct distance and in the correct position.
Use the appropriate screws for installation according to the type of wall material.
For wooden walls, use tapping screws; for concrete walls, use tapping screws with an expansion fixture.
Failure to use the correct screws may result in improper installation or damage to the wall or product. After installation, verify that the screen is level and flat on both sides.
Ensure that the screen is properly aligned and securely fastened to prevent any potential issues or damage.
Wall or Ceiling Installation #
Step 1: Choose Your Mounting Location #
Before installation, determine the optimal mounting location for your cassette.
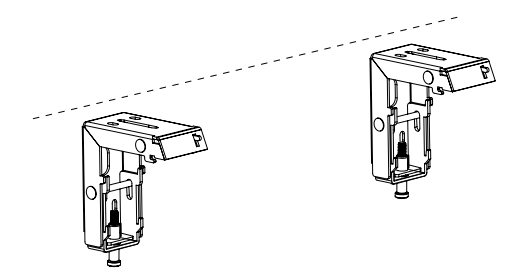
For a secure and level installation, install the brackets between 1″ and 8″ from each side of the cassette.
When ceiling mounting, it may be necessary to adjust the brackets by shimming one down to ensure proper alignment.
To achieve a sturdy and stable installation, mount the brackets to a stud for wall mounting or a joist for ceiling mounting.
Mounting location and hardware for ceiling, flown, and wall brackets must be capable of handling a system weight of 55 pounds.
Step 2: Prepare the Bracket Latch #
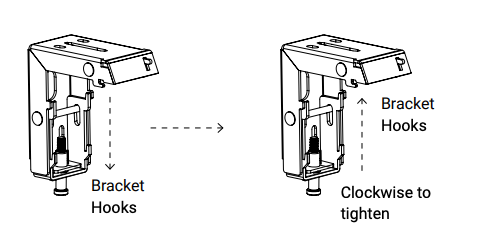
Ensure the bracket latch is fully down by loosening the locking screw.
Step 3: Hang and Secure the Cassette #
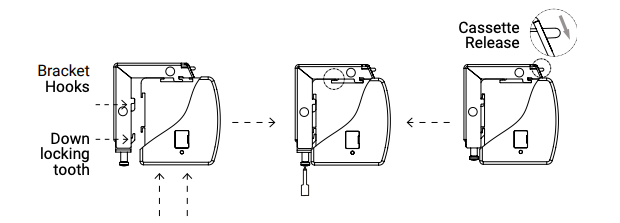
To secure the casing, place the two ends of the casing flatly onto the bracket, ensuring proper alignment.
Then, push the casing into the bracket until the locking tooth engages.
You will hear a distinct locking sound when the casing is securely fixed onto the bracket.
Once locked, tighten the lock screw to complete the installation.
Please refer to the following illustration for guidance.
To remove the screen, first loosen the locking screw, hold the release latch down, and pull the screen away then down from the bracket.
Using the “Flown” Mount #
Step 1: Install the Flown Adaptor #
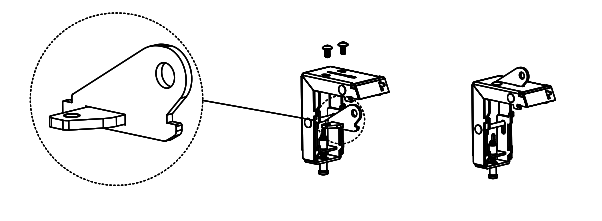
Insert the locking plate into the slotted flown adaptor and install through the bottom of the wall/ceiling bracket.
Secure by using the included M5 x 10 screws. (Applies to both brackets.)
Step 2: Position Cables and Anchors #
Cables and anchors should be mounted to fall within 2.5″ and 9.5″ from the left and right
Though the bracket supports flown mount, Screen Innovations does not include cable, anchors, or rigging hardware.
Step 3: Install the Cassette onto Flown Brackets #
Install the brackets onto the cassette and fully tighten the locking screws.
To secure the casing, place the two ends of the casing flatly onto the bracket, ensuring proper alignment.
Then, push the casing into the bracket until the locking tooth engages.
You will hear a distinct locking sound when the casing is securely fixed onto the bracket.
Once locked, tighten the lock screw to complete the installation.
Please refer to the following illustration for guidance.
Setting Limits #
If you need to adjust the height limit for installation purposes, you can do so by using the adjustment stick provided. Simply insert the bar into the adjustment hole located on the left side of the motor, as shown in the figure below.
Lower Limit #
Adjusting the Lower Limit #
Press the DOWN button on the remote until the screen stops at its current lower limit.
Use the yellow tool and insert it into the Yellow hole.
Turn the yellow tool CLOCKWISE approximately 1 full turn for every 2″.
The screen will not move during this process.
Press the UP button on the remote — the screen will begin to raise. Stop it after about 1 foot.
Press the DOWN button — the screen will go down and stop above its previous limit.
Now turn the yellow tool COUNTER CLOCKWISE and the screen will begin to jog down. Continue until you reach the desired lower limit.
Upper Limit #
The upper limit is pre-set from the factory. Only adjust if needed.
Adjusting the Upper Limit #
Press the UP button on the remote until the screen stops at its current upper limit.
Use the yellow tool and insert it into the Green hole.
Turn the yellow tool CLOCKWISE approximately 1 full turn for every 2″.
The screen will not move during this process.
Press the DOWN button on the remote — the screen will begin to lower. Stop it after about 1 foot.
Press the UP button — the screen will go up and stop below its previous limit.
Now turn the yellow tool COUNTER CLOCKWISE and the screen will begin to jog up. Continue until you reach the desired upper limit.
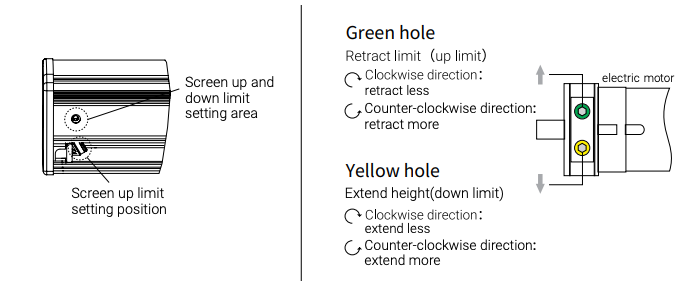
If the screen retracts above the set height limit, the screen will automatically lower. To prevent this, press the stop switch (either manually or using RF control) immediately. If this occurs, you can adjust the height by turning the green knob in a clockwise direction.
To avoid damage to the motor or screen, operate with caution and ensure that the screen does not over-retract. If this occurs, stop the motor immediately to prevent any potential damage.
Controlling the Screen #
The Short Throw Motorized screen has 4 control options:
IR Control
Wall Switch & Dry Contact
RS485 or RS232
Manual Control (cycle control button)
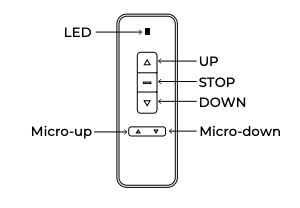
UP — Screen UP
STOP — Screen STOP
DOWN — Screen DOWN
Micro-UP — Retract screen in small increment
Micro-DOWN — Lower screen in small increment
IR — Transfer signal by IR (Wavelength: 940 nm)
IR Control #
Programming Code Setting (Pairing) #
Connect the screen to power within 10 seconds (programming mode).
Press the UP & STOP buttons together on the remote.
Pairing is completed.
Programming Code Clearing #
Connect the screen to power within 10 seconds (programming mode).
Press the UP & STOP buttons together on the remote.
Clearing is completed.
Manual Control #
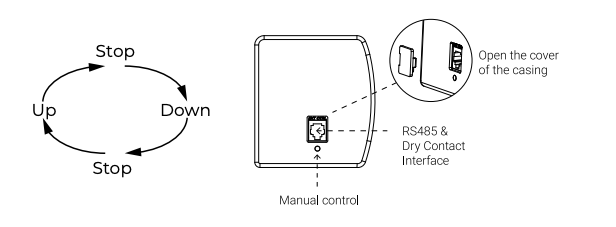
The Manual Control button is located on the left side of the enclosure near the RJ45 connection.
Dry Contact (RJ45) #
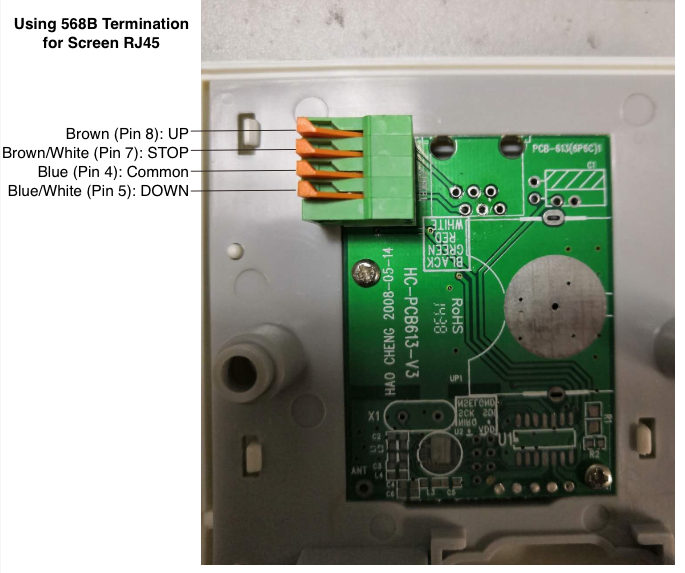
Please check the wire and function below for RJ45 connections.

Using a 568B Termination:
UP: BLUE (Pin 4) and BROWN (Pin 8)
DOWN: BLUE (Pin 4) and WHITE/BLUE (Pin 5)
STOP: BLUE (Pin 4) and WHITE/BROWN (Pin 7)
Wall Switch Pin Out #
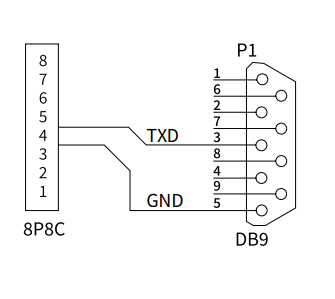
RS485 / RS232 Control #
RS485 / RS232 Port Settings #
Baud Rate: 2400
Data Bits: 8
Odd-even check: None
Stop bits: 1
Hexadecimal Control Codes #
Up:
ff ee ee ee dd
Stop:
ff ee ee ee cc
Down:
ff ee ee ee ee
Reset Address Code (some central control systems):
ff ee ee ee aa
Basic Maintenance & Cleaning #
Daily Care #
To enjoy the best viewing experience, retract the screen into the casing when not in use.
Before retracting the screen, check the front and back sides of the material to ensure the surface does not contain dust, insects, or debris.
If anything of concern is found, use a soft cloth and gently clean the surface before retracting.
Screen Cleaning #
To remove markings caused by debris, gently clean the affected area on the casing or material with warm water mixed with mild detergent.
Afterward, use a clean cloth to gently towel dry the area. Do not let the material air dry after cleaning.
Please avoid using any solvent, chemical liquid, or frictional cleaner, as these can cause permanent damage to the material.
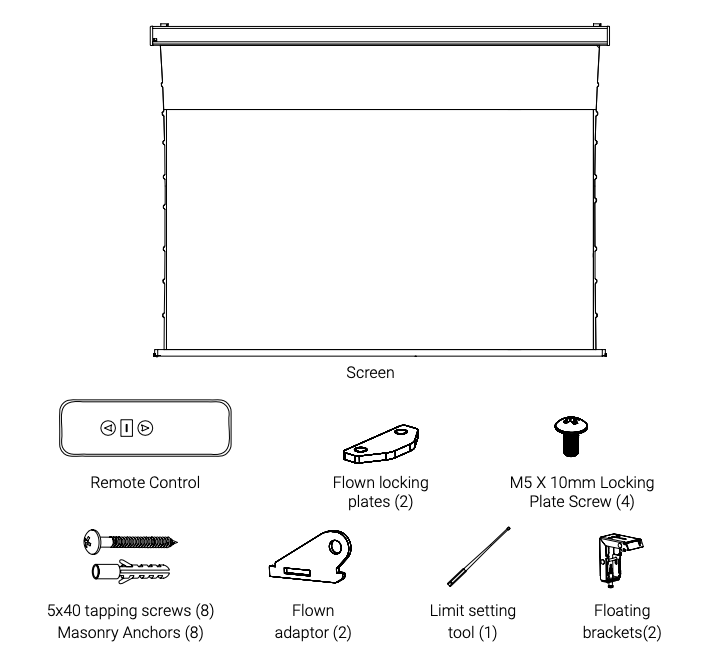
Parts in the Box #