
Step 1: Software and COM Port Setup #
Download and install the latest SDN Motor Configuration software as administrator when possible from: Download the Somfy SDN Motor Configuration Software here
Connect the USB-Programming Cable to any USB port on your laptop
Open Device Manager from Windows Start menu
Go to Ports and click to expand it
Make note of the COM Port number listed for the RS485 port
Info: If RS485 Port is not listed under “Ports”, you must install the driver for the USB-to-RS485 Adaptor. Download from: https://support.advantech-bb.com/download?product_model_name=BB-485USB9F-2W-LS#Driver
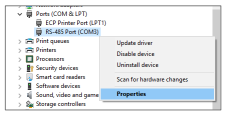
Right click on the RS485 Port and click Properties
Click the Port Settings tab and confirm the settings are:
Bits per second: 4800
Data Bits: 8
Parity: Odd
Stop Bits: 1
Flow Control: None
Open the Somfy Digital Network™ (SDN) Motor Configuration Software from the Desktop icon or Windows Start menu
Select the COM port at the top left of the window that you noted from Device Manager and click “Connect”. You are now connected to the COM port
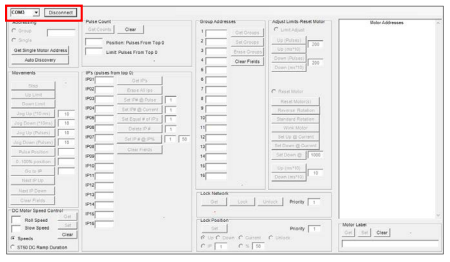
Warning: If no COM ports are listed in the dropdown, close the software, ensure USB cable is connected, then reopen. If still no COM port, reinstall the USB-Programming Cable driver. Ensure Motor Config is the only software running and no other software is using the COM port.
Step 2: Discovering Motors #
Discover a Single Motor: #
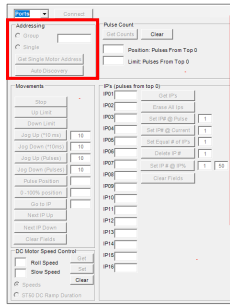
Click the “Get Single Motor Address” button
The Node ID of the motor found will populate the field under the Addressing section
Discover All Motors on an SDN System: #
Click the “Auto Discovery” button
The Node IDs of all motors found will populate the field under the Motor Addresses section
Step 3: Setting Limits #
Movement Controls: #
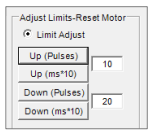
Up (Pulses) – Moves the motor up by the number of pulses specified in the field to the right
Up (ms*10) – Moves the motor up by the number of milliseconds times 10 specified in the field to the right
Down (Pulses) – Moves the motor down by the number of pulses specified in the field to the right
Down (ms*10) – Moves the motor down by the number of milliseconds times 10 specified in the field to the right
Adjusting Limits: #
Send the motor to its Up or Down limit
Select the “Limit Adjust” radio button
A pop-up warning will appear about enabling Limit Adjust Mode; click OK
Adjust the chosen limit:
[Higher] Enter “10”, “20” or “50” in the top field and click Up (Pulses) or Up (ms*10) to adjust the limit slightly higher
[Lower] Enter “10”, “20”, “50”, etc., in the bottom field and click Down (Pulses) or Down (ms*10) to adjust the limit slightly lower
Disconnect and reconnect the Motor Configuration Software, discover the motor, send it Up or Down, then send it to the adjusted limit to confirm the change has been set
Step 4: Resetting Motor and Alternate Limit Setting #
Available Functions: #
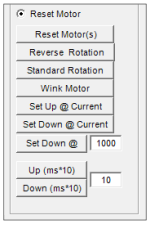
Reset Motor(s) – Resets all the limits that are set on the motor
Reverse Rotation – Sets the motor to run in the reverse direction
Standard Rotation – Sets the motor to run in the standard direction
Wink Motor – Jogs the motor up and down
Set Up @ Current – Sets the upper limit to the current position that the motor is in
Set Down @ Current – Sets the down limit to the current position that the motor is in
Set Down @ – Sets the down limit at the pulse count entered in the box next to it
Up (ms*10) – If the motor has no limits set, moves the motor up by the number of milliseconds specified in the box times 10
Down (ms*10) – If the motor has no limits set, moves the motor down by the number of milliseconds specified in the box times 10
Reset Motor Procedure: #
Select the “Reset Motor” radio button
A pop-up warning will appear about enabling Reset Motor Mode; click OK
Use the buttons under the Reset Motor section to adjust the motor accordingly
To Set Limits: #
Using the Up (ms*10) or Down (ms*10) buttons, move the screen to the desired upper limit, and press the “Set Up @ Current” button to save the upper limit
Using the Up (ms*10) or Down (ms*10) buttons, move the screen to the desired lower limit, and press the “Set Down @ Current” button to save the lower limit
Tip: You can change the size of the increments by changing the number in the field next to the Up and Down (ms*10) buttons. This number can be between 10-255. Be careful not to use too large a number close to the top or lower limit of the screen to avoid damage to the screen.



