
SI TriMesh™ — Quick Start Guide #
Step by step, from the box to the handoff. Version 1.2, for bridge firmware v1.2.
Check your bridge matches: the build line at the bottom of the left menu reads v1.2 (2026-09-17). A later build date on the same version is fine.
This guide walks one path, in order: get into the bridge, update it, set up the Zigbee coordinator, check the airwaves and pick a channel, build the wireless network in the right order, name and organize everything, set direction and limits, build groups and scenes, hand it to the control system, and back it up. Every step says why it comes before the next — on this system, order matters more than any screen.
For what a screen does rather than what to press next, see the SI TriMesh Instruction Manual.
Help while you work: the bridge has a support tile built in. Settings → Support opens ATEN, SI’s AI support assistant (siagent.screeninnovations.com) — ask it anything as you go, in plain words, and quote the exact message if the bridge printed one. Anything ATEN cannot settle goes to the SI Support team. There is a fuller note at the end of this guide on what to send them.
Before you start #
In the kit / on the job:
The TriMesh IP Bridge — powered over its network cable (PoE). There is no power brick.
The Zigbee coordinator — the base station your wireless shades report to. Also powered over one PoE network cable.
A switch with PoE ports, or PoE injectors to put in line.
If the job uses a control system: the TRO.Y, on the same network, plus one Ethernet patch cable to link the bridge’s RS485 port to a BUS port on the TRO.Y.
A laptop or tablet on the same network as the bridge — not the guest Wi-Fi.
Internet on that network for a few minutes (the bridge sets its clock from it, and the firmware updates need it).
The shades — leave the wireless shades unpowered until their turn. They join one at a time, in an order that matters.
Plan a couple of hours for a typical house. Setting travel limits takes the longest and must not be rushed.
Three habits that save every install:
The bridge says “ok” when it has accepted a command — not when the change has taken. After every rename, room, group, limit, or scene: reload the page and check it is showing.
The bridge talks to one thing at a time. Opening its page in a second browser tab or on a phone signs the first one out. If you keep getting logged out, something else is connected. (The TRO.Y works the same way.)
The page signs you out after about two hours of sitting idle. A banner warns you first with a Stay logged in button. Log back in and carry on — nothing you saved is lost.
Words you will meet:
Word | Meaning |
|---|---|
coordinator | the Zigbee base station the wireless shades report to |
router (extender) | a mains-powered Zigbee device that relays signal for battery shades — Smart Plugs, Smart Outlets, Low Voltage motors (not the Wi-Fi router) |
limits | the top and bottom points a shade is allowed to travel to |
Saved Positions | heights stored inside a motor that the homeowner can return to |
Nino / Nano | SI’s Zigbee motor (Nino) and Somfy’s (Nano) — the join steps are the same, the confirmation light differs |
Kratos | an 8-motor 24 V power supply for Nano Low Voltage shades (a DUO shade uses two motors) — a power supply, nothing else. Nino Low Voltage motors use the 12 V Nino Power Panel, never a Kratos |
Advanced view | the installer view of the bridge’s page — most of this guide lives there |
Step 1 — Find the bridge and get in #
Why first: nothing else can happen until you can see the bridge’s page.
One network cable from a PoE port (or through an injector) into the bridge. That cable is also its power. Give it a minute.
On your laptop, browse to:
https://si-ip-bridge-XXXXXX.local
XXXXXX is the last six characters of the bridge’s hardware (MAC) address, written without colons — it is printed on the label, and no two bridges share a name. The name can take about five seconds to answer the first time.
If the name never answers (some job-site networks block it): find the bridge’s IP address in the router’s client list and put
https://in front of it — for examplehttps://10.0.1.23. It is the same page either way.The browser stops you with “Your connection is not private” and a code such as
NET::ERR_CERT_AUTHORITY_INVALID. This is expected on a local network — the bridge encrypts its pages with its own certificate, and your computer has no reason to recognise it yet. It takes two clicks to get past:Click Advanced (bottom left). Do not click Back to safety.
The panel expands; at the bottom click Proceed to
<your bridge's address>(unsafe).
You will see this the first time each computer or phone opens the bridge. The two screenshots below are Chrome on a Mac; Safari, Edge and Firefox word it differently, but every one of them has the same two steps — open the advanced or details section, then continue anyway.
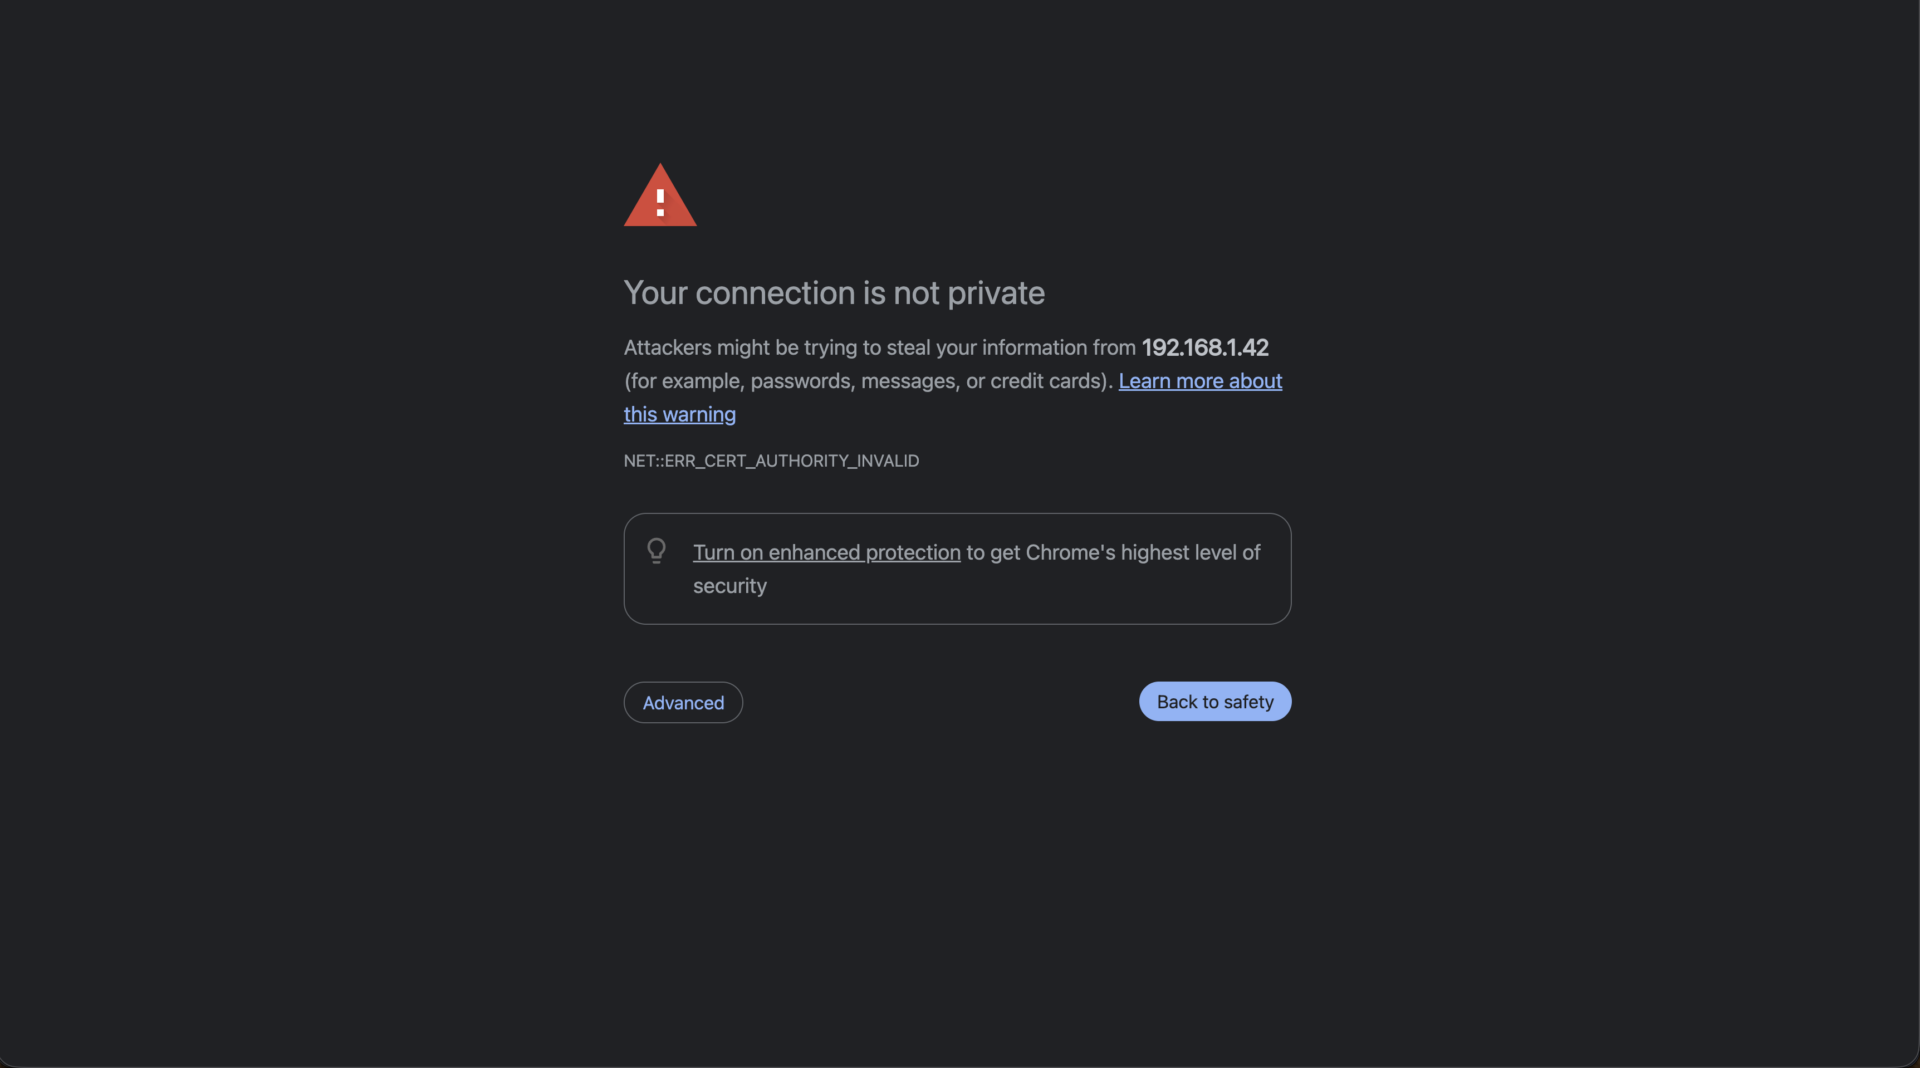
What you see first. Click Advanced (bottom left).
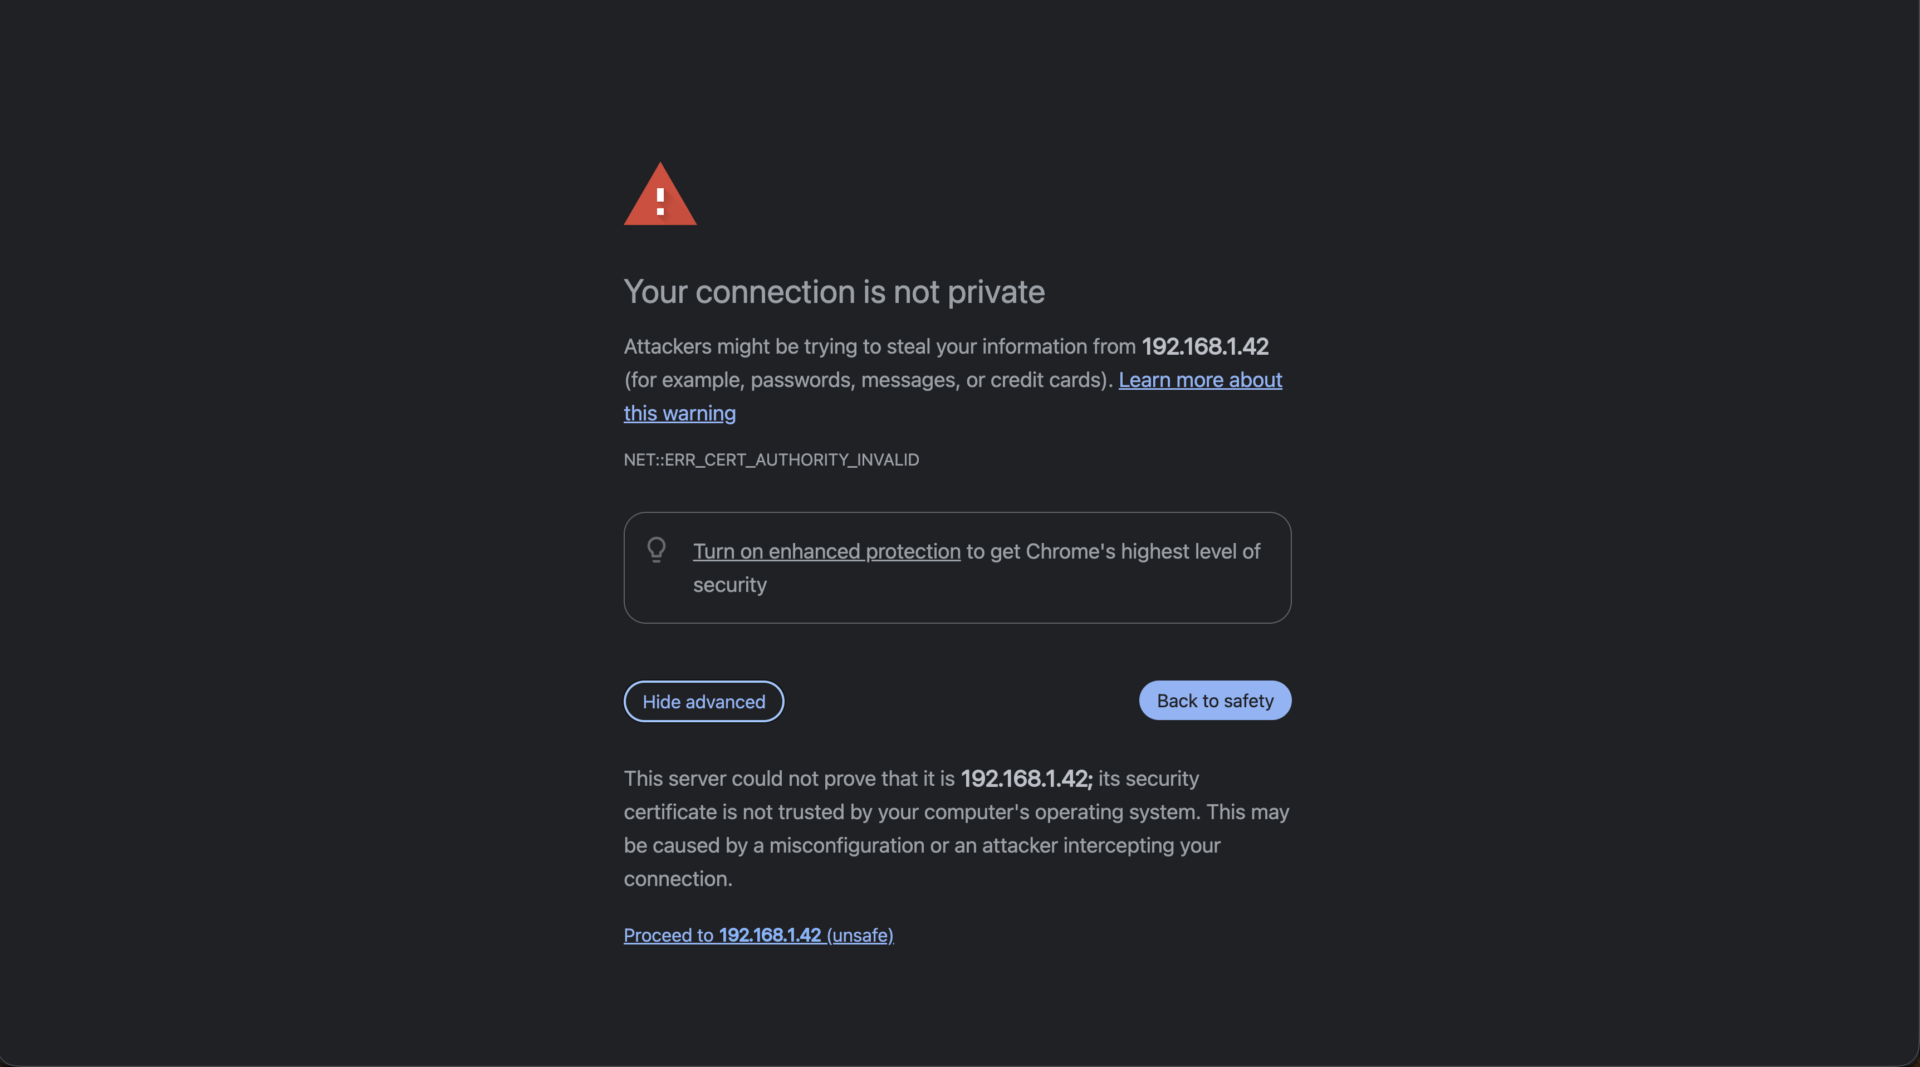
After Advanced: click Proceed to … (unsafe) at the bottom.
A brand-new bridge lands on account creation: choose a password of at least 10 characters, entered twice. Write it down and put it in the job record — there is no way to look it up later. (Locked out? Hold the button marked B on the bridge for 4 seconds and set a new one; shades, rooms, and scenes are kept.) The optional hint is shown to anyone who reaches the login page — never put the password in it.
Then, at the top of the left menu, tick View: Advanced. The installer tools — Discovery, Zigbee Management, limits, the coordinator’s panel — only exist in Advanced view.
If the page never comes up: the port is not delivering PoE (no light = no power), or your laptop is on a different network — guest Wi-Fi, or Wi-Fi plus a rack cable at the same time.
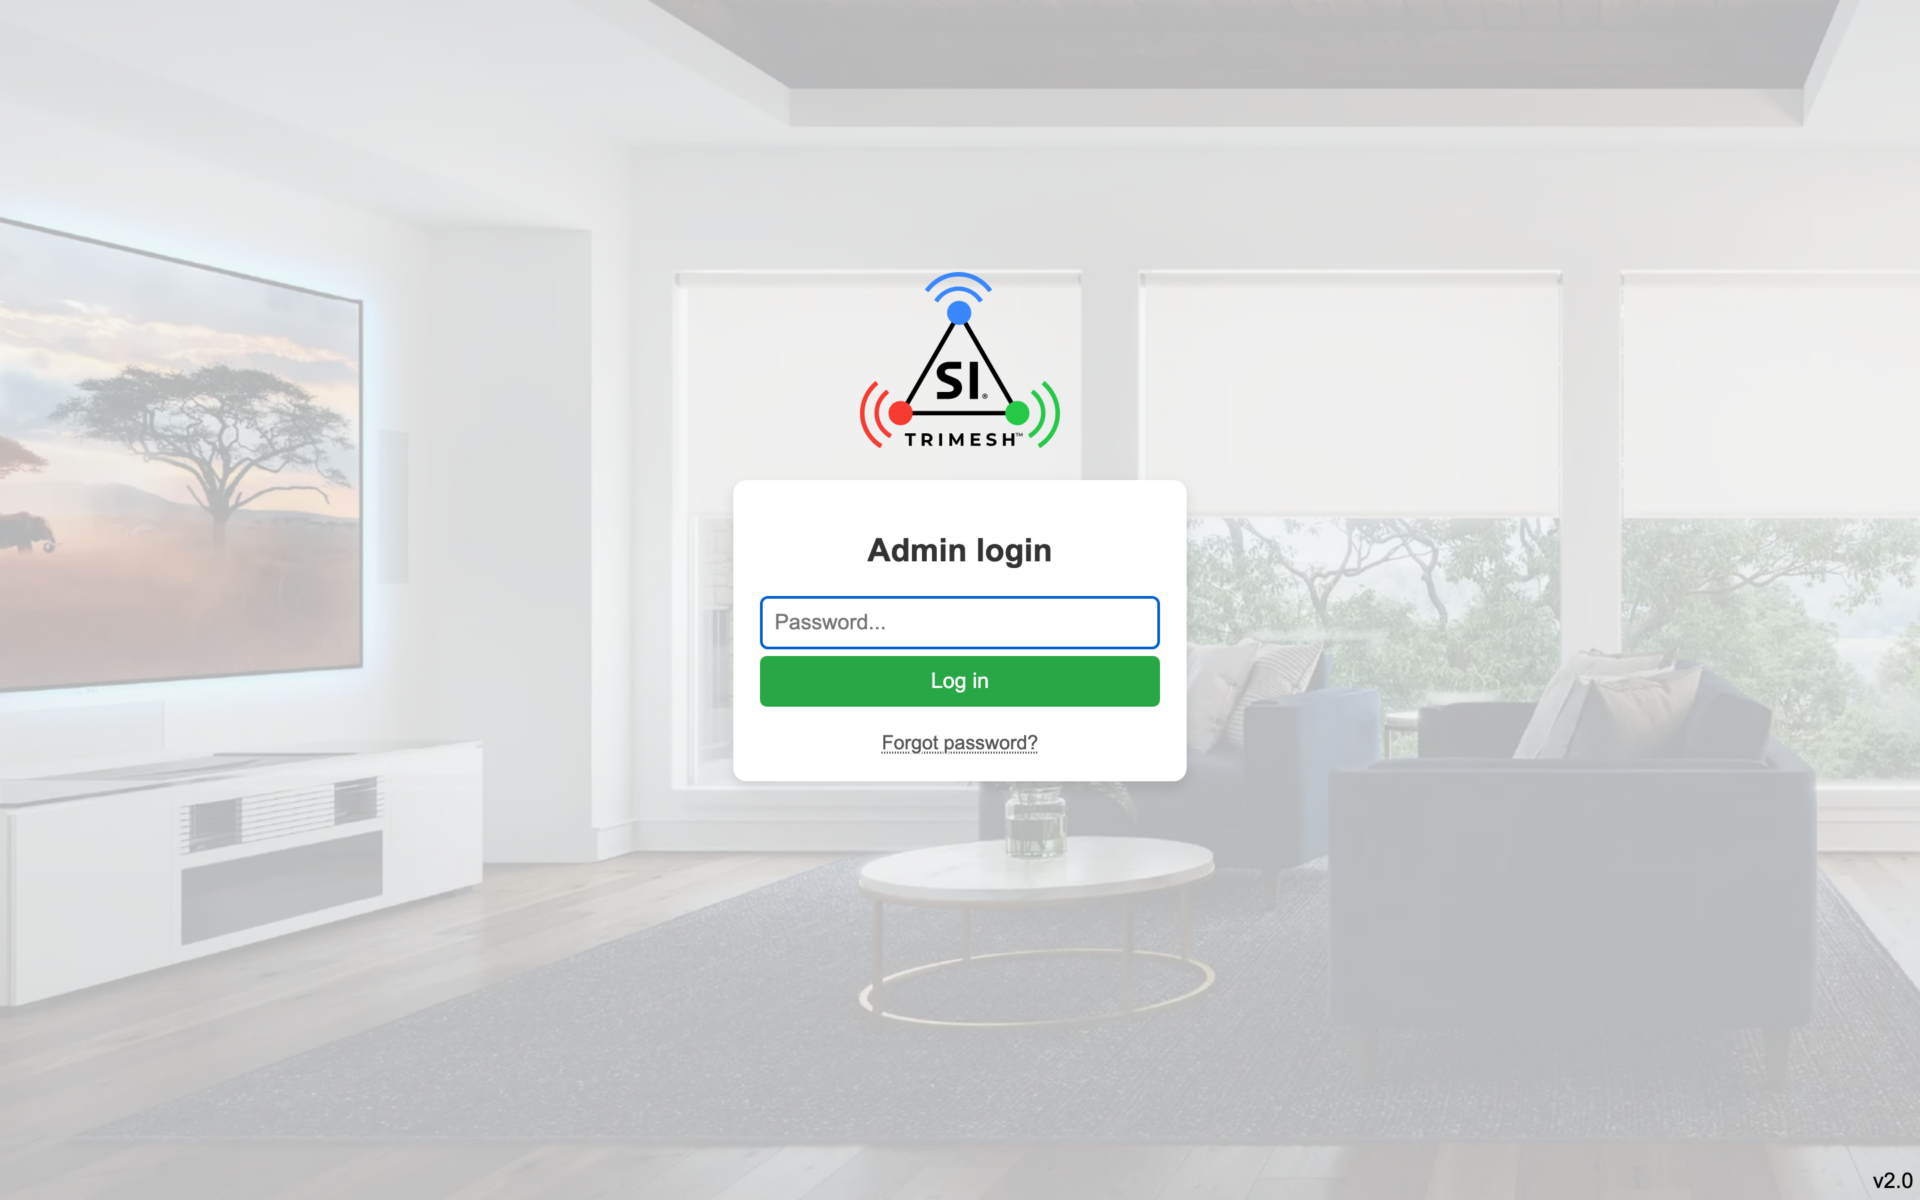
The login page.
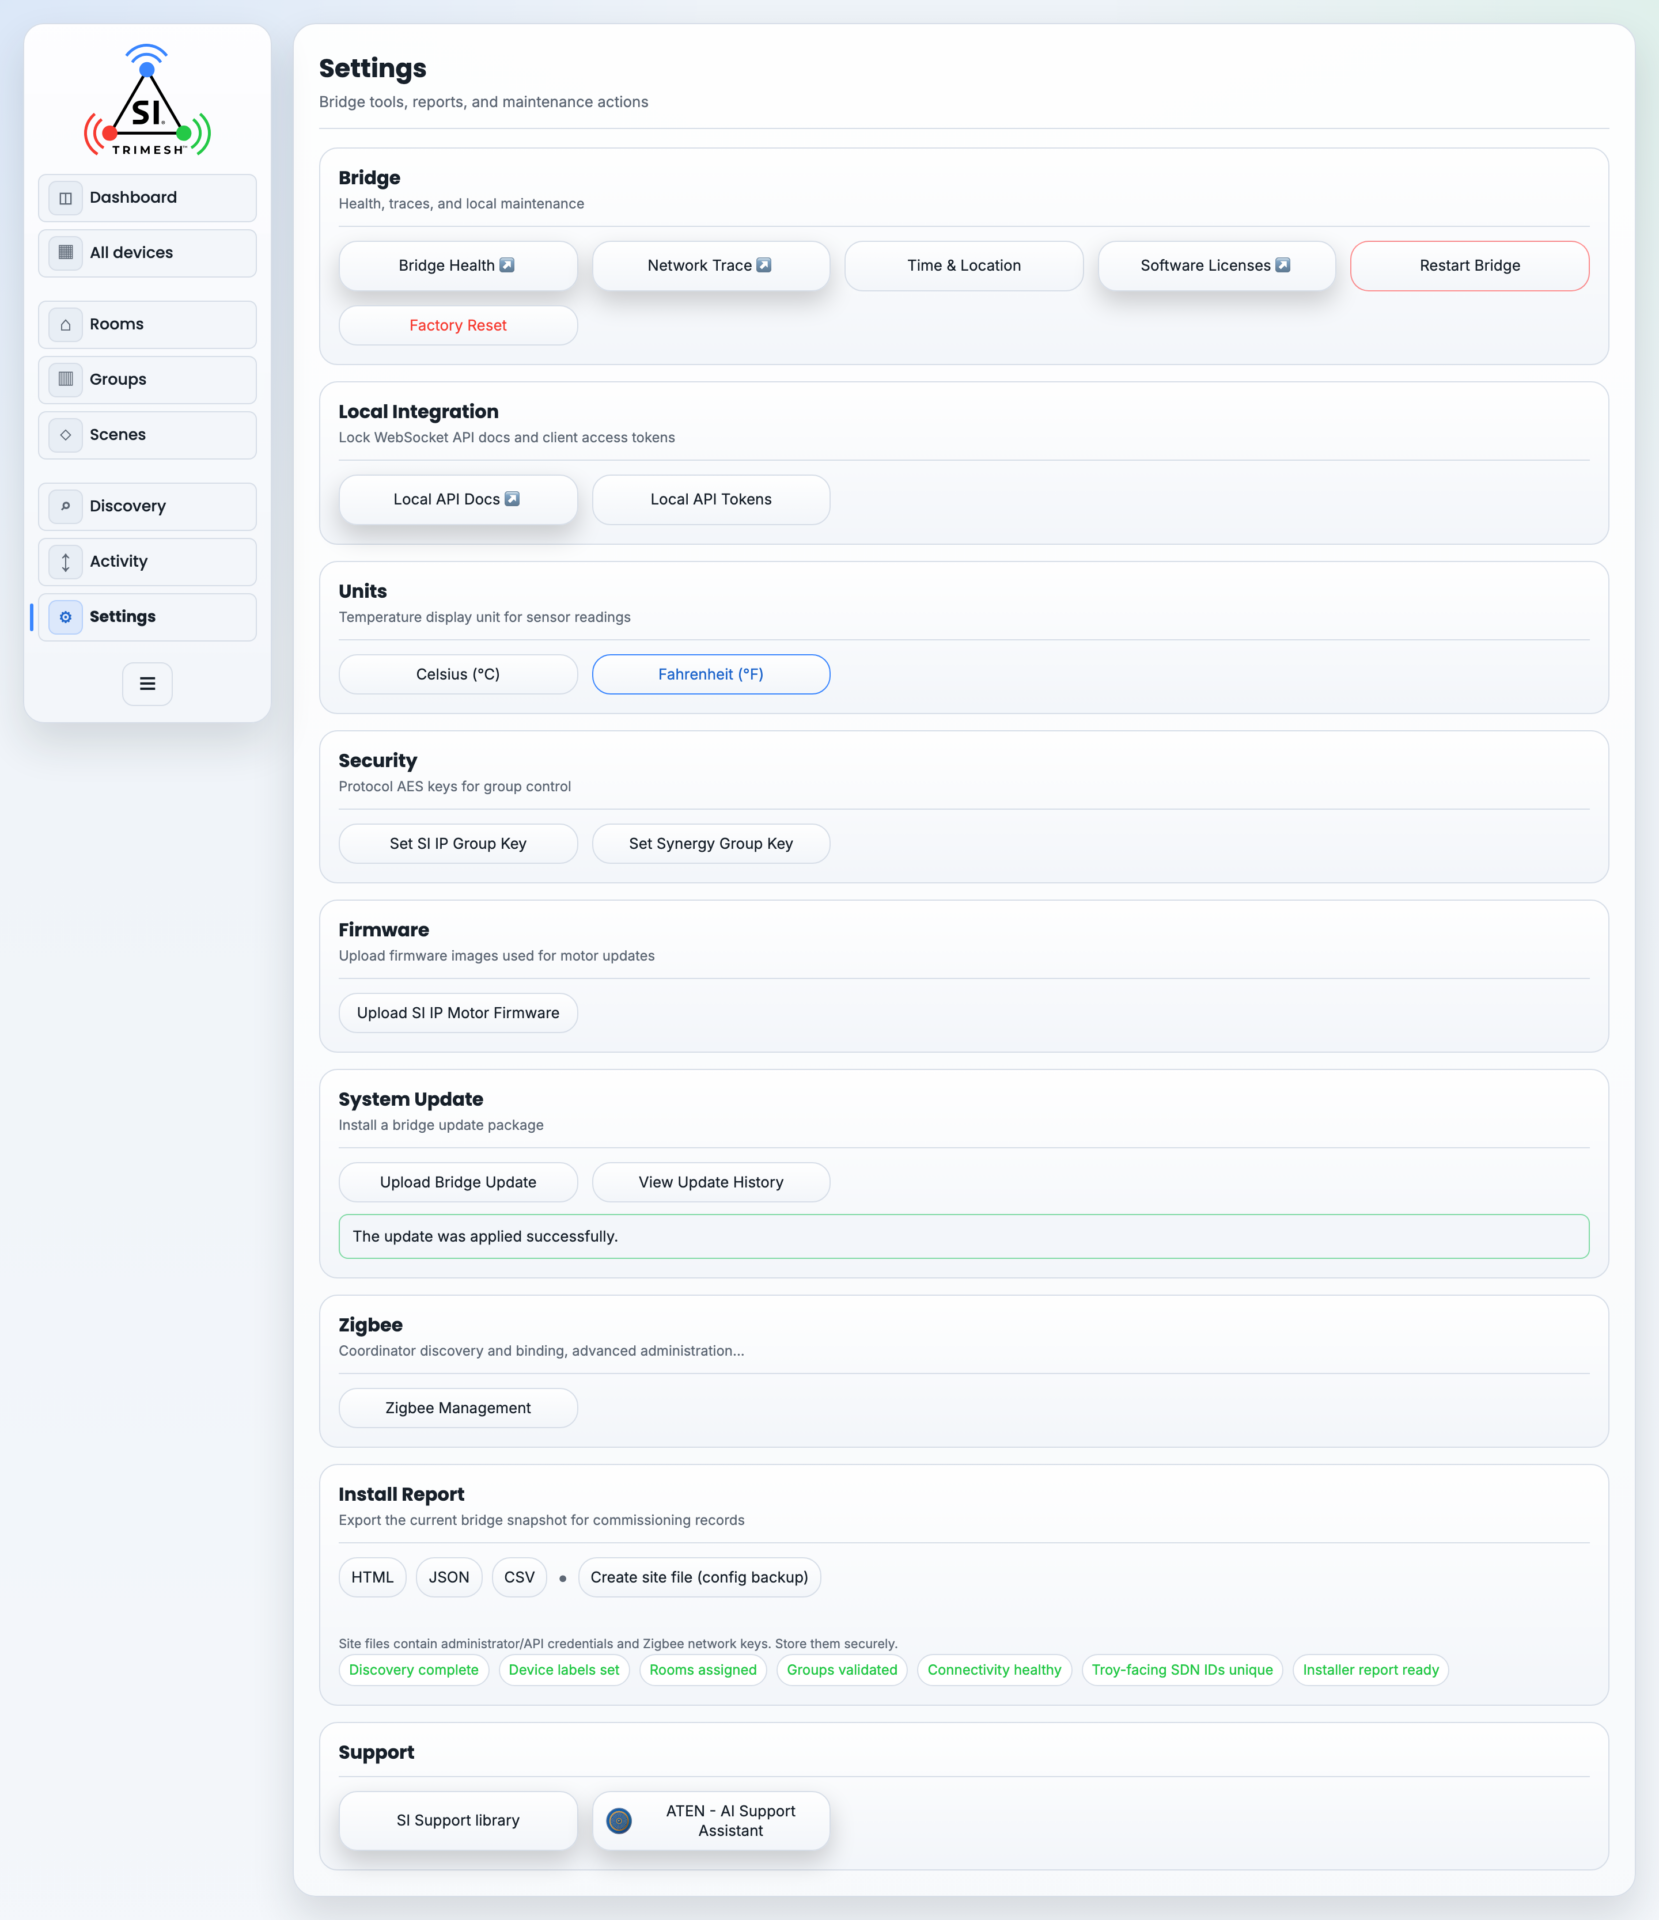
Settings with View: Advanced on — note the toggle in the left menu.
Step 2 — Update the bridge, before anything joins #
Why now: updating after shades are on risks having to re-join or re-limit them. This is one of the two steps that needs the internet, along with the clock in Step 11.
Get the current bridge update file (
.zip) from SI.Settings → System Update → Upload Bridge Update. Choose the zip and confirm.
Watch the states: queued → verifying → applying → rebooting → applied. A panel titled Bridge update in progress takes over the screen, tells you the bridge will reboot, and counts down before the page refreshes itself. Leave it alone until it comes back.
Prove the update landed by the date, not the number. Settings → System Update → View Update History shows when the bridge was last updated, and the build line at the bottom of the left menu carries the build date after the version. The plain version number on its own reads the same before and after.
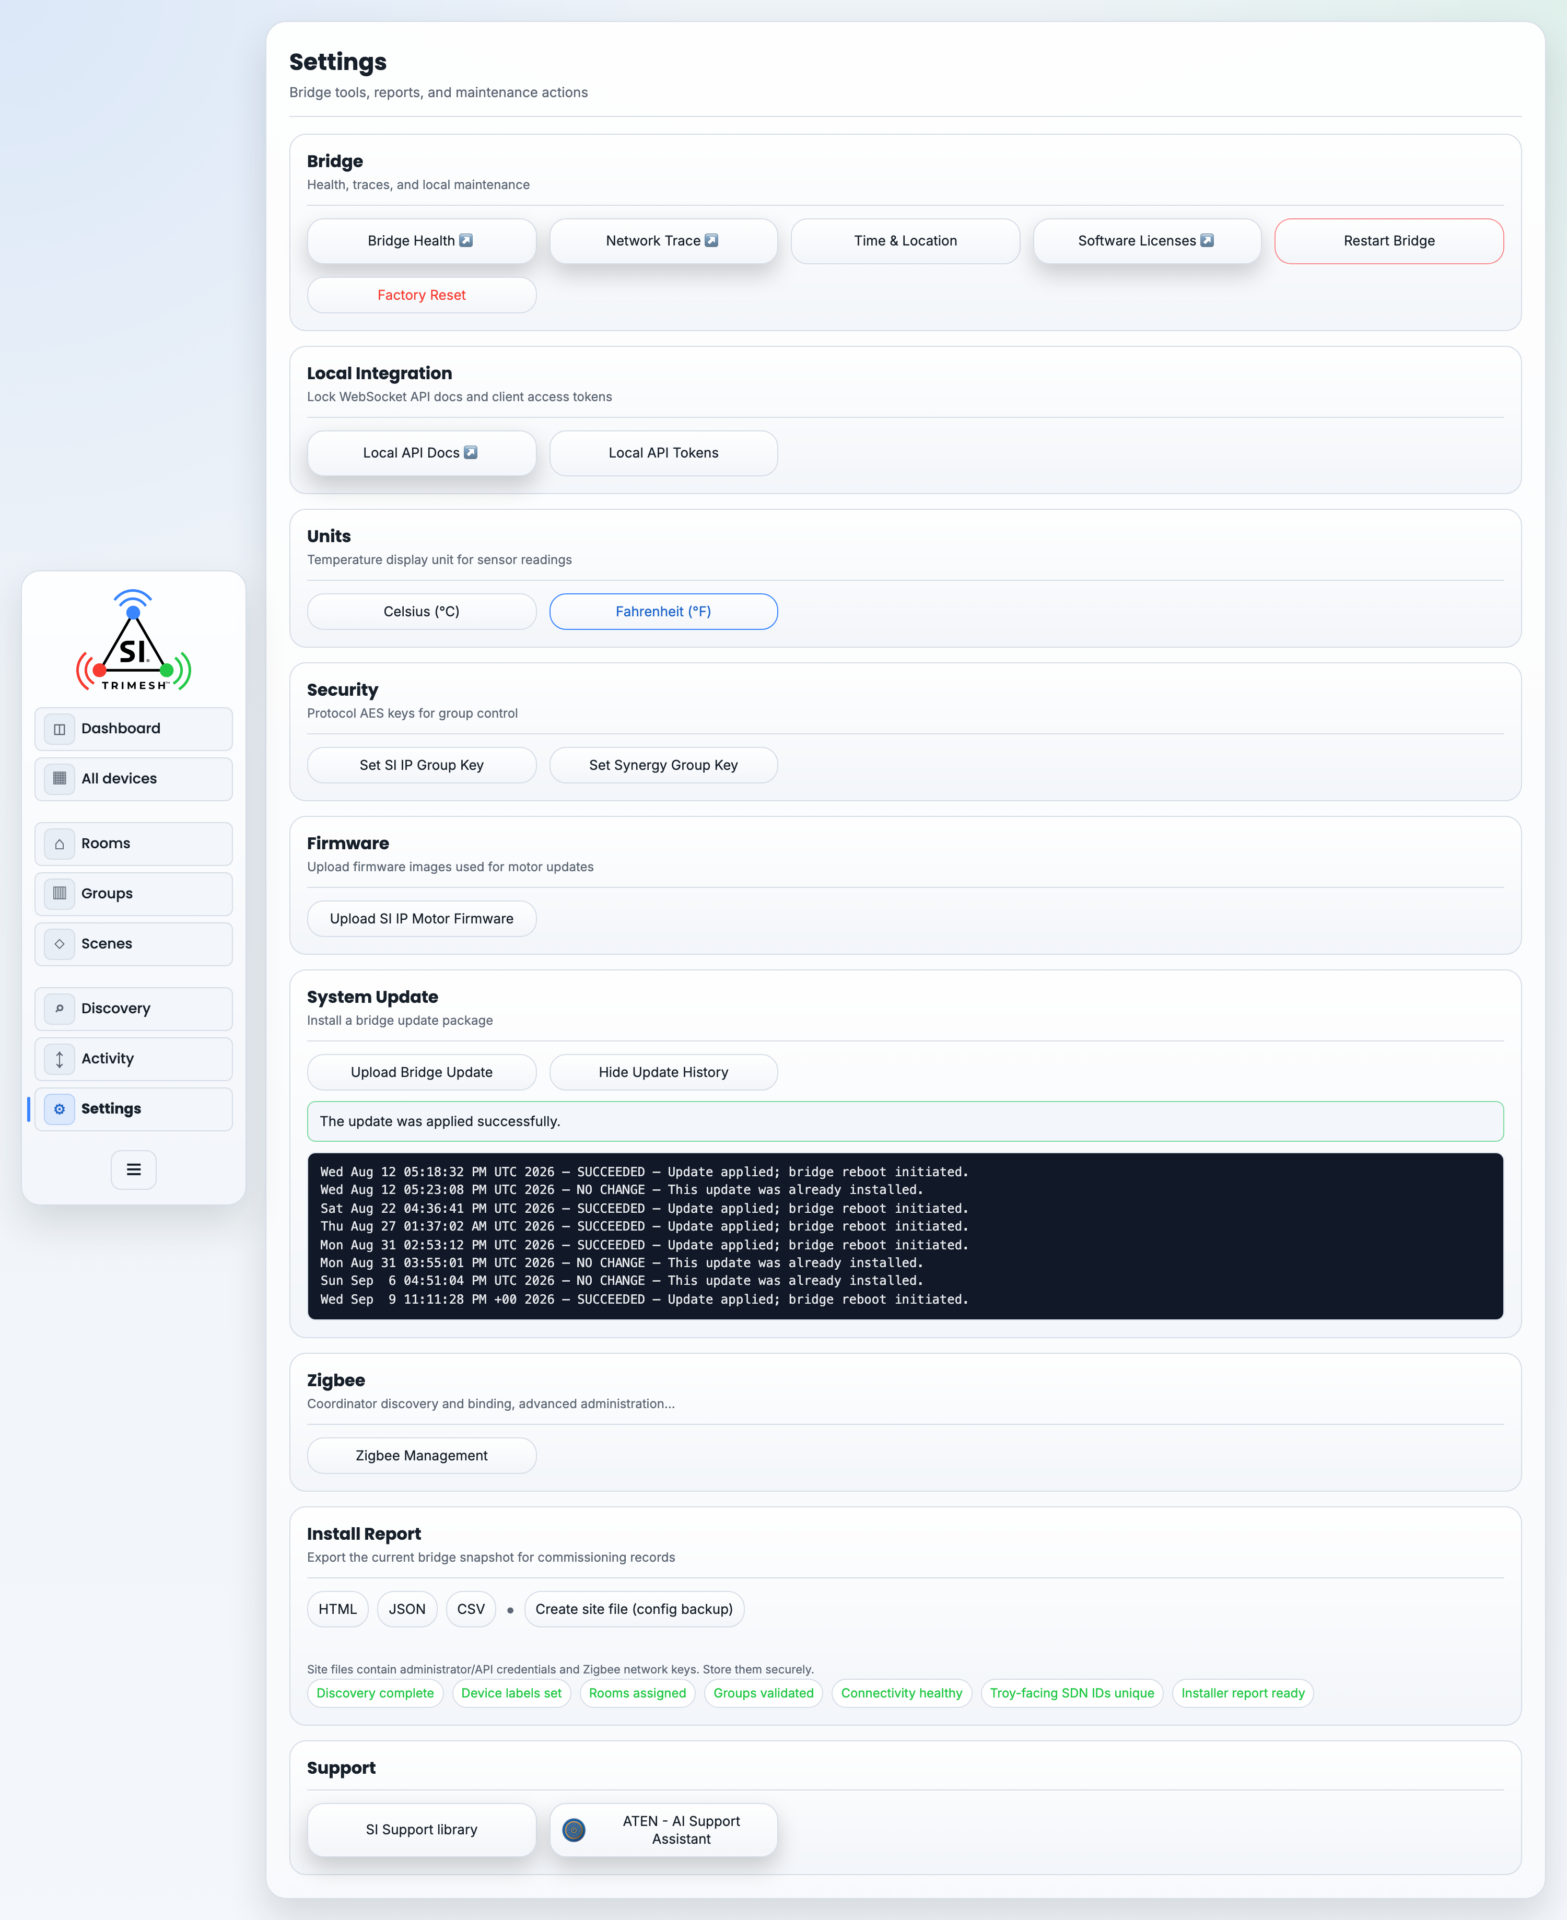
View Update History — the applied dates are the proof.
Step 3 — Set up the Zigbee coordinator #
Why now: every wireless shade joins through it, so it must be placed, powered, adopted and updated before any shade is powered.
Place it well. Antennas up, out in the open, mid-house, near the middle of the shades. Not in the rack, not in a metal cabinet, not on top of the Wi-Fi router. This one box’s position decides how well every battery shade hears commands.
Power it: one PoE network cable, on the same network as the bridge. Then wait — a coordinator answers nothing at all for the first minute or two after power-up. Silence means “wait”, not “no coordinator here”.
Adopt it. Go to Settings → Zigbee → Zigbee Management → Coordinators.
If it already shows bound in slot #1, skip to the credentials below — the bridge often adopts a fresh coordinator by itself.
Otherwise: Scan for coordinators, pick yours by the serial number on its label, choose slot #1, press Bind to slot.
Bind by serial, never by list position. Slot numbers are not stable — on our bench, two coordinators swapped slot numbers overnight. And Bind to slot fires the moment you press it, with no confirmation (its neighbours Unbind, Restart, and Reset all ask first) — re-read the slot dropdown before you press. Success looks like the slot showing the coordinator’s serial number; give it a moment, reload, and check.
Store the coordinator’s credentials. In the Coordinator API credentials section for slot #1, press Auto-provision — once — and wait a few seconds. On success the password field fills in by itself; that is your confirmation. This is the coordinator’s own login, separate from the bridge password — and without it, the airwaves scan in Step 4 is refused. Auto-provision works on a factory-fresh coordinator; if it does not fill in, factory-reset the coordinator (hold its button about 10 seconds until it blinks red), wait for it to come back, and press Auto-provision again. (A SONOFF coordinator shows only a password box — its username is fixed. An SMLIGHT coordinator shows a username box as well.)
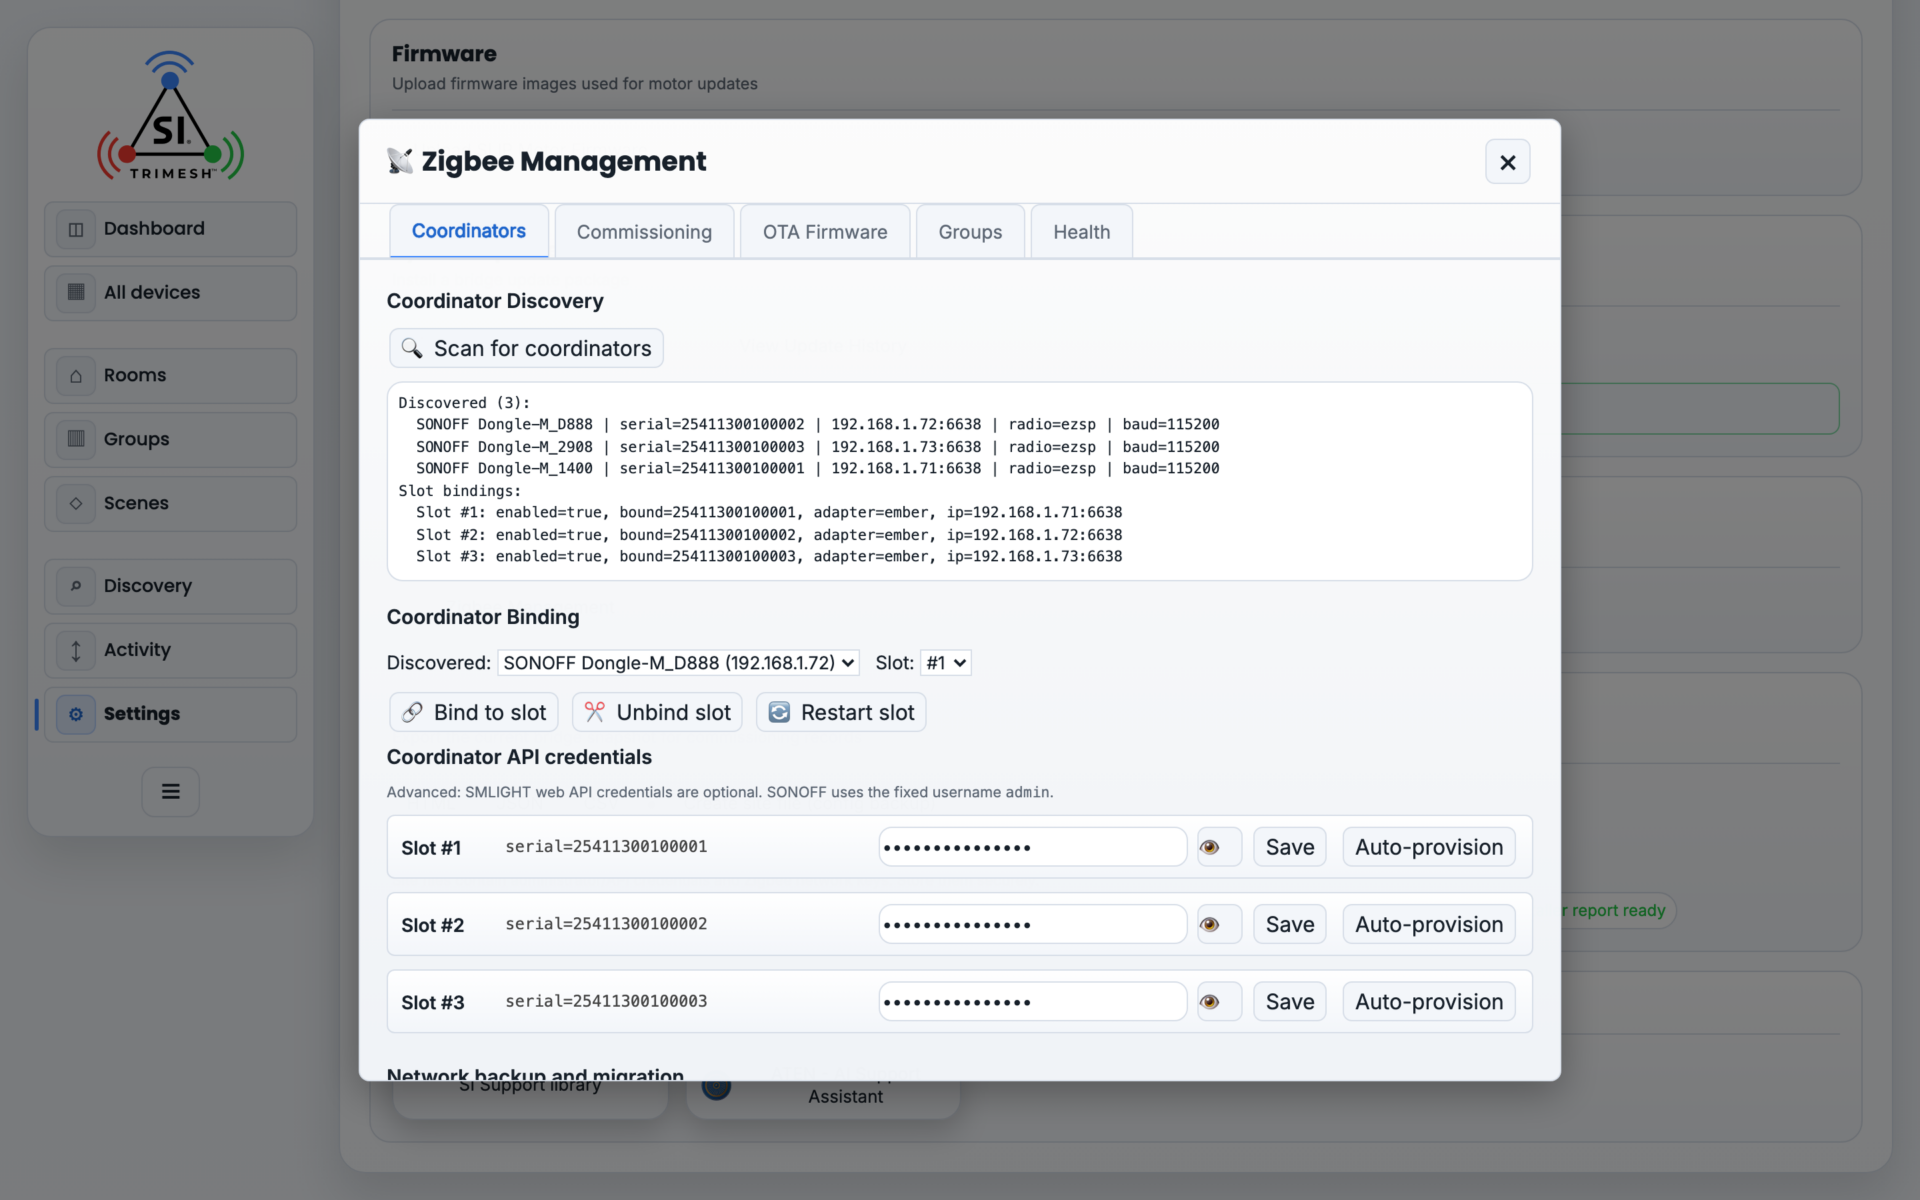
The Coordinators tab, with the slots and the Coordinator API credentials section.
Update the coordinator’s firmware. The coordinator has its own firmware — separate from the bridge’s, and the bridge update in Step 2 does not touch it — so do this now, before any shade joins:
On Discovery / Pairing, read the coordinator’s IP address off its row and browse to
http://+ that address (plain http, not https). Log in asadminwith the password the bridge just created for it: Zigbee Management → Coordinators → Coordinator API credentials → the eye button (Show API password). (If you opened the coordinator’s page before the bridge was on the network, it made you create a password instead. Type that same password into the bridge’s Coordinator API credentials and press Save — Auto-provision will not work on a coordinator that already has one. If the two do not match, the airwaves scan in Step 4 refuses with “Unauthorized”.)Open Firmware in its menu. There are two entries, one per chip: EFR32MG24 (the Zigbee side) and ESP32-D0WDR2-V3 (the network side). For each one: Check for Updates → Stable tab → Flash Firmware on the newest version. Do not unplug it while it flashes. Its Overview page should then read “The firmware is up to date.”
On the same page, switch on Automatic Updates — it installs stable updates between 02:00 and 03:00 and restarts the coordinator afterwards. Check Overview shows Automatic Updates as Enabled.
If the job has more than one coordinator, do all of this on each.
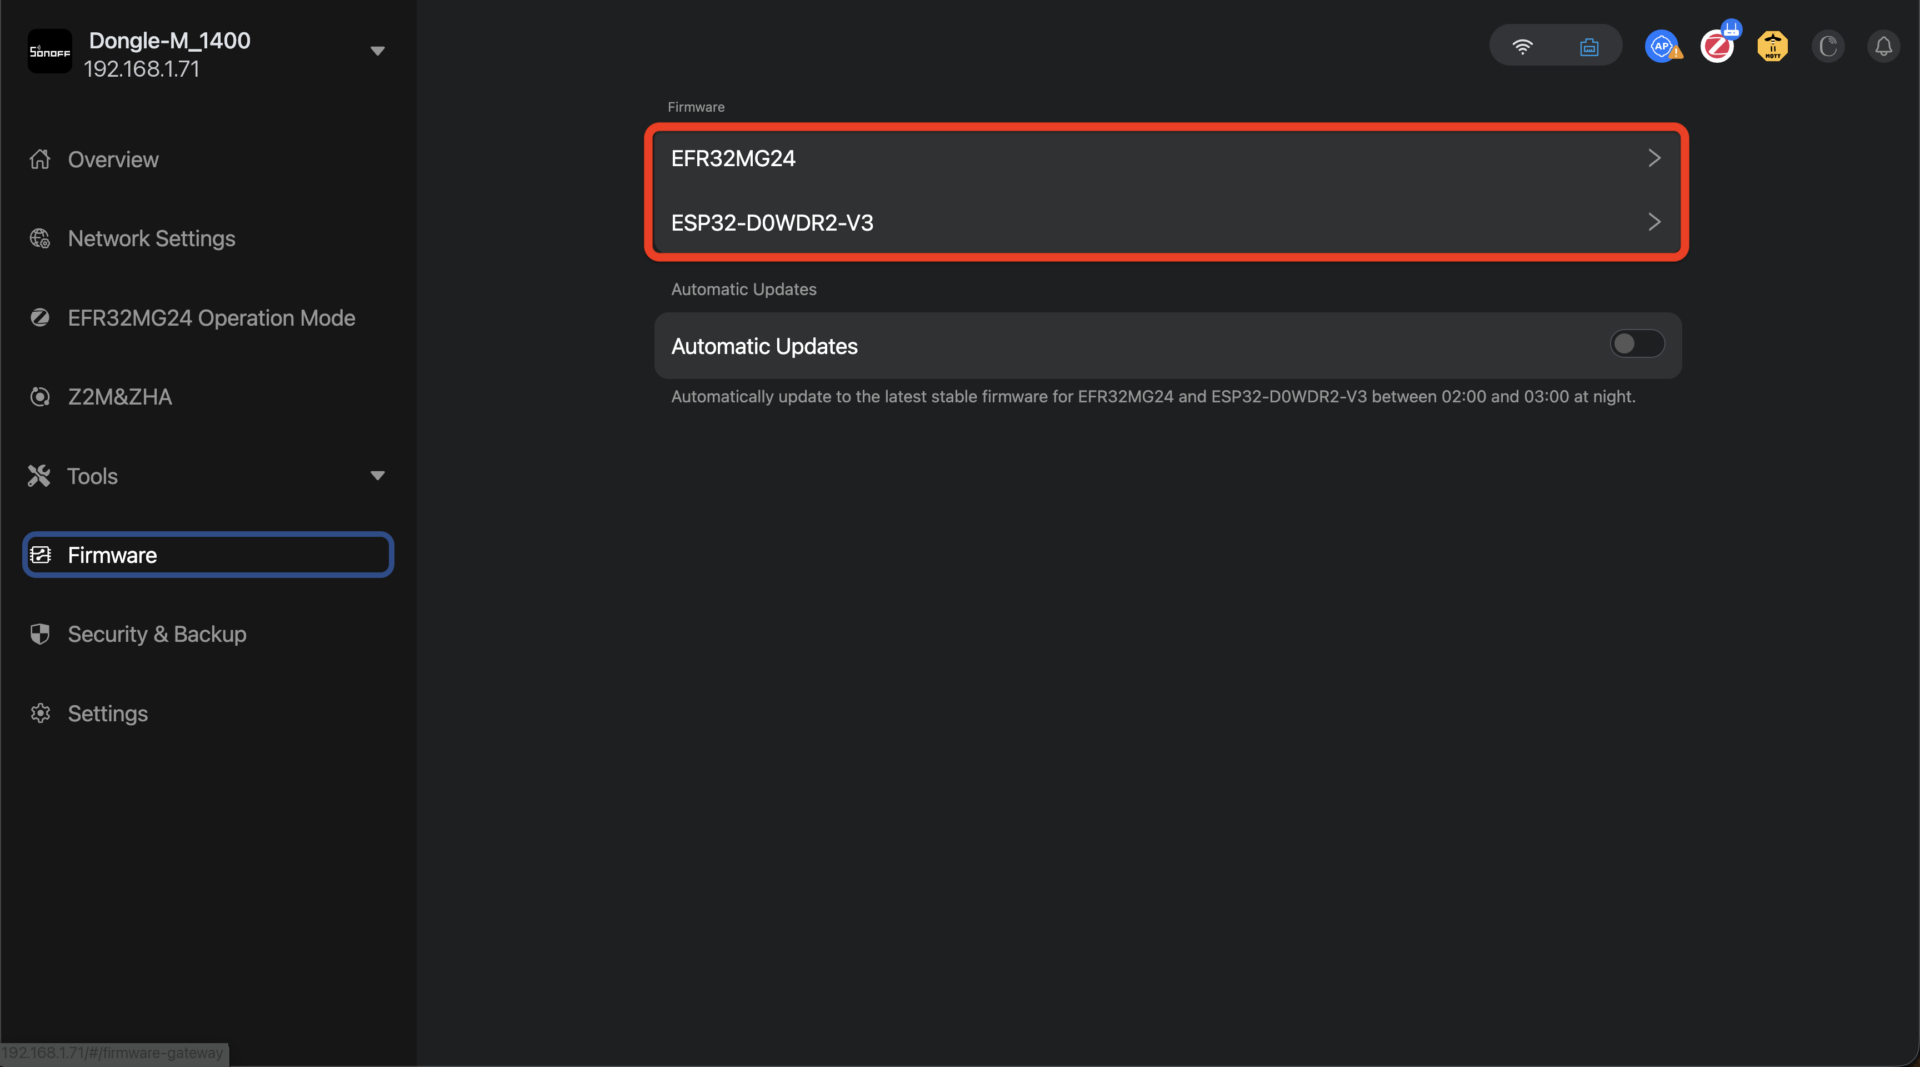
The coordinator’s Firmware page: one entry per chip and the Automatic Updates switch.
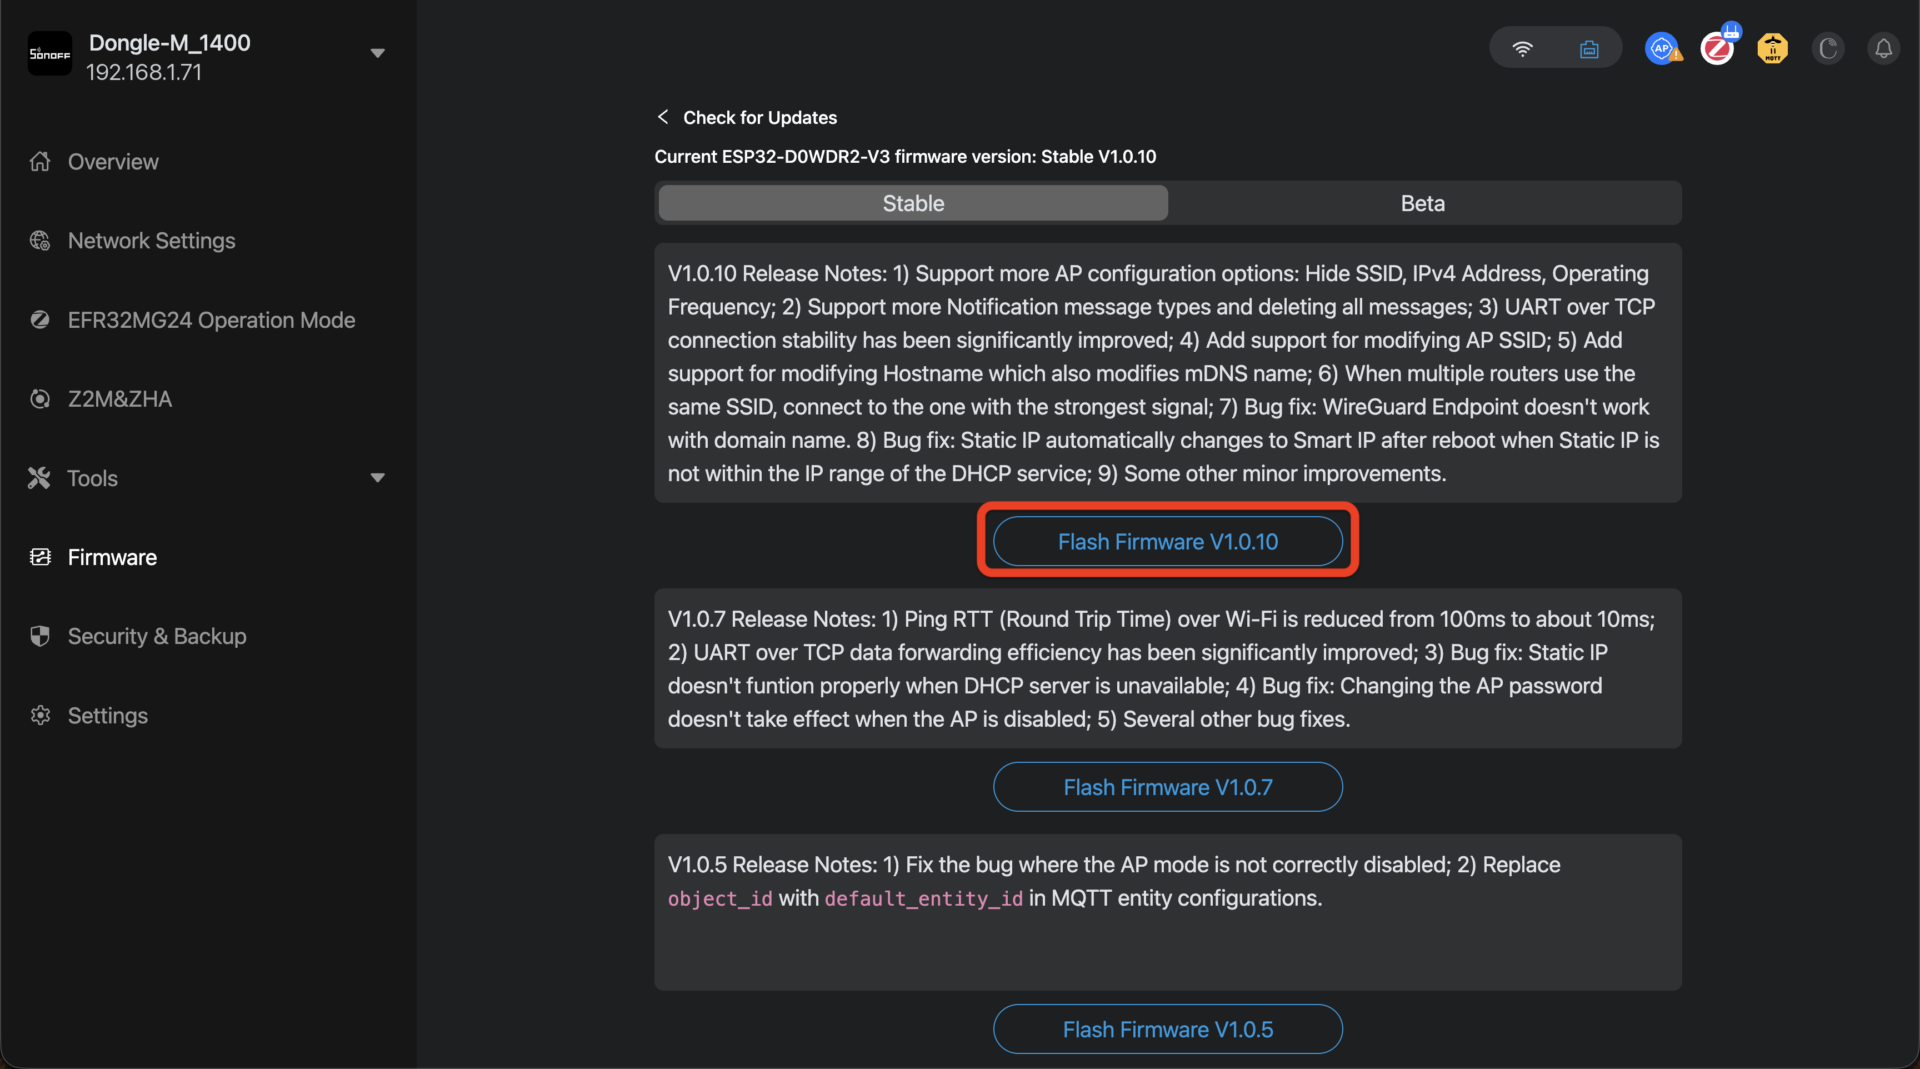
Check for Updates: the Stable tab with a Flash Firmware button per version.
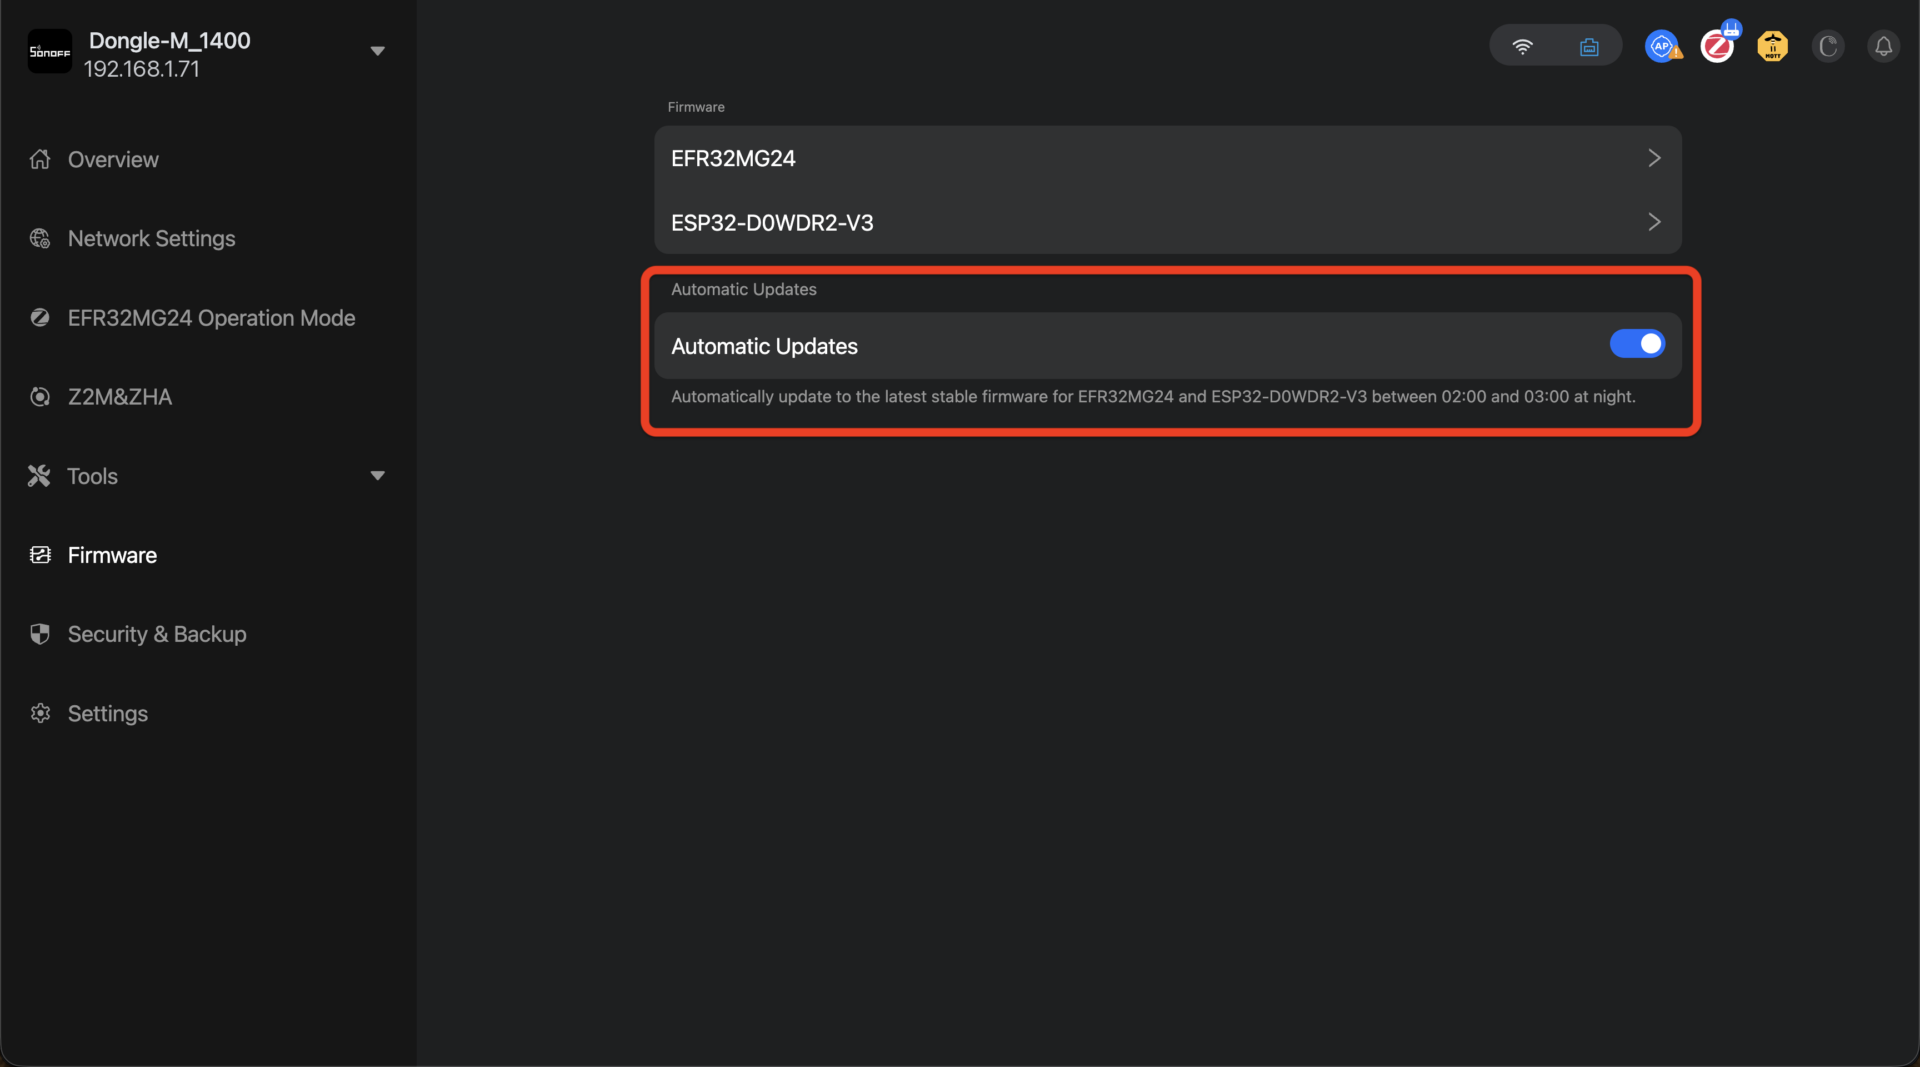
Automatic Updates switched on.
Multi-coordinator jobs (large homes): a normal home needs one. If you have more than one, each runs its own separate wireless network — bind each to its own slot, and see the channel note in Step 4.
Step 4 — Check the airwaves and set the channel #
Why now: do it while the network is empty. A channel change is safe even later — proven on a fully loaded test system — but picking a quiet channel before anything joins costs one minute and zero disruption.
Advanced view first, or the coordinator page will not open and there is no Scan button.
Then Discovery → the Coordinator #1 (serial=…) row → View → scroll to Channel health:.
1. Press “Scan 2.4 GHz channels”. The button greys out for 15 seconds. That is only a double-press guard — the scan itself came back in about five seconds on a live system. Watch the text block at the bottom instead: “Scanning: true” means it is working, and a new “Scan timestamp:” means the report has arrived. If the timestamp has not moved, press Refresh on the Coordinator health: line above. If this coordinator has been scanned before, the old chart stays on screen the whole time, so the timestamp is your only proof the picture is new.
2. Read the sentence above the chart. – “No interference detected…” — write down both channel numbers and carry on. – “Potential interference detected…” or “Scan complete. Compare Wi-Fi and Zigbee energy…” — look at the chart.
3. Read the chart in one move. Amber bars above the centre line are your shade network; wide blue bars below it are house Wi-Fi. The bottom scale is MHz. Find the amber bar labelled “ch N” and look straight down. Blue sitting over it means they are sharing spectrum.
Bar height is relative to that scan only, so tall bars do not mean loud. Judge by position on the scale, and point at a bar for its real energy and MHz range.
4. Pick a channel. Use Zigbee radio channel: and prefer Recommended Channels (ZLL) — 11, 15, 20, 25 — choosing the one whose part of the scale is clearest of blue. The tool does not choose for you. Every fresh coordinator starts on channel 11, so on a multi-coordinator job move the second and third deliberately; the bridge will let two coordinators sit on the same channel.
The confirmation is honest about the cost: the coordinator restarts and some devices may need re-pairing. Do this before you commission shades. Then scan again, because the readout shows the new channel immediately while the chart is still the old measurement.
If it will not scan, the text block says why. “Coordinator API credentials are not configured yet.” means the coordinator needs its API password saved first (Step 3). “Unauthorized” means a stored password is wrong — retype it and Save. “This feature is only available on SONOFF Dongle-M and SMLIGHT SLZB-06 series coordinators.” means the scan is not available on this coordinator; carry on with the rest of the commissioning.
Photograph the text block for your notes and for any support case: it holds both channels, the verdict and the time on one screen.
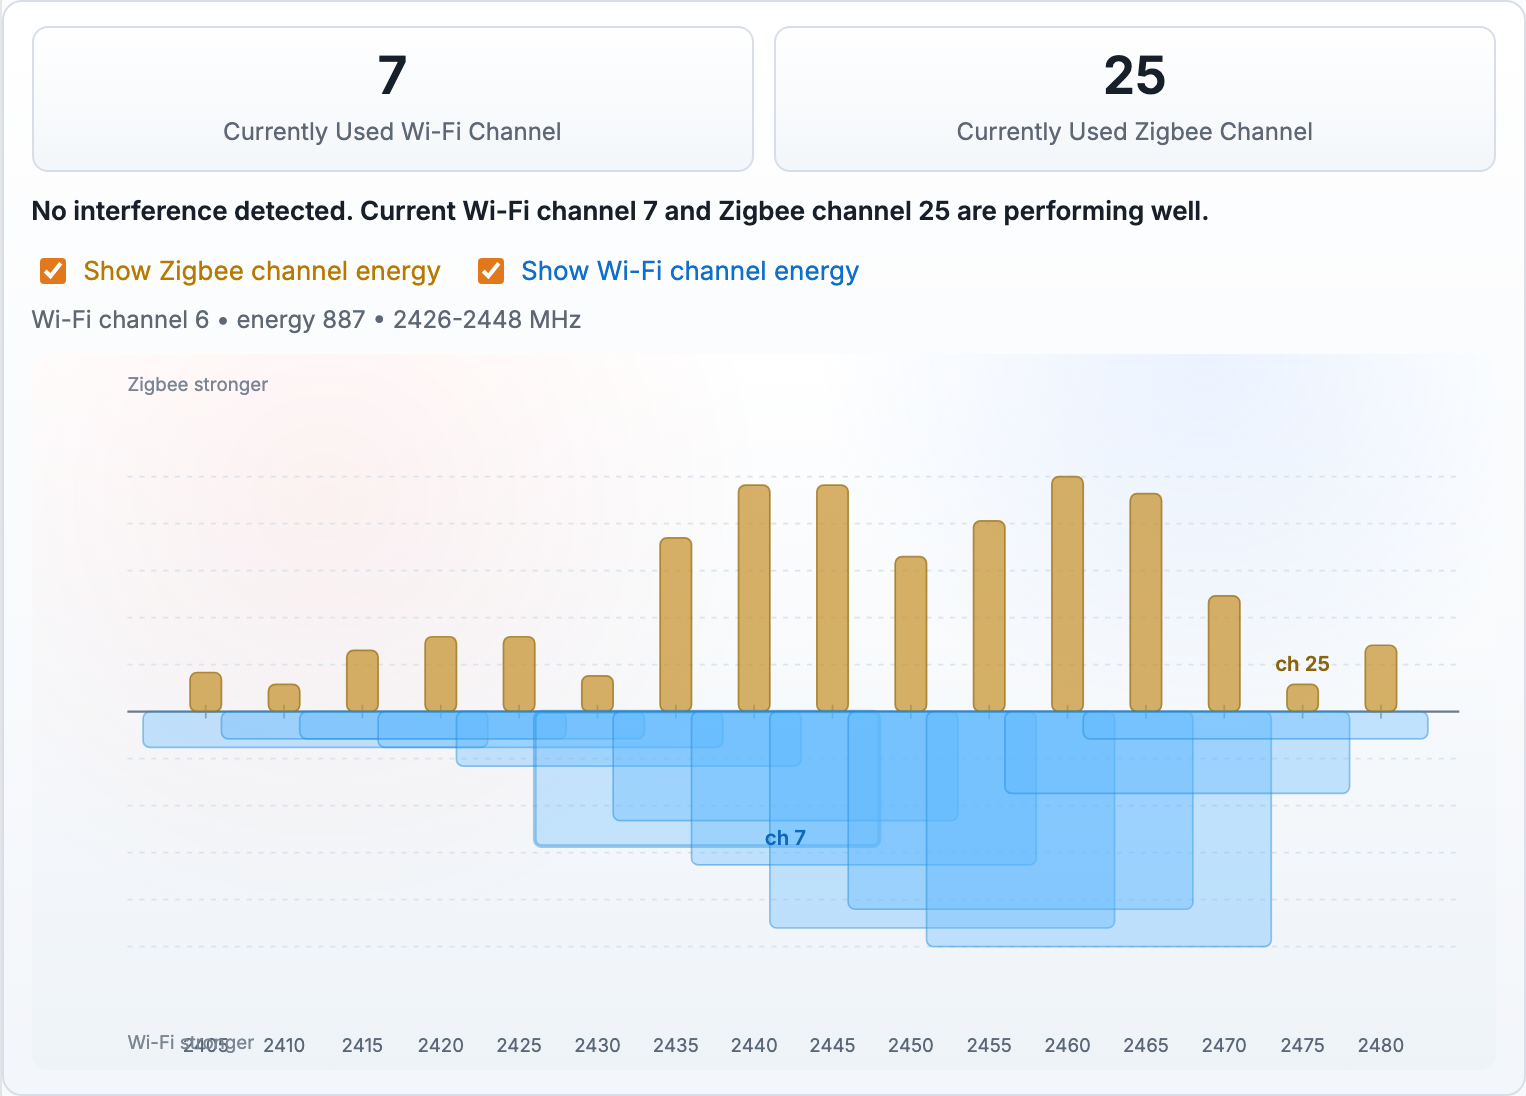
A real scan result. The two tiles give the channel each system is on, the sentence is the verdict, and in the chart the amber bars above the line are Zigbee while the blue blocks below are house Wi-Fi. The scale along the bottom is MHz.

The channel selector, with the four recommended channels grouped at the top.
Step 5 — Build the network: routers first #
Why this order: mains-powered devices are routers — they carry the signal for the battery shades. Battery shades joined before the routers exist get weak links and mystery dropouts.
Join every mains-powered Zigbee device before any battery shade: Low Voltage motors, Smart Plugs, Smart Outlets. Start nearest the coordinator and work outward.
Open pairing. There are two places to do it, and for joining devices the Discovery / Pairing page is the one to use — the pairing controls sit at the top of the page where the new devices will appear:
Discovery / Pairing page (recommended): pick your coordinator from the Zigbee dropdown — its options read Coordinator #1 · serial, so you can match the serial on the label — then press Open network for pairing. The button beside it is the status: it reads Pairing closed, then Coordinator #1 open · 2:58 remaining while the window is open.
Zigbee Management → Commissioning: the same thing, plus the only place you can change the window length — Pairing (s), 180 by default, 254 maximum. The Discovery button uses whatever number is in that field.
Three rules:
One pairing window at a time, bridge-wide. Opening pairing on a second coordinator silently closes the first. Finish one coordinator’s devices, then move to the next.
The window closes itself when the countdown ends. Press Open network for pairing again for the next device — re-opening it costs nothing. Working one device at a time, you will re-open it often; that is normal.
Close it deliberately when you step away (Disable pairing on the Commissioning tab). Typing 0 in the seconds field does not close anything — 0 is read as “unset” and becomes the 180-second default.
Putting a device into joining mode:
Nino or Nano motor (Low Voltage or WireFree): push and hold the button on the motor head through two jogs (a jog is a short down-and-up move) — hold through the first, release after the second. The confirmation light differs by family: an SI Nino flashes red; a Somfy Nano flashes amber — the colour is what tells them apart, not the pattern. On a WireFree shade the button is recessed in the end bracket — reach it with a paper clip or small Allen key.
Smart Plug / Smart Outlet: hold the button on the side until its light begins to flash.
New arrivals appear in Discovery with a NEW badge. The join can take 10–20 seconds to show. Do not repeat the button sequence in that window — wait the full 20 seconds before trying again.
Plugs and outlets list as type “switch”, not “motor”. They are on the network when you see them in the switch section — do not hunt for them among the shades.
Name every router as it joins, exactly the way Step 6 names the shades — Identify, Rename, assign its Room. Plugs and Low Voltage shades need real names too; anything left unnamed prints as a raw code on every report.

The Discovery / Pairing page with a pairing window open and its countdown running.
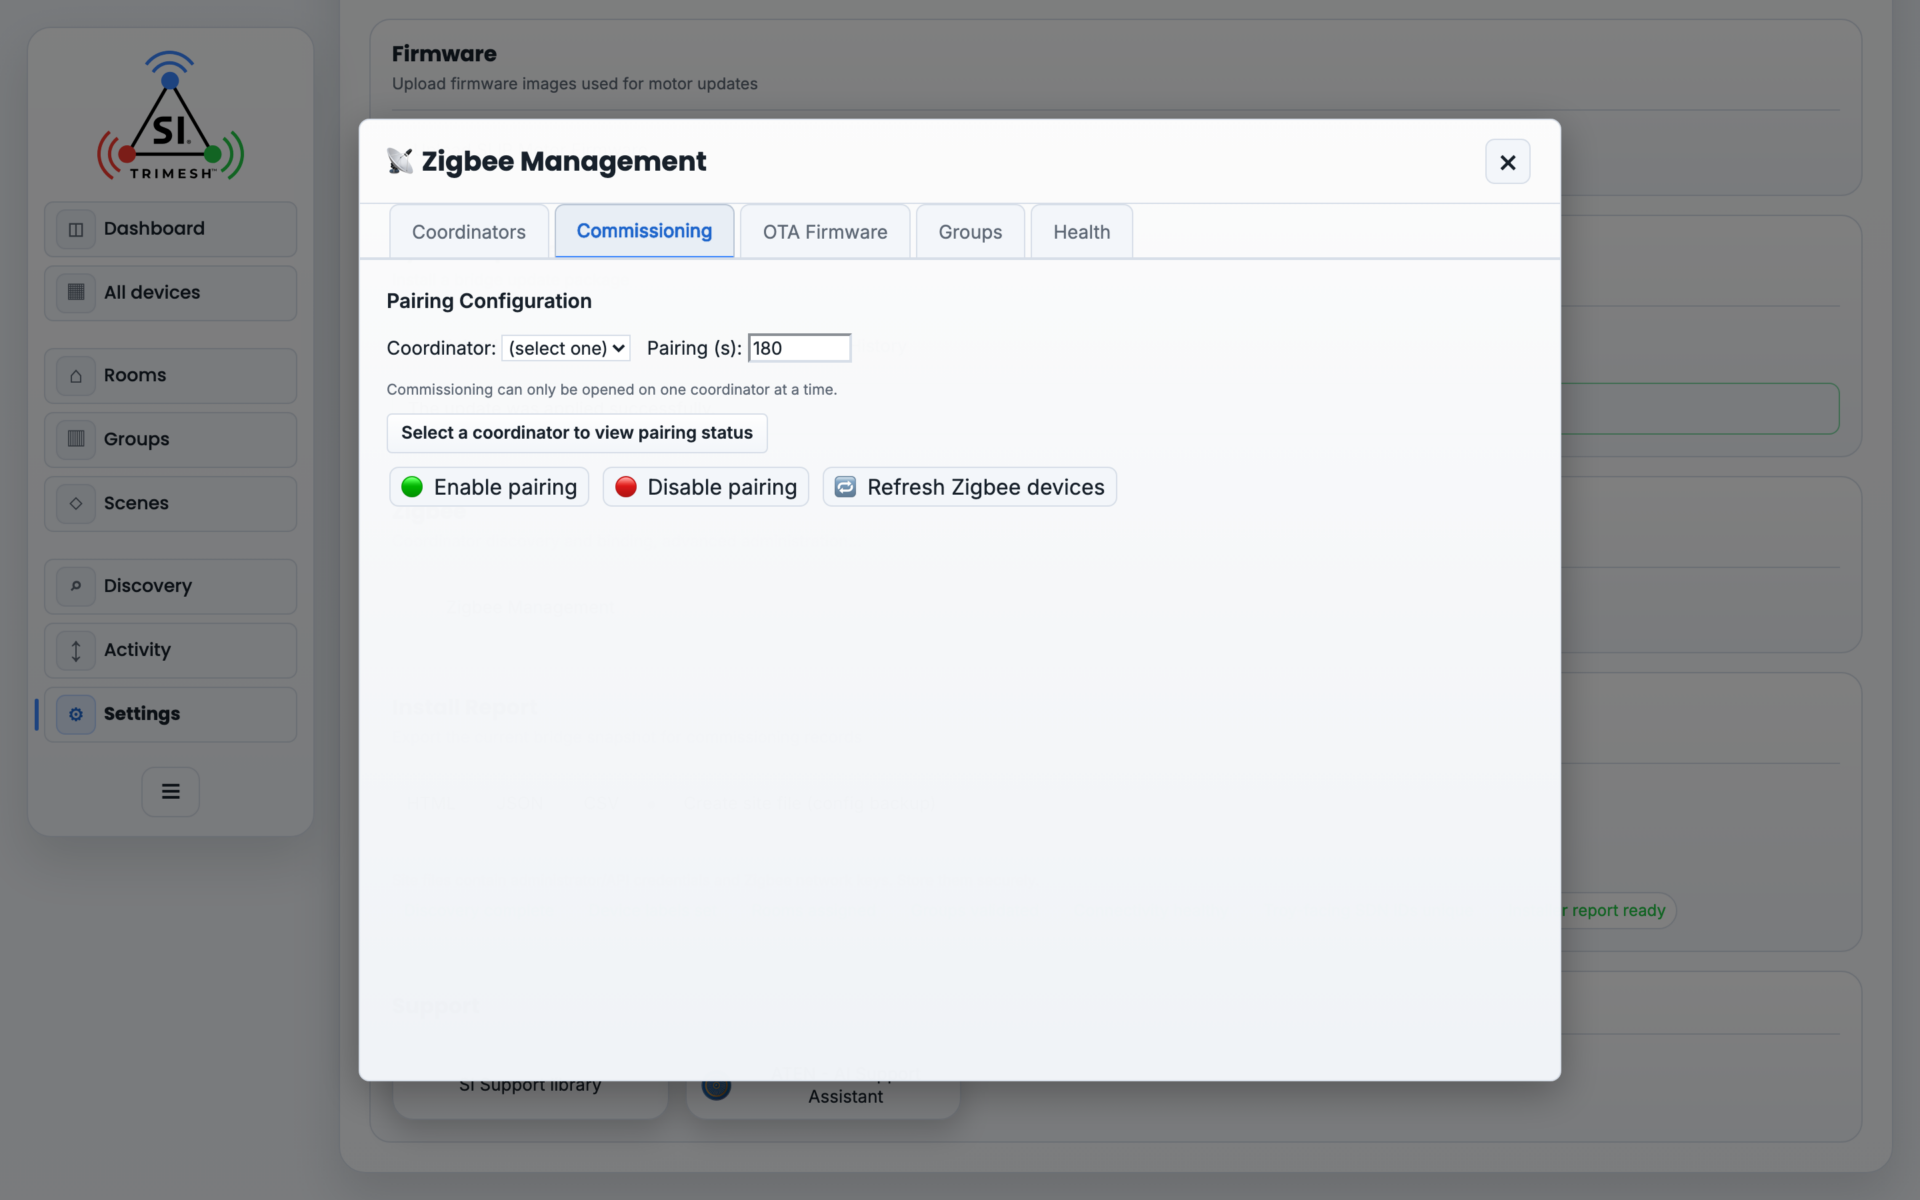
The Commissioning tab, where the window length is set.
Step 6 — Add the shades, one at a time #
Why one at a time: crossed names are how limits land on the wrong shade later. Two minutes per shade here saves an afternoon of untangling.
For each battery shade in turn — power it, re-open pairing if the countdown has run out, join it (Step 5’s button sequence), then before touching the next one:
Identify. On its Discovery row press Jog (shades) or Identify (plugs, outlets, remotes) — the shade gives a short jog, a plug blinks. Now you know which physical device this row is. New arrivals are highlighted and counted at the top of the page (“2 new devices found”); the highlights fade on their own, and Clear highlights clears them by hand.
Rename. Click its Label — the column immediately right of Device ID — and give it its final name (“Living Room Right Blackout”). Reload and check the name is showing. A shade arriving named “undefined” or as a code like
0x7cc6...is a placeholder, not a problem — but never leave it unnamed: an unnamed shade prints as raw code on every report and looks exactly like a failed join.Room. A fresh bridge has no rooms: Rooms → Edit → Create new room, then assign the shade with the Device / Room picker at the top of the Rooms page. Reload and check.
If a shade will not join, most likely first:
It never entered joining mode — you released after the first jog instead of the second. Redo the hold, through two jogs.
You pressed the button again during the 10–20 second wait. Wait it out, then redo the sequence once.
It already belongs to another system or coordinator. Remove it there, or factory-reset the motor using the reset procedure in that motor’s own instructions.
It is too far from anything powered. Join it near the coordinator or add a Smart Plug between them.
Naming tip for the control-system side: the TRO.Y truncates names to 16 characters. Keep the first 16 characters of every shade name unique — “Living Room Right Sheer” and “Living Room Right Blackout” both become “Living Room Righ” on the control system.
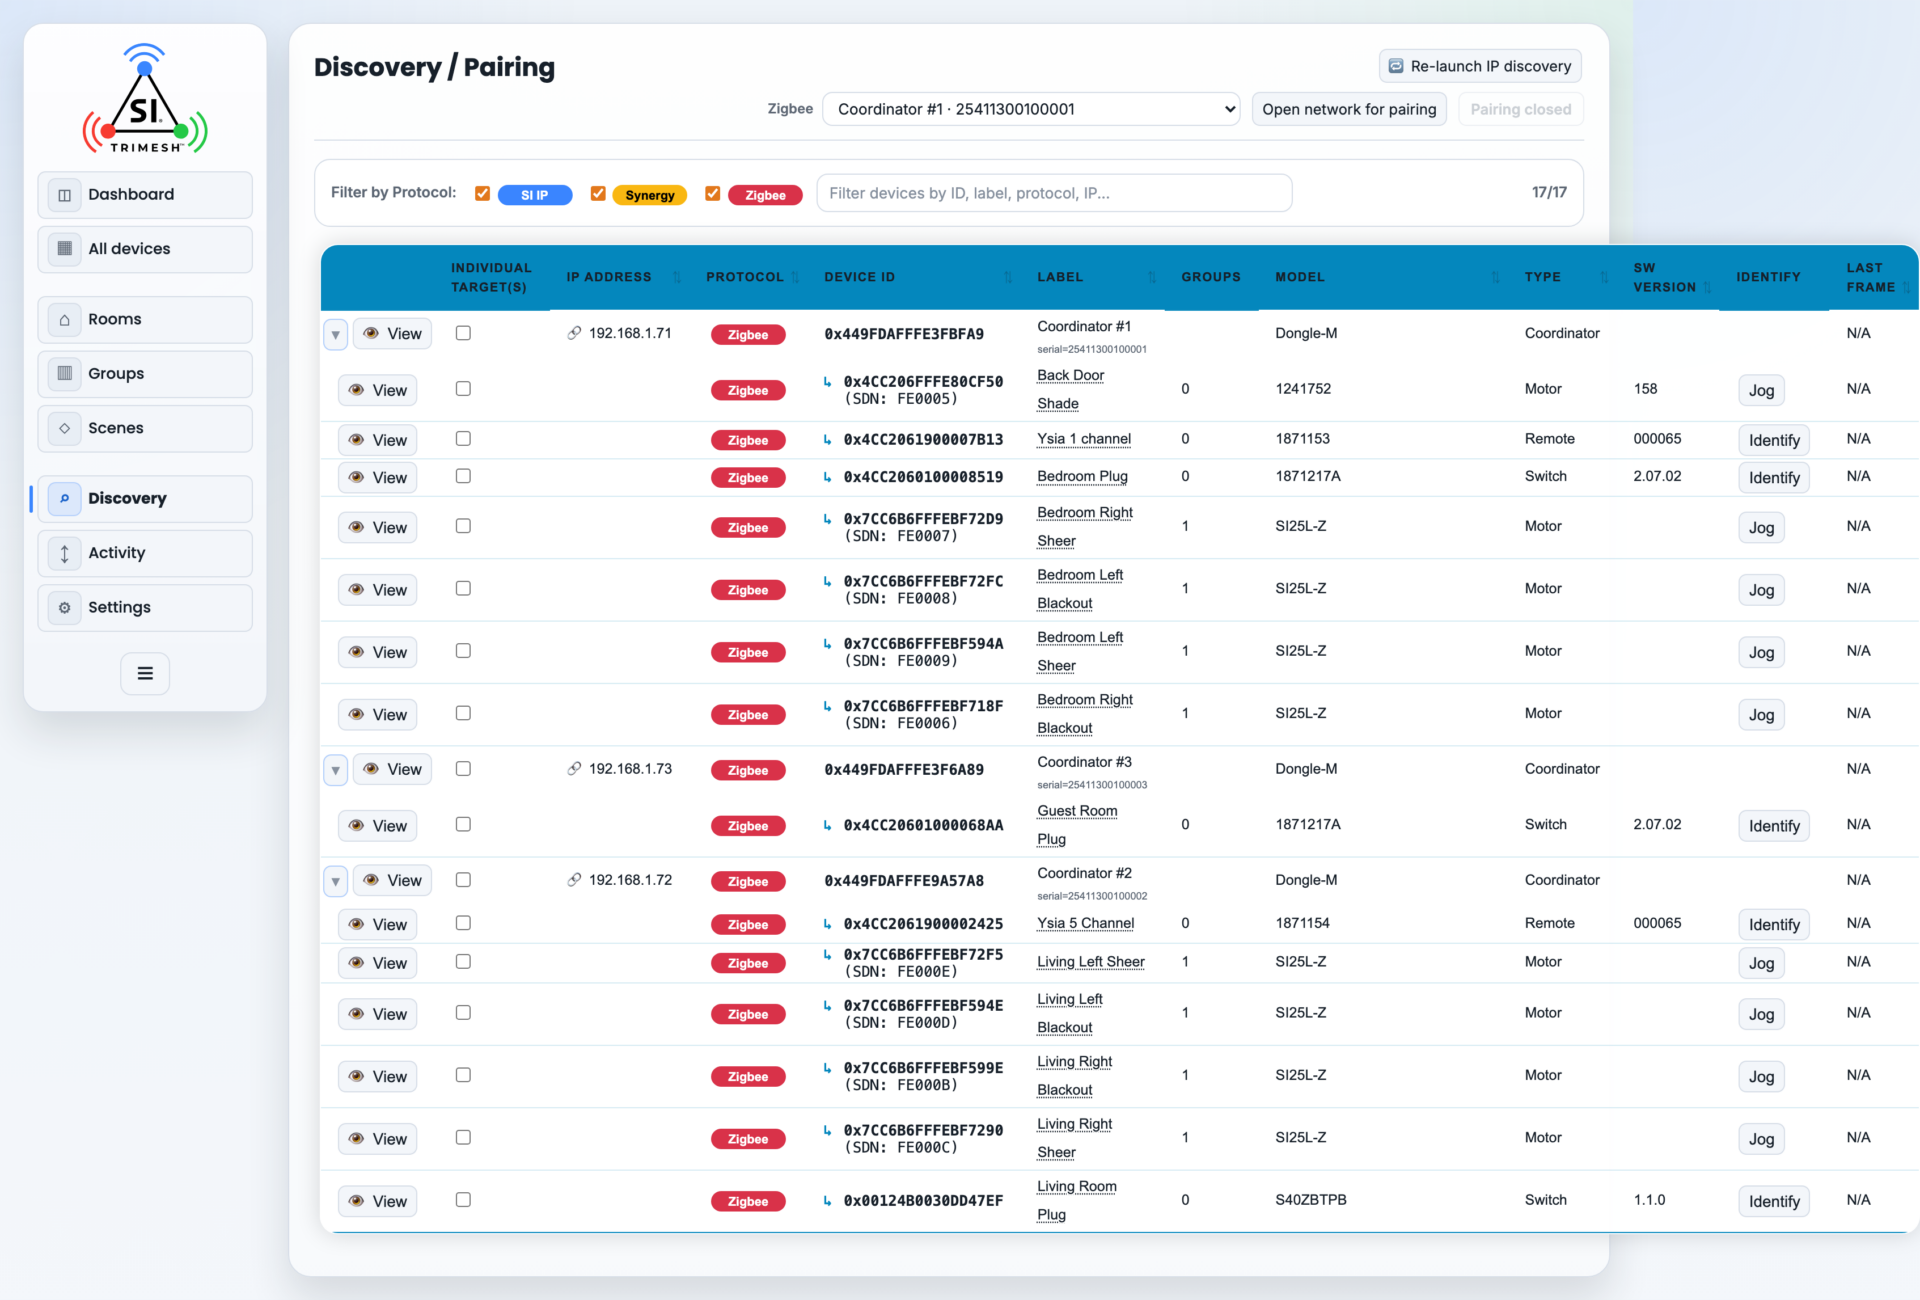
Discovery with Identify and the clickable Label column.
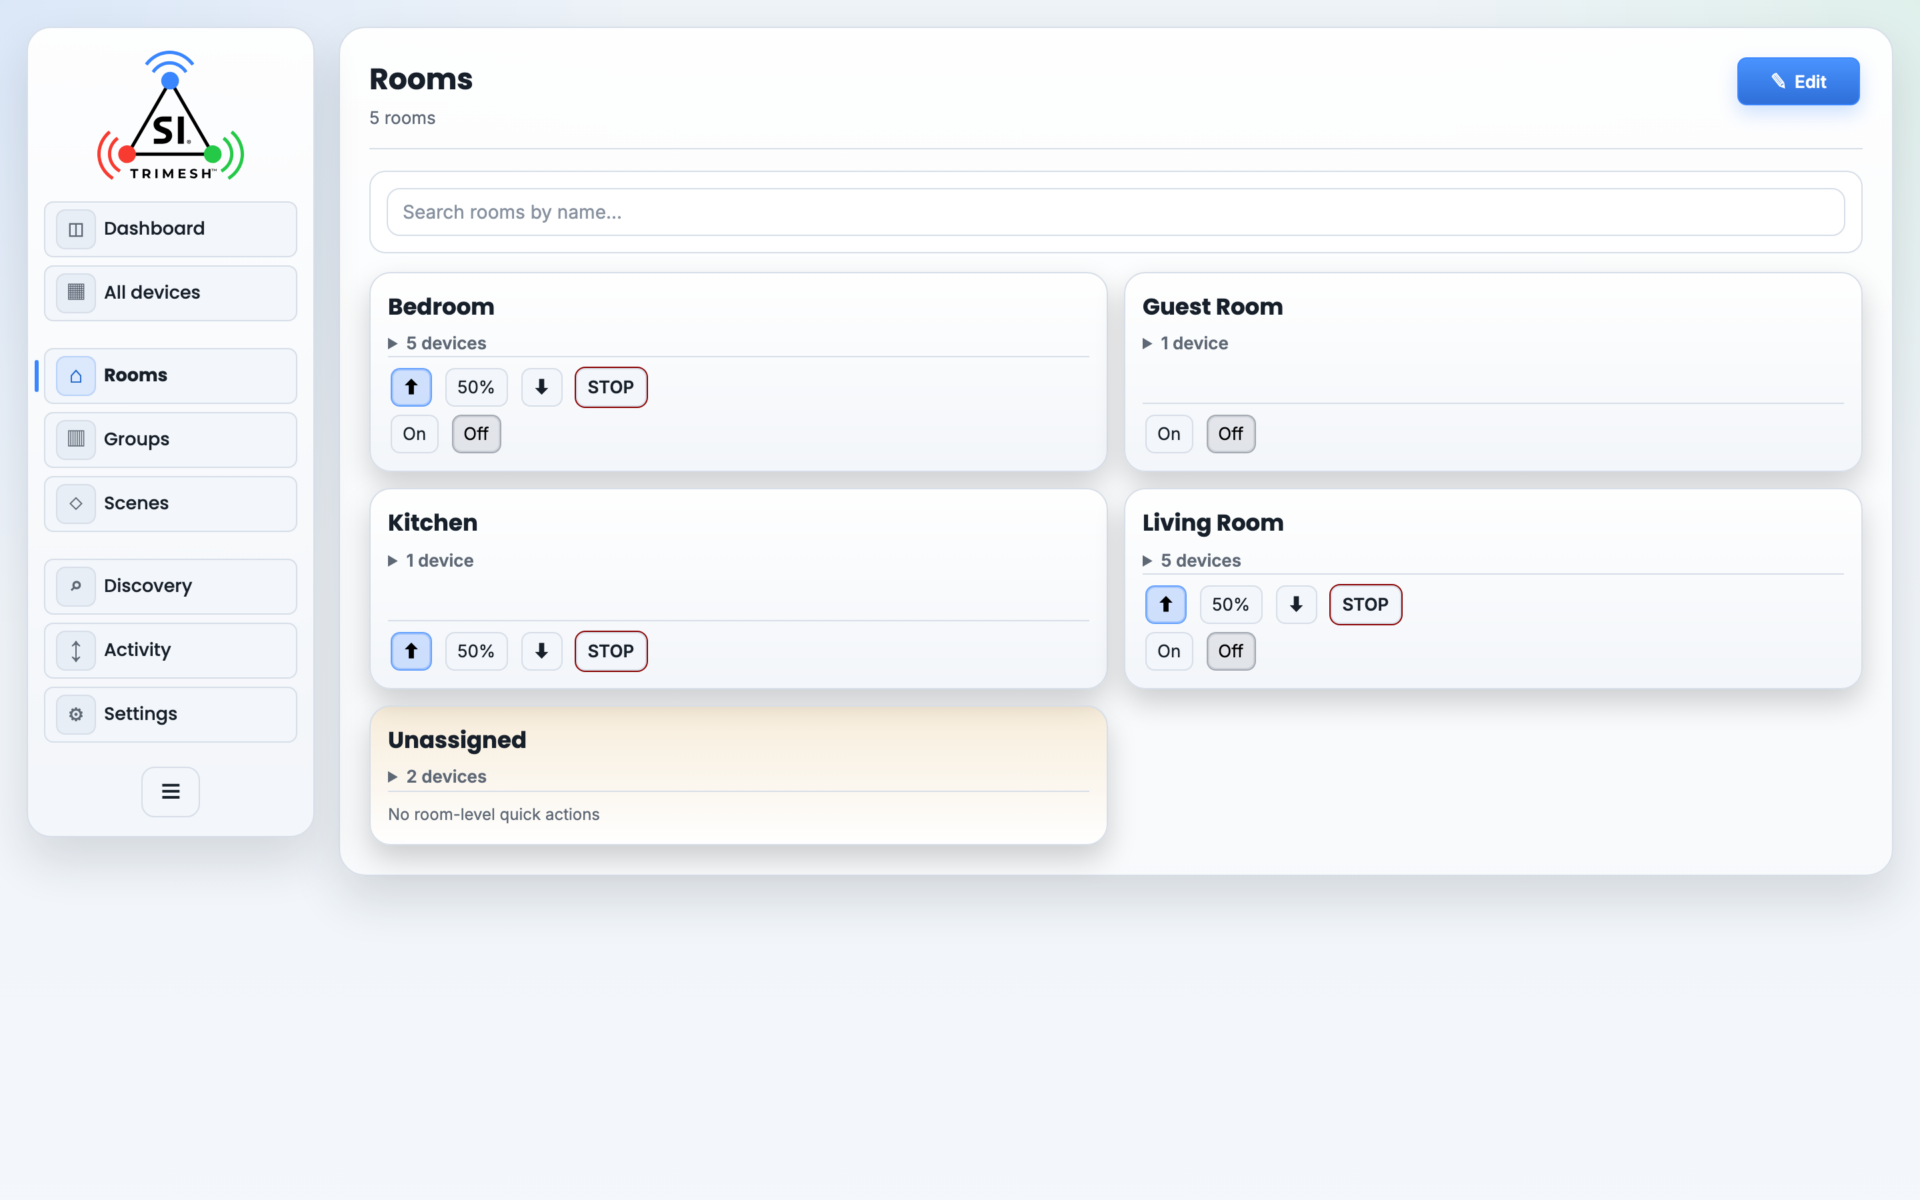
The Rooms page with Create new room and the assignment picker.
Step 7 — Direction and limits #
Why before groups and scenes: limits are the one operation that can damage a shade, and a percentage command is only safe once limits exist. Take your time — this is the one step that must not be rushed, eyes on the fabric.
Stand where you can see the shade, hand near STOP, one shade at a time.
Direction first. Open the shade’s control panel — on the All devices page, tap the shade’s tile (or press View on its Discovery row). The first move is a short jog, never a full run — with no limits set, neither direction is safe yet. Move a short way, press STOP, and check one thing: did it move the way you asked? (Ignore the position number for now — a shade with no limits always reads 0.) If it moved the wrong way:
SI Zigbee motor: SI SW Specific controls → Rotation direction → Apply. It fires with no confirmation — press once, re-test.
Somfy Zigbee motor: Reverse direction (it asks to confirm).
Invert cover reverses both the movement and the reading together — use it when both are backwards.
Then limits. If your shades arrived with factory limits (they run and stop where they should on a full watched travel), skip to Step 8. Setting or fixing limits on an SI Zigbee motor (SI SW Specific controls → Limits), the rules that are not on the screen:
Creep to the spot with the panel’s jog and step buttons and STOP — never a typed position. A shade with no limits reads position 0, and a typed position can run it away at speed.
If a boundary already holds a limit, Clear it first (choose Clear, choose the end, press Apply) — a save onto an occupied boundary is silently ignored, and a stored limit also clamps travel, so the shade may refuse to reach the new spot until the old limit is cleared.
Do not save a limit immediately after a Clear — the motor jogs to acknowledge the clear, and a save arriving during that jog is swallowed. Let it settle.
Saving an end means: choose Set, choose Upper or Lower, press Apply — one selector aims both ends, so re-read it before every Apply. Nothing is enforced or reported until BOTH ends are set. A motor with one limit stored behaves as if it has none — half a pair looks like total failure. Set the top, set the bottom, then run the shade end to end, watching it. On that full run, also read the number: fully open should read 0 (the displayed number depends on the shade’s Invert cover setting; if movement and number are both backwards, Invert cover flips both together).
The shade must be fully stopped — several seconds after the fabric looks still — before any save; a save on a moving shade returns ok and stores nothing.
On the plug-in (PoE) limits row the button is Set, and for about five seconds after you press it the whole page stops accepting clicks. That is normal. Wait for it to come back rather than clicking again.
Somfy Zigbee motors store a limit immediately (Store limit → Store) and enforce each one on its own; there is no clear — to widen a limit, use the step-past-the-limit control, then Store the new spot.
A note that prevents a false alarm: SI Zigbee motors never display their limit values anywhere. The only readback is in the shade’s Properties panel — the limits entry reads “configured” once both ends are stored. “No numbers shown” is normal for the family.
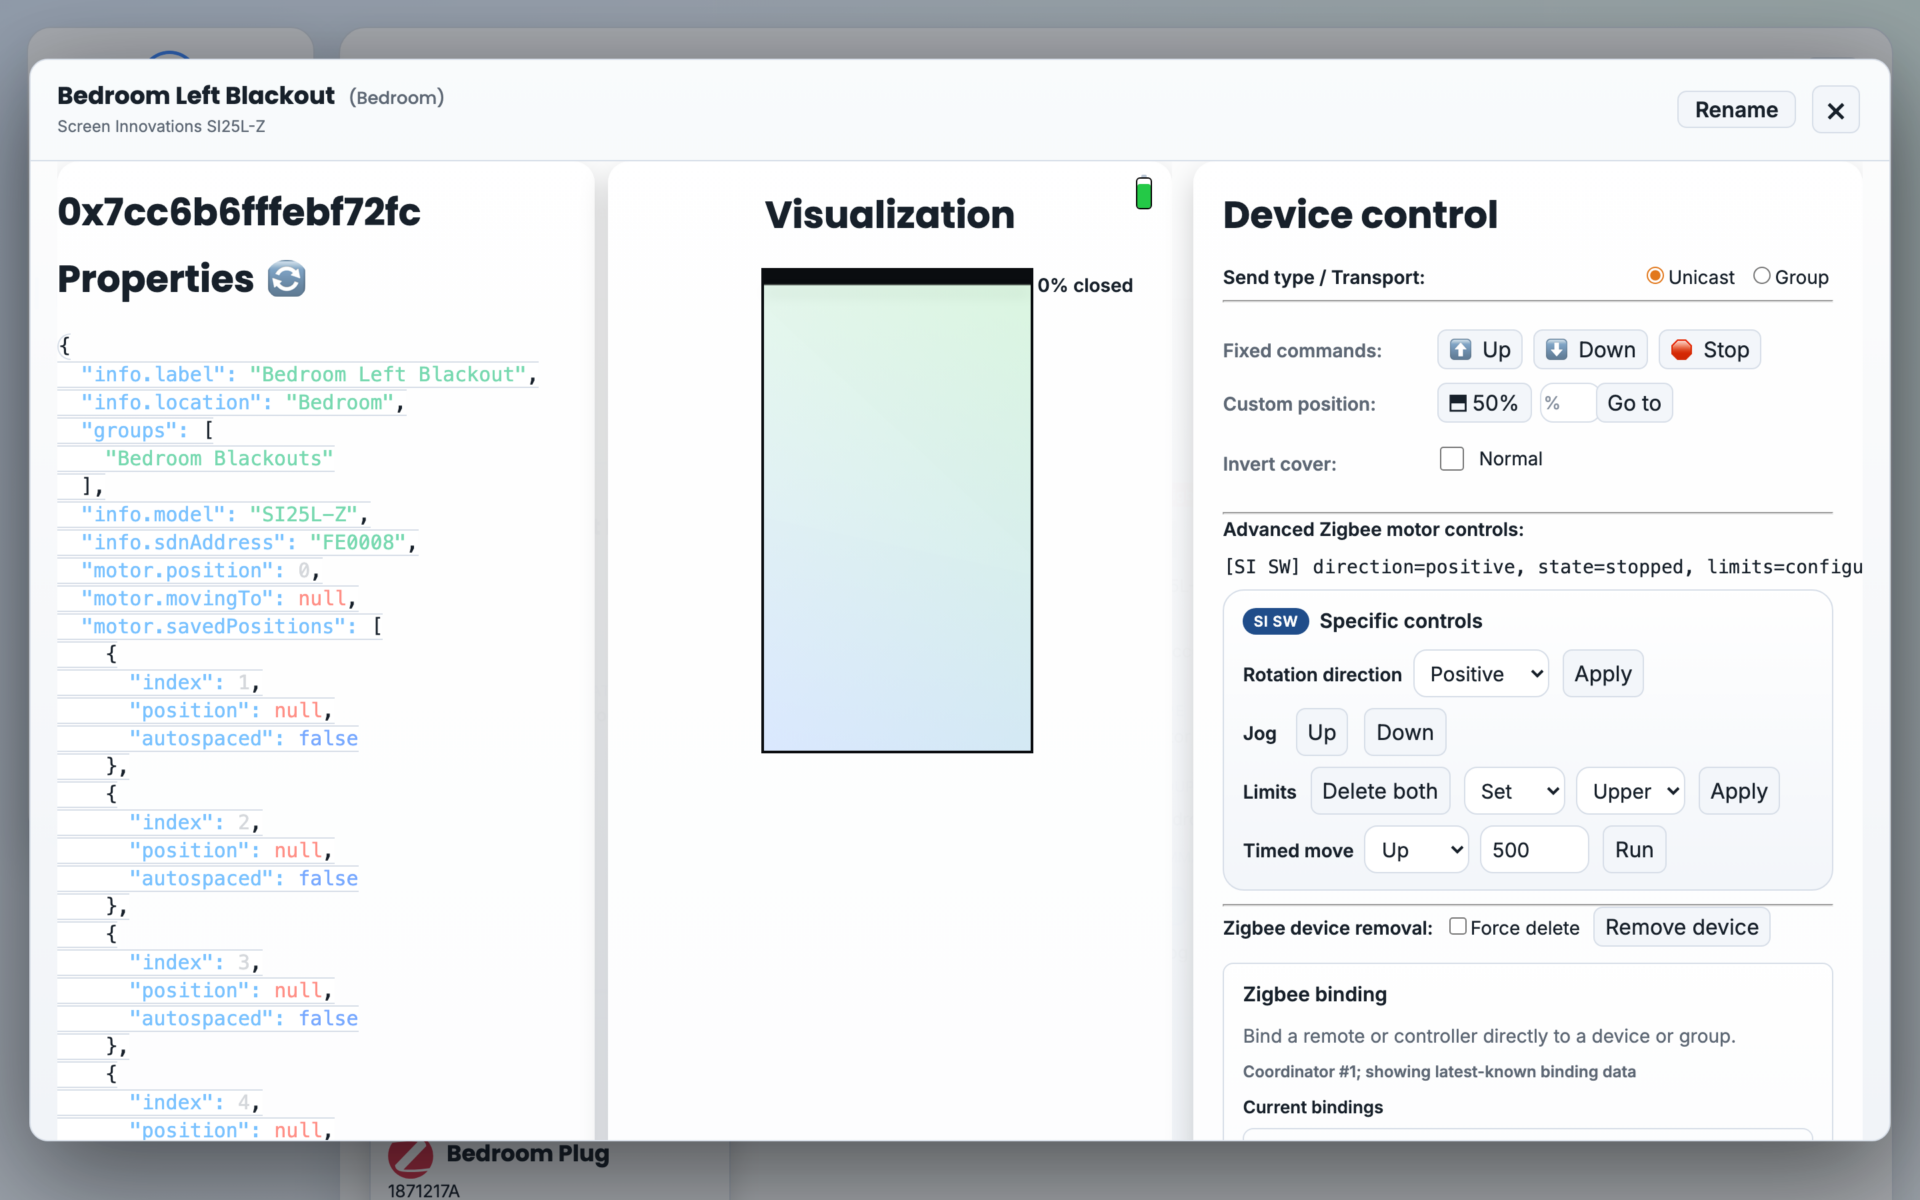
A shade’s control panel with the direction and limit controls in Advanced view.
Step 8 — Saved Positions, where the shade offers them #
Why now: a Saved Position is only meaningful once real limits exist.
Some shades store Saved Positions — heights the homeowner returns to with one press. On this firmware that is the PoE families (SI PoE: 8 slots; Sonesse: 15), not Zigbee shades, so do not hunt for the control on a Zigbee shade.
Run the shade to the height, press STOP, let it settle, then press Set on a slot. Send the shade away and prove it comes back to the spot.
Step 9 — Check wireless strength, and read the map’s advice #
Why now: it only means something once every shade is on. Fix a weak shade now, before groups and scenes depend on it.
The network map lives on the same coordinator page as the airwaves scan (Step 4): Discovery / Pairing → the coordinator’s row → View → Network map:.
Take the snapshot properly. Tick Include routes before you press Refresh graph — the map’s own advice refuses to reach its conclusions without routes. Then wait: the button reads Generating… (up to 3 min) and a big house takes most of that. When it finishes, press Open graph.
Read the header line first. It names the coordinator, then says updated <time> and whether routes were included, partially read, or not requested. If it says anything other than included, take it again — everything below depends on it.
How to read the picture. Red dot is the coordinator, blue dots are routers (plugs, outlets, Low Voltage motors), green dots are battery shades hanging off a parent. Under Overlay → LQI, leave it on Merged: you get one line per pair of devices with both ends’ numbers, so a lopsided link is obvious at a glance. Signal is reported by the device on the far side of the arrow, and the two ends often disagree — that is normal, not a fault.
The numbers that mean something. On a shade-to-router link, below 60 is low and 60 to 99 is worth checking. Above 80 on a router-to-router link is the good band. A blank is a missing measurement, not a bad link.
Ask it about one shade. Click the coordinator, then hold Shift and click the problem shade. You get Estimated path — the hops between them — and under it Routing recommendations. Read the summary line first:
“No clear routing changes suggested by this snapshot.” — the mesh looks fine; the problem is elsewhere.
“Collect a complete, current view before choosing routing changes.” — it is refusing to judge, and the list below says what to go and collect. Usually a link type is switched off, or the map is more than 30 minutes old.
“Suggested checks for this path; confirm them before changing the installation.” — it has something for you.
Each item names the rooms involved and what to do, and the order it gives is worth following: re-scan and test the shade in both directions, look for metal or a 2.4 GHz source, then try repositioning a router you already have — and only then consider adding one. It also warns, in its own words, that adding a router does not force a battery shade to change parent.
Two shortcuts. If the advice complains that reads failed for one or two devices, you do not need another three-minute map: select just that device and press Read neighbor table under Network tables. And every recommendation ends with “test command delivery” — you can do that without leaving the map, because selecting a shade gives you up, 50%, down and STOP right there.
Fix a weak shade before moving on. The usual answer is a Smart Plug nearer to it, which becomes a router it can reach. Re-take the map afterwards and prove it changed.
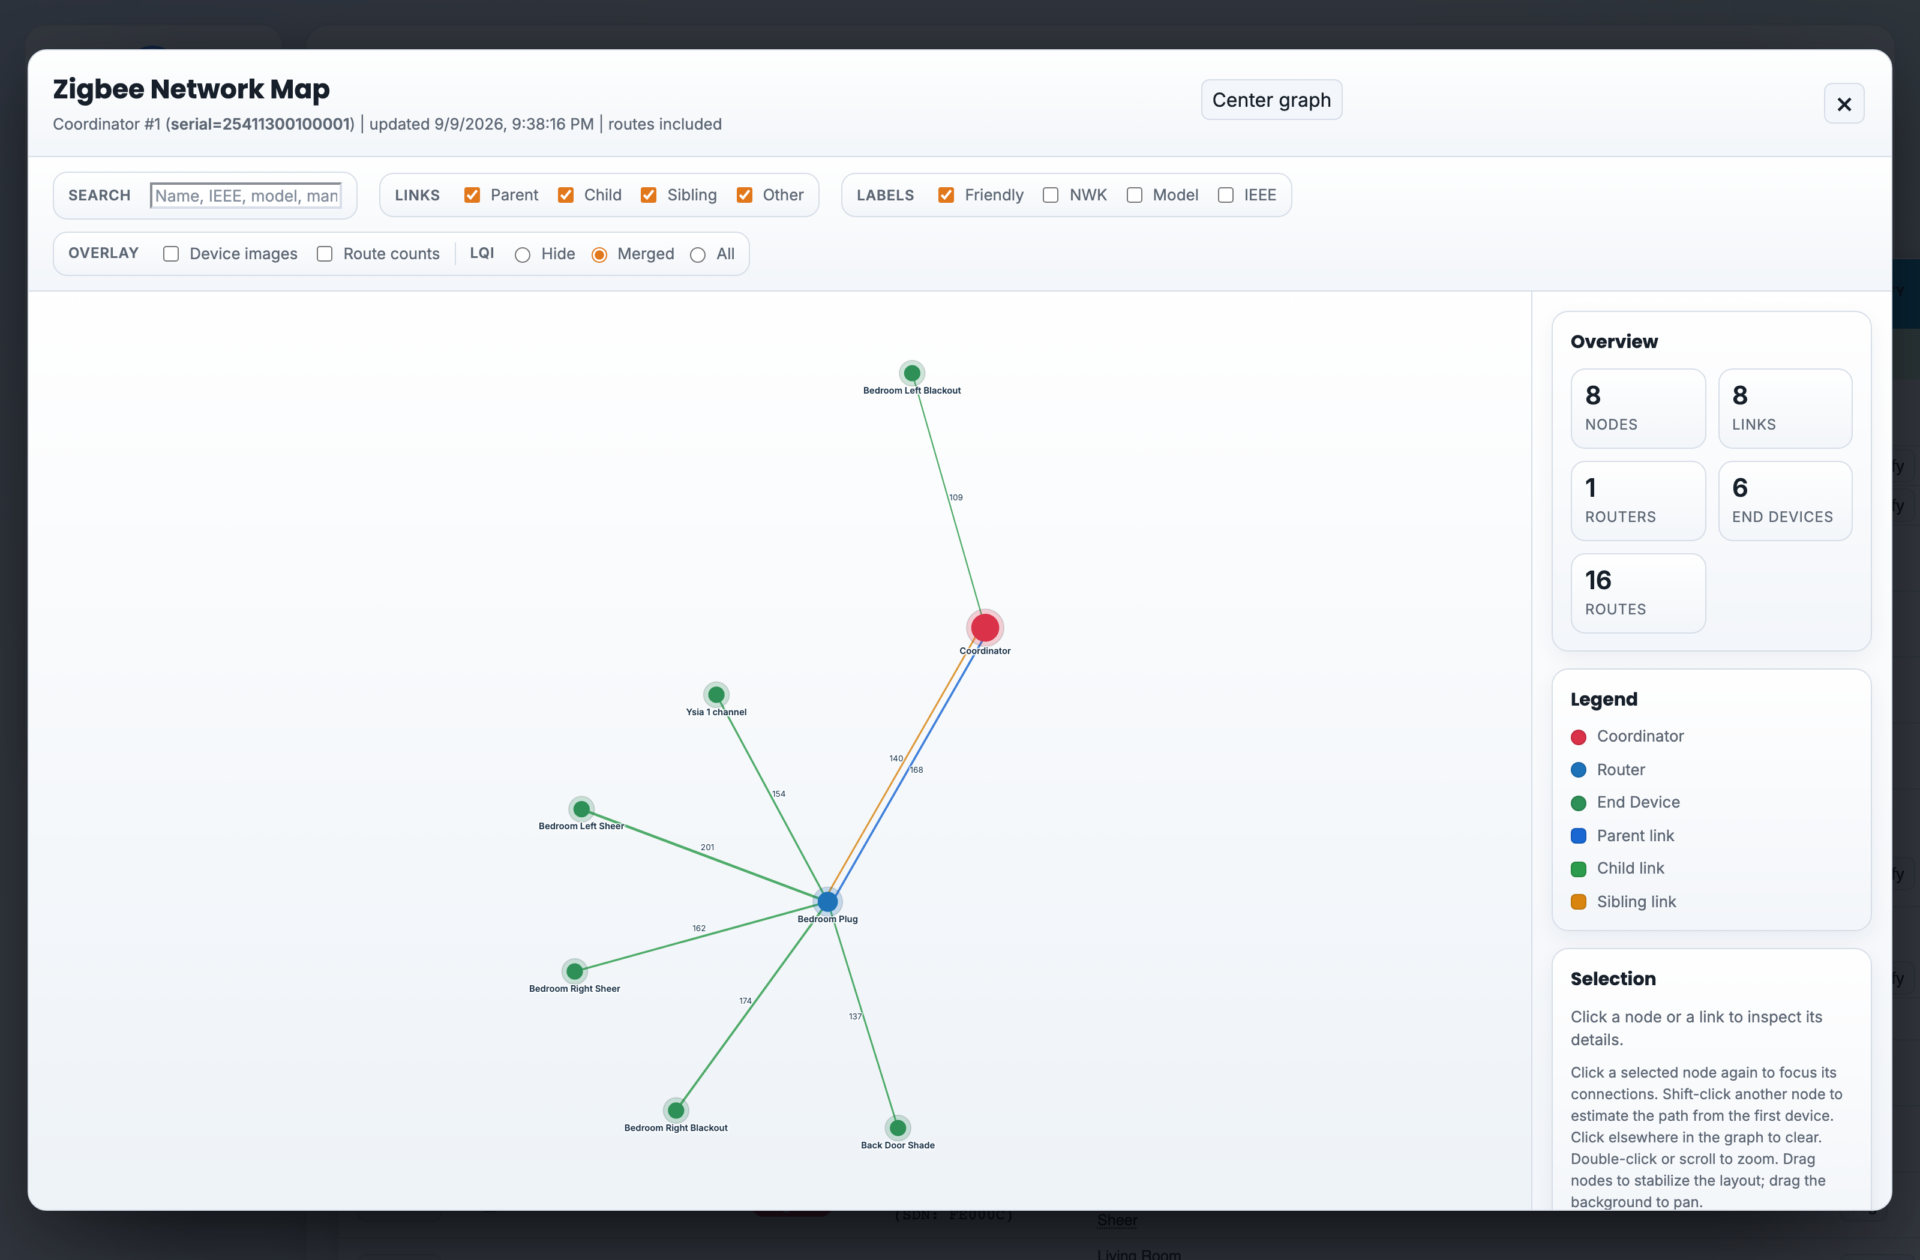
The map of one coordinator’s network: red is the coordinator, blue a router, green the battery shades hanging off it.
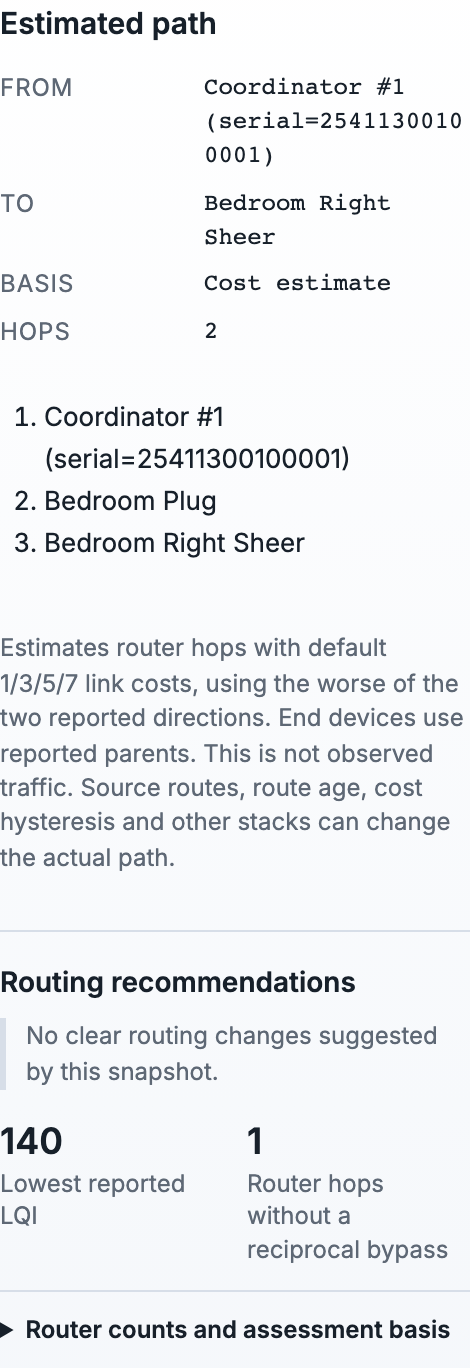
Shift-clicking a shade gives the Estimated path — here the coordinator reaches a bedroom shade through a Smart Plug in two hops — with the Routing recommendations underneath.

The map summary on the coordinator page. Check routes were included before you trust the advice.
Step 10 — Groups: shades that move together #
Why now: a group is one wireless command that every member obeys at once — the only way multiple shades move in perfect sync. Build them before scenes so scenes can target them.
A group is Zigbee shades only — PoE shades move together with a scene instead.
Groups → Edit → New Zigbee group. Name it — final and unique, first 16 characters unique — because a group is addressed by its name: rename it later and everything pointed at it breaks.
Pick the Coordinator this group lives on, tick the member shades, then press Create group (the button reads Add selected when you are adding to a group that already exists). The three chips across the top — 1 Details, 2 Compatible devices, 3 Apply — are just step markers. Leave Group ID on Auto.
The bridge creates the group first and adds members a moment later. If the member list comes back empty, reload and add the members in Edit — do not create the group again. (Groups are built here on the Groups page; the Zigbee Management → Groups tab can create and rename them but cannot add members.)
Test with Up / Down / STOP. Send a percentage only after every member has limits (Step 7).
Two rules worth knowing:
A group lives on one coordinator. The Coordinator you pick in step 1 decides the network, and step 2 then lists only that coordinator’s shades. It starts on #1 — pick it deliberately, and on a multi-coordinator job expect one group per network.
Moving a shade to another coordinator silently drops it from its groups — re-add it.
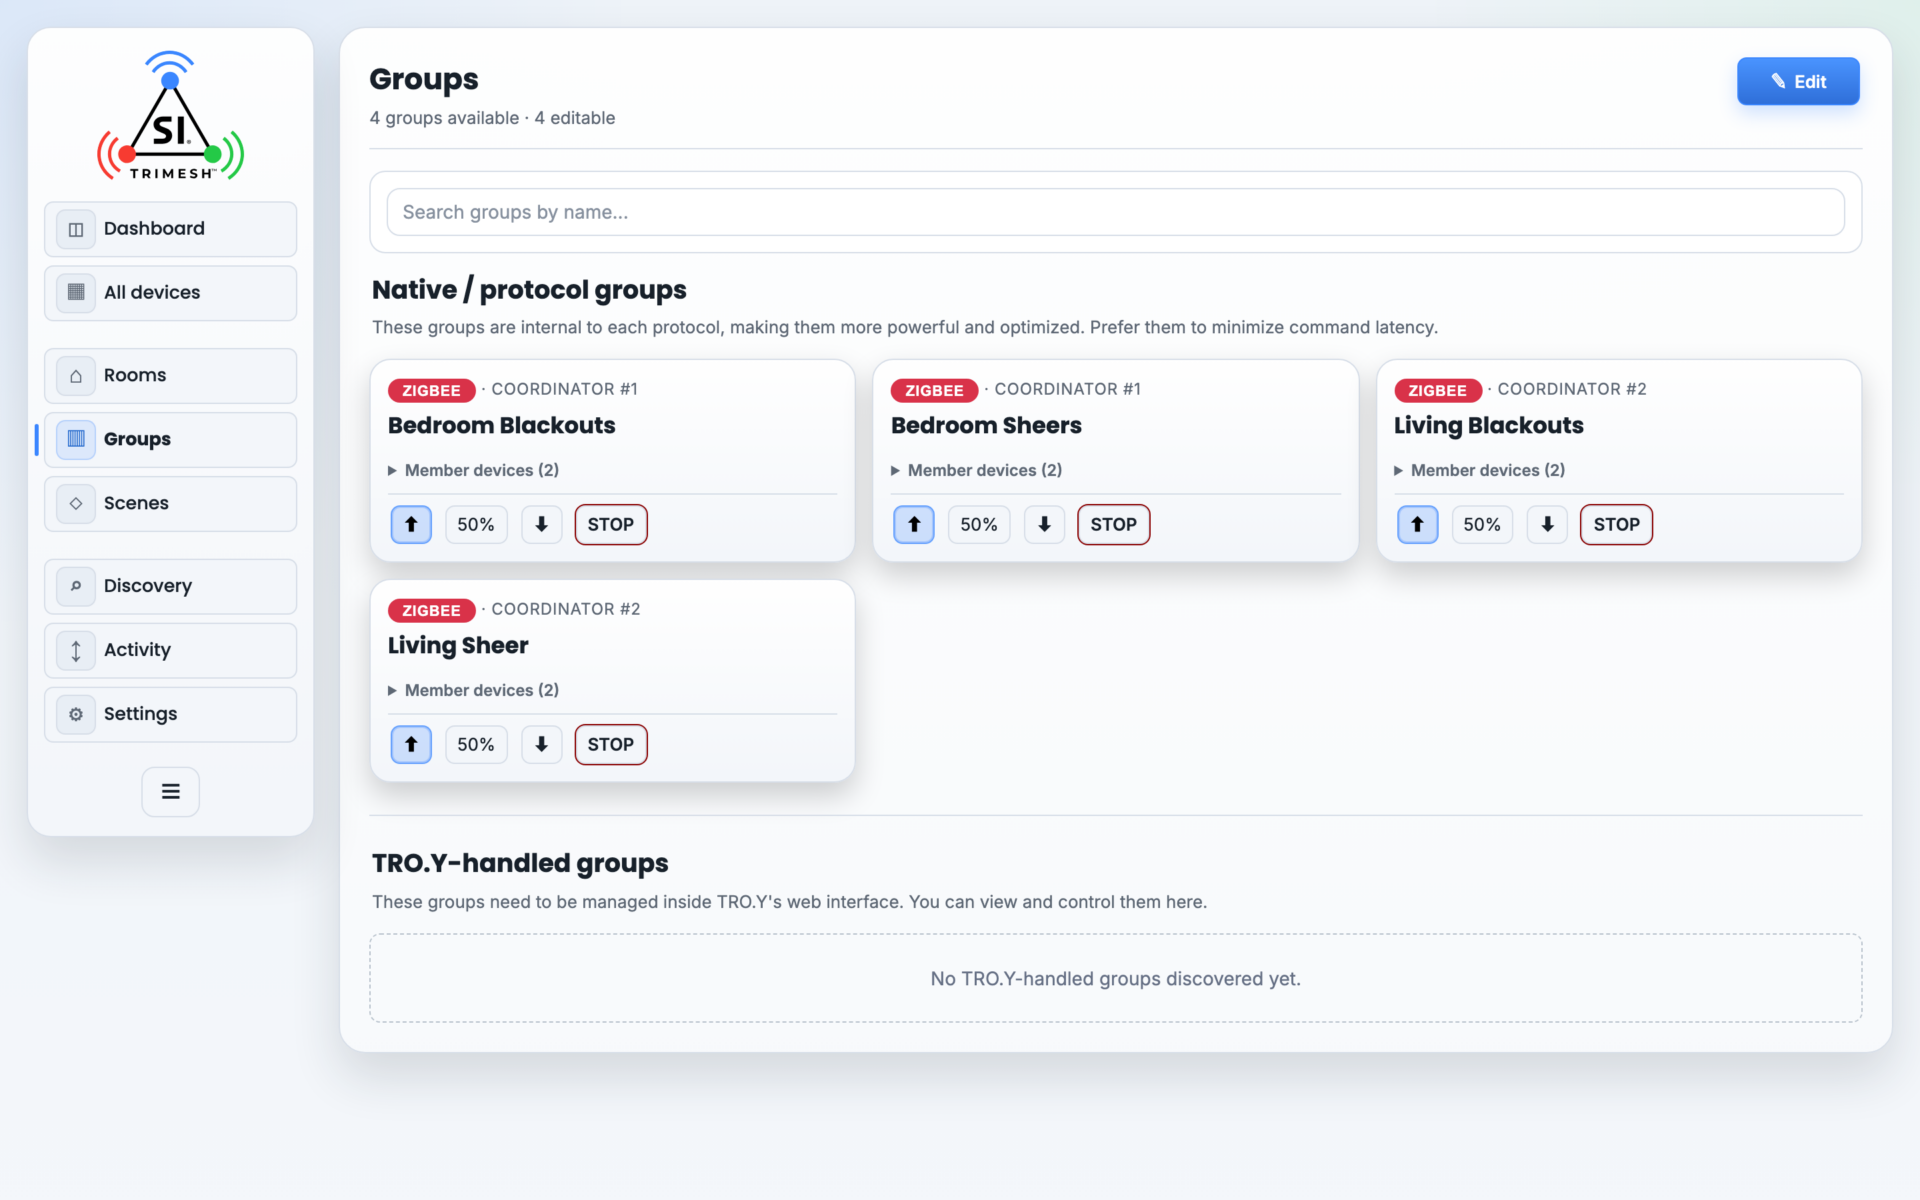
The Groups page.
Step 11 — Scenes and schedules #
Why now: shades work, groups exist — a scene built on top of them runs on the bridge itself, with no phone and no internet.
Before any schedule: Settings → Bridge → Time & Location. Set the timezone, latitude and longitude — all three (the pre-filled 48.8566 / 2.3522 are placeholders for Paris; replace them — a press-and-hold on your location in your phone’s map app shows the site’s coordinates). Then check there is no “Clock not synchronized” warning. A bridge that has never seen the internet has a timezone but not the time, and every schedule then fires wrong or never. A few minutes on an internet-connected network clears it.
Build a scene: Scenes → Edit → New scene — name, icon, colour, then actions. An action targets a device, a room, a group, or all devices. Prefer a group as the target: one command, shades move together. Save, reload, run it once, watch it.
Triggers make a scene run itself: a schedule (time and days) or sunrise/sunset (with a minutes offset). Four quiet traps:
The schedule clock is 24-hour. Typing 3 means 3 in the morning. 15:00 is 3 PM.
A scene with no actions is silently dropped on save, and so is any trigger with no days ticked — that applies to sunrise/sunset triggers exactly as it does to clock times. “Every day” means every day ticked.
Deleting a scene deletes its schedules too.
Edit scenes from one device at a time — the bridge saves the whole scene list in one write.
And the standing habit: after saving, reload and check the scene and its trigger are showing, exactly as you set them.
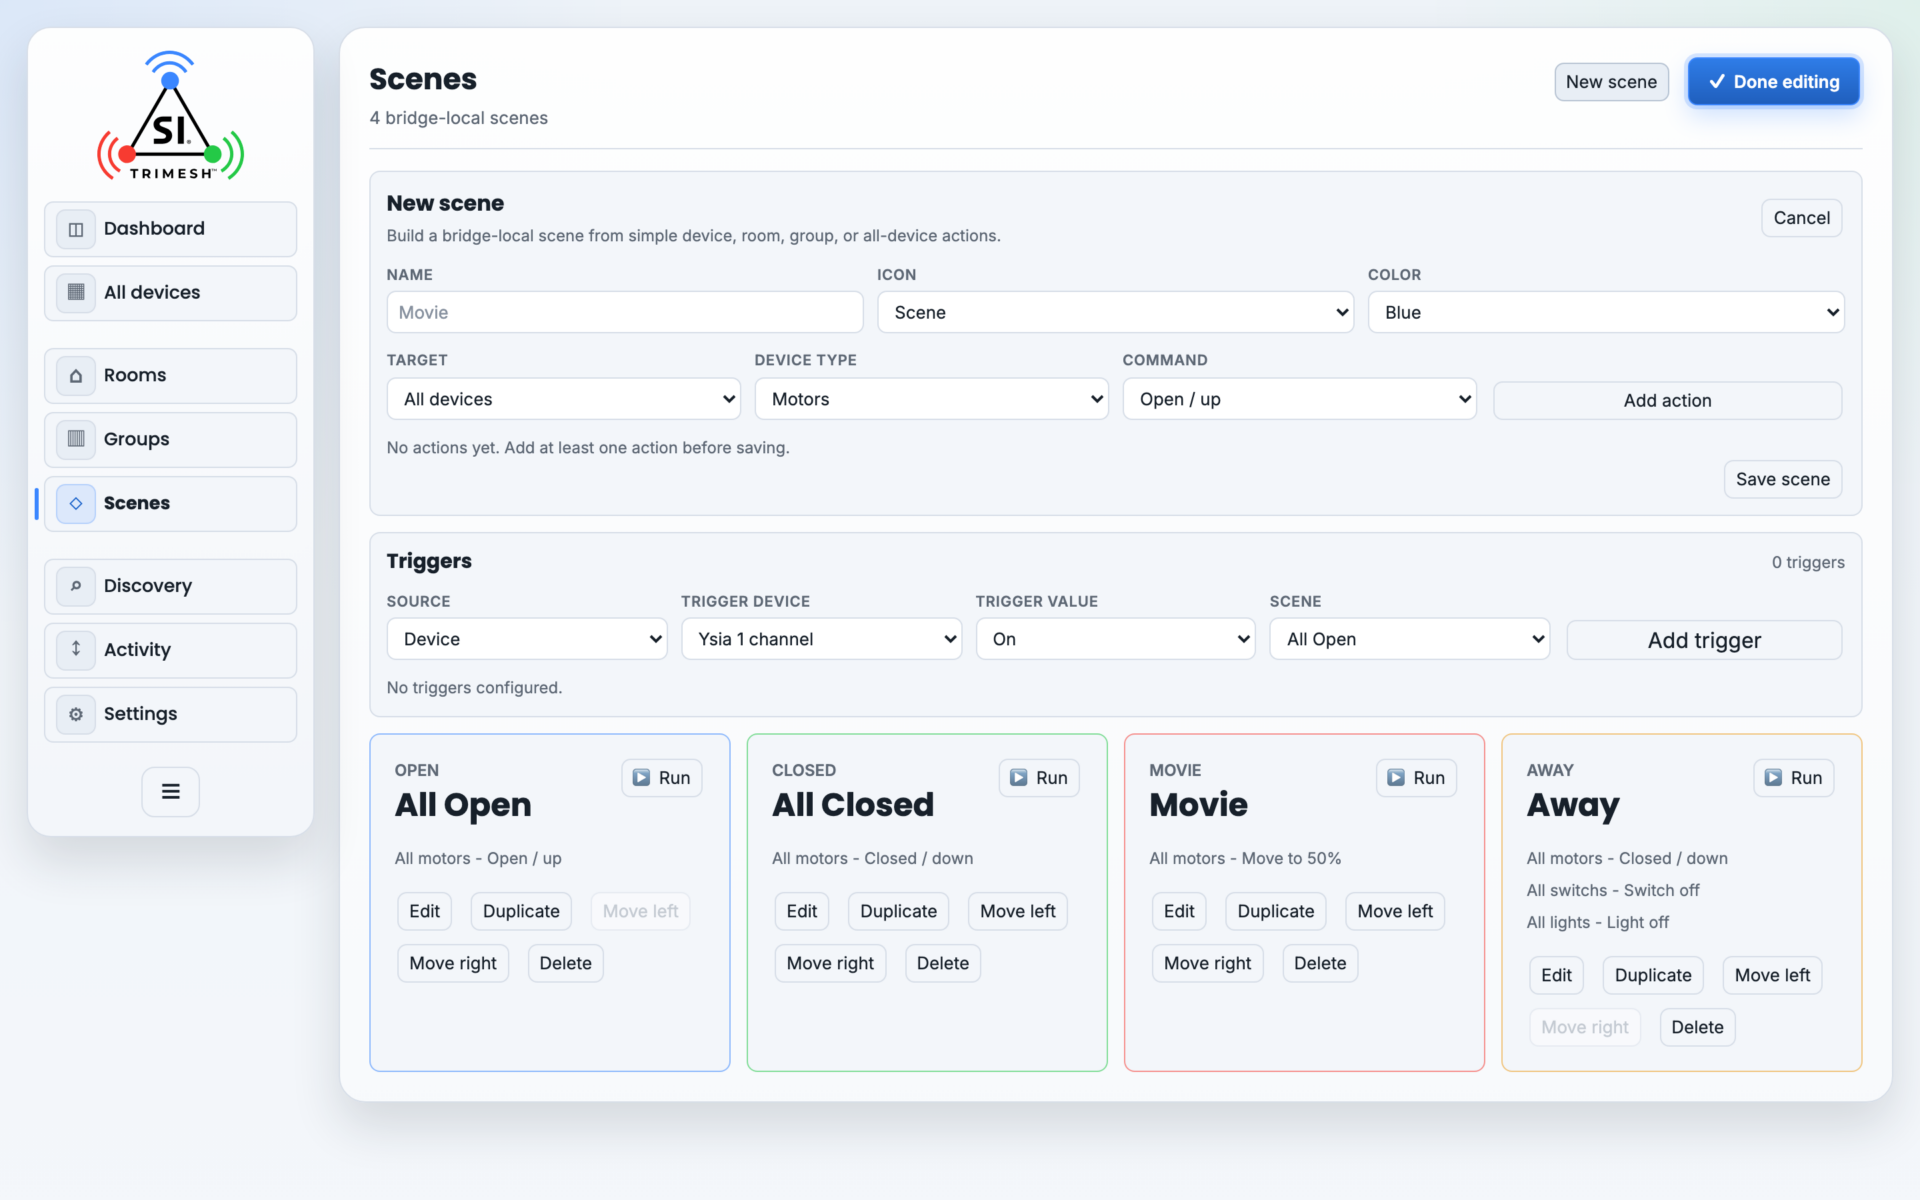
The scene editor with actions and triggers.
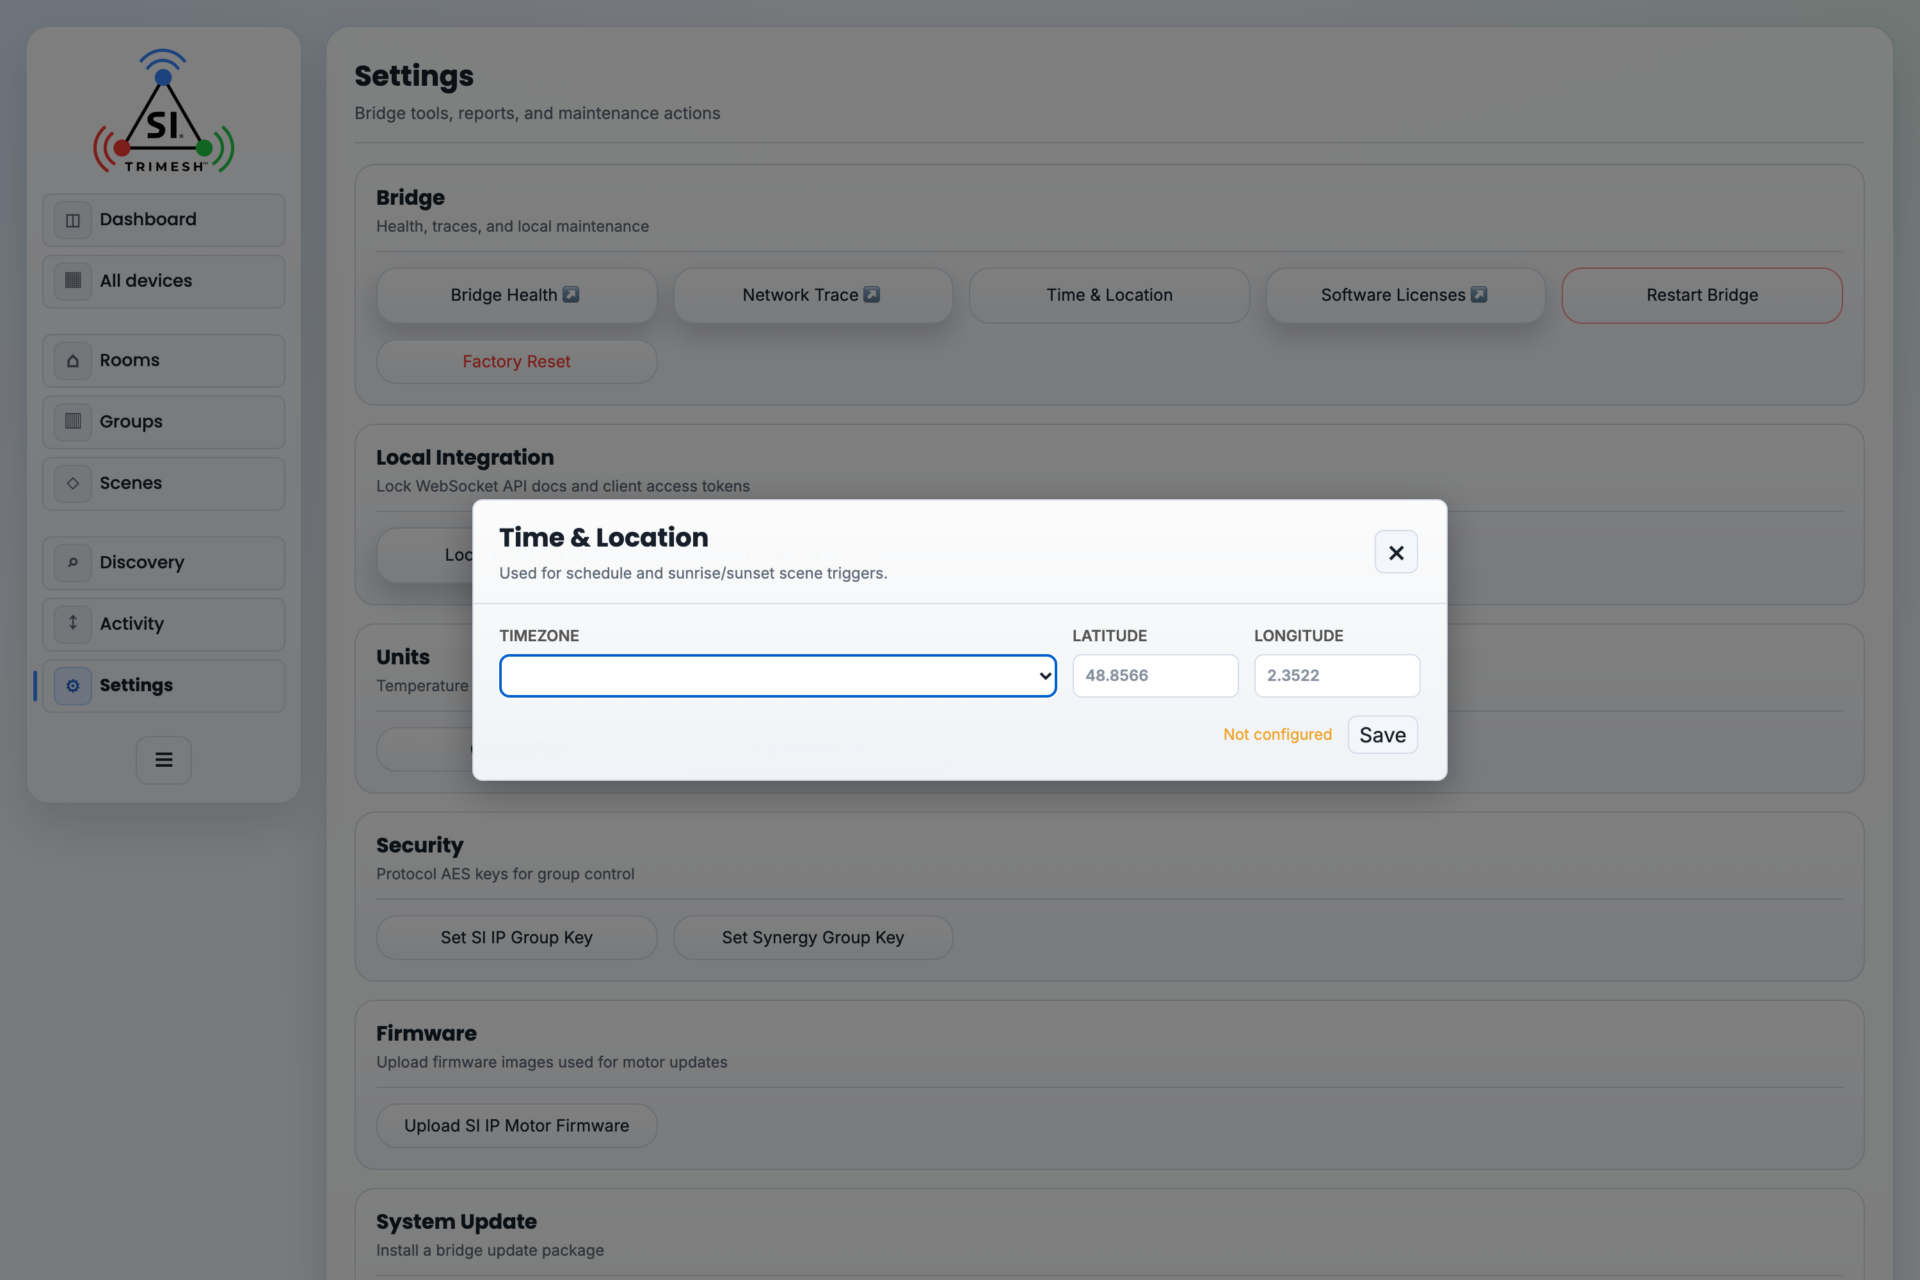
Time & Location — all three fields, and no clock warning.
Step 12 — Handheld remotes (Somfy Ysia) #
Why now: a remote is bound to finished shades and finished groups.
A remote is set up in two parts: join it, then tell it what to drive.
Join. Open pairing (Step 5). On the remote, push and hold the programming button on the back. The LED goes solid green, flashes red, back to green, flashes red a second time — let go after the second red flash. It shows amber while it joins, then a single green flash.
Bind — what each button does. Open the remote’s own control panel in Advanced view; a multi-channel remote appears under a Physical Zigbee device · n endpoints header, and you bind from that physical device. In the Zigbee binding panel: choose the Source endpoint (the remote’s channel — each channel has its own bindings), the destination (a shade with destination endpoint 1, or a group with none), and tick the clusters Window covering, Scenes, Identify. Nothing is pre-ticked for a device with no bindings yet — press Bind without ticking anything and nothing is bound. Existing bindings appear as their own badges, each with its own remove control, so a single wrong command can be undone without clearing the channel. Tap the programming button to wake the remote, then press Bind — amber, then green. Do not press Bind again while one is working. Refresh the binding panel until the entry appears; it fills in slowly.
On a 5-channel remote, bind each channel separately with the remote switched to that channel (the small button under the channel lights; all four lit = channel 5).
Three answers to “what should this button drive”:
One shade → bind to that shade.
A room of shades → bind to one group — never one bind per shade. A remote’s binding table is small.
A scene, a PoE shade, or anything on a TRO.Y → nothing to bind. Pairing already connected every channel to the coordinator; build a Device trigger in Scenes instead. Offering a PoE shade as a bind target fails with “unknown Zigbee group”, which is expected.
Know this before you promise a customer a button. A multi-channel remote cannot be used as a scene trigger on this firmware. In the Scenes trigger list it appears but is greyed out, and the bridge explains why: “Multi-channel Zigbee remotes are not currently supported as a trigger source.” A single-channel remote works fine. So a 5-channel Ysia can drive Zigbee shades and Zigbee groups by binding, but it cannot fire a scene, a PoE shade, or a TRO.Y shade. Plan its buttons accordingly.
If a remote will not join or bind, most likely first: you let go before the second red flash; the LED is stuck flashing amber — take a battery out and start over; it joined but no binding appears — remove the remote and add it again, since the second attempt usually takes; it is still on another system — clear it there first; no light at all — replace the battery.
Step 13 — Hand it to the control system #
Why last: the control system imports a finished installation. Every name, room, and group you set above is what it will see.
Skip this step on a standalone job. The bridge runs its own shades, scenes and schedules with nothing else attached.
How the two boxes share the work: the bridge keeps running its own shades; the TRO.Y imports them so Control4 and other control systems can reach them. Every Zigbee motor was automatically given a TRO.Y-facing address (FE00xx) the moment it paired — there is nothing to pair on the TRO.Y side. You can see those addresses on the Discovery / Pairing page: each motor’s row shows it under the Device ID, like (SDN: FE0005). Plugs, outlets, remotes and the coordinators do not cross to the TRO.Y; only motors do.
Do not pair Zigbee shades on the TRO.Y, and do not plug a Helen coordinator into it. On a TriMesh job the bridge’s coordinator owns all the wireless. Two base stations claiming the same shades is the classic failure.
Connect the bridge to the TRO.Y. Run a standard Ethernet cable from the bridge’s RS485 port to any one of the four BUS ports on the TRO.Y. It is an ordinary network patch cable, but it is not a network connection — it carries the wired bus the TRO.Y uses to talk to the bridge, so it goes port-to-port between the two boxes, not through the switch.
Open the TRO.Y’s page. Find it in the router’s client list (a factory-fresh unit is named
SI_TRO.Y) and browse to its address; first-time TRO.Y setup is covered by the TRO.Y Quick Setup Guide. One browser, one tab — the TRO.Y also talks to one client at a time. If the building has two, confirm you have the right one by the address and firmware on its status page.Run the TRO.Y’s wired (485) discovery — even though these shades are wireless. This is how the bridge’s shades arrive: they show up as rows
FE####marked “(IP Bridge’d)”. They look like wired motors in the table; they are not on the bus.Name the rows and press Commit Integration Table. A row that is not Committed is invisible to Control4. Do not refresh, navigate away, or unplug anything while the Commit runs — it takes a few moments, and the green “Table is Committed” box returns when it is done. Then reload and check the names are showing.
Four signs the import worked:
The TRO.Y’s table shows the bridge’s shades as “(IP Bridge’d)” rows.
The bridge’s Install Report lists one extra device on the SDN protocol with the id
000001— that row is the TRO.Y link itself. (Do not look for it on the Discovery page: that table shows SI IP, Synergy and Zigbee devices.)The same Install Report shows the Troy Exposed count. With a TRO.Y linked it reads your motor count plus one — the extra is the TRO.Y link row from sign 2. (On a bridge with no TRO.Y attached the same tile simply equals the motor count; two such bridges read 9 with 9 motors and 6 with 6.) A DUO shade counts as two motors. If the count is lower than your motor count, that many shades never got a TRO.Y address: chase those before you leave.
In the Installer status checks (bottom of the Settings page), “Troy-facing SDN IDs unique” is green.
(“Online” on the bridge’s SDN row alone proves nothing — check the four signs.)
If the shades do not appear on the TRO.Y, in order: the cable between the two (a crossed data pair looks identical to a port that is not passing data — swap the pair, try the other Bus Out); then on the bridge’s Discovery / Pairing page press Re-launch IP discovery — despite the name it re-scans the wired connection as well; then clear the TRO.Y’s integration table and run its 485 discovery again.
Hand off to the integrator: the Control4 driver talks to the TRO.Y — from there the TRO.Y 2: 3rd-Party Integration article applies unchanged. Group commands from the control system follow the groups you built in Step 10; scenes and schedules stay on the bridge.
If the job uses Home Assistant instead, it talks to the bridge directly: Settings → Local Integration → Local API Tokens, create a token named “Home Assistant” — it is shown once, copy it now — then unzip SI’s connector si_trimesh_bridge into /config/custom_components/, restart Home Assistant, add the integration and paste the token. Two silent killers: a nested folder from the unzip (the path must be exactly custom_components/si_trimesh_bridge/manifest.json), and forgetting the restart. Home Assistant shows position the opposite way round (0 = closed).
Step 14 — Test, back up, hand over #
Why now: everything below is the record of what you built. Make it while you are still logged in and still in Advanced view.
Test pass. One shade at a time, in room order: Identify (right shade?), full run, direction correct. Then every group and every scene once, watched.
Installer status checks (Advanced view, on the Dashboard and at the bottom of Settings) — all should read green: Discovery complete, Device labels set, Rooms assigned, Groups validated, Connectivity healthy, Troy-facing SDN IDs unique, Installer report ready.
Disable pairing (Zigbee Management → Commissioning) if any window is still open.
Export the Install Report (Settings → Install Report → HTML; JSON and CSV too if the project wants them). It records every device, name, room, group, coordinator assignment, link quality and online state, plus the Troy Exposed and warning counts. It does not record limits or scenes — your test pass is the proof of those. If the bridge has just rebooted, give it a few minutes first: devices it has not heard from yet export with blank online state and blank signal, which reads like half the job is offline when it is not.
“Yes / unknown” in the Online column is normal, not a fault. The second half only says whether the bridge has recently heard from that device, and it reads unknown for most Zigbee devices because the bridge does not poll sleeping devices. On a healthy system nearly every Zigbee row reads this way.
A blank in the Raw LQI column means not measured, not no signal. Coordinators have no link to themselves.
Create the site file (same page) and Export backup for each coordinator (Zigbee Management → Coordinators → Network backup and migration). Both can take a few minutes on a full system — let them finish. If one coordinator’s backup fails, the panel says which slot and offers Retry or Download partial site file; retry first, and note on the job record what is missing. Both files contain the wireless network keys and administrator credentials — keep them with the job record, never email them, and never attach them to a ticket. That coordinator backup is what turns a failed coordinator into a swap instead of re-pairing the whole house.
Switch View back to Simple and build the homeowner’s Dashboard: Edit dashboard, add widgets — Scene, Room, Device, Group, Bridge status; sizes Medium / Compact / Wide.
Logout, and close the browser. An idle page signs itself out after about two hours, but closing the browser is the clean end to the job.
One button to stay away from: Factory Reset, in Settings under Bridge, next to Restart Bridge. It erases the whole configuration — names, rooms, groups, scenes, every Zigbee network and all API tokens — and reboots to a blank setup page. It asks you to type RESET first, so it cannot happen by accident, but it is not part of any normal job.
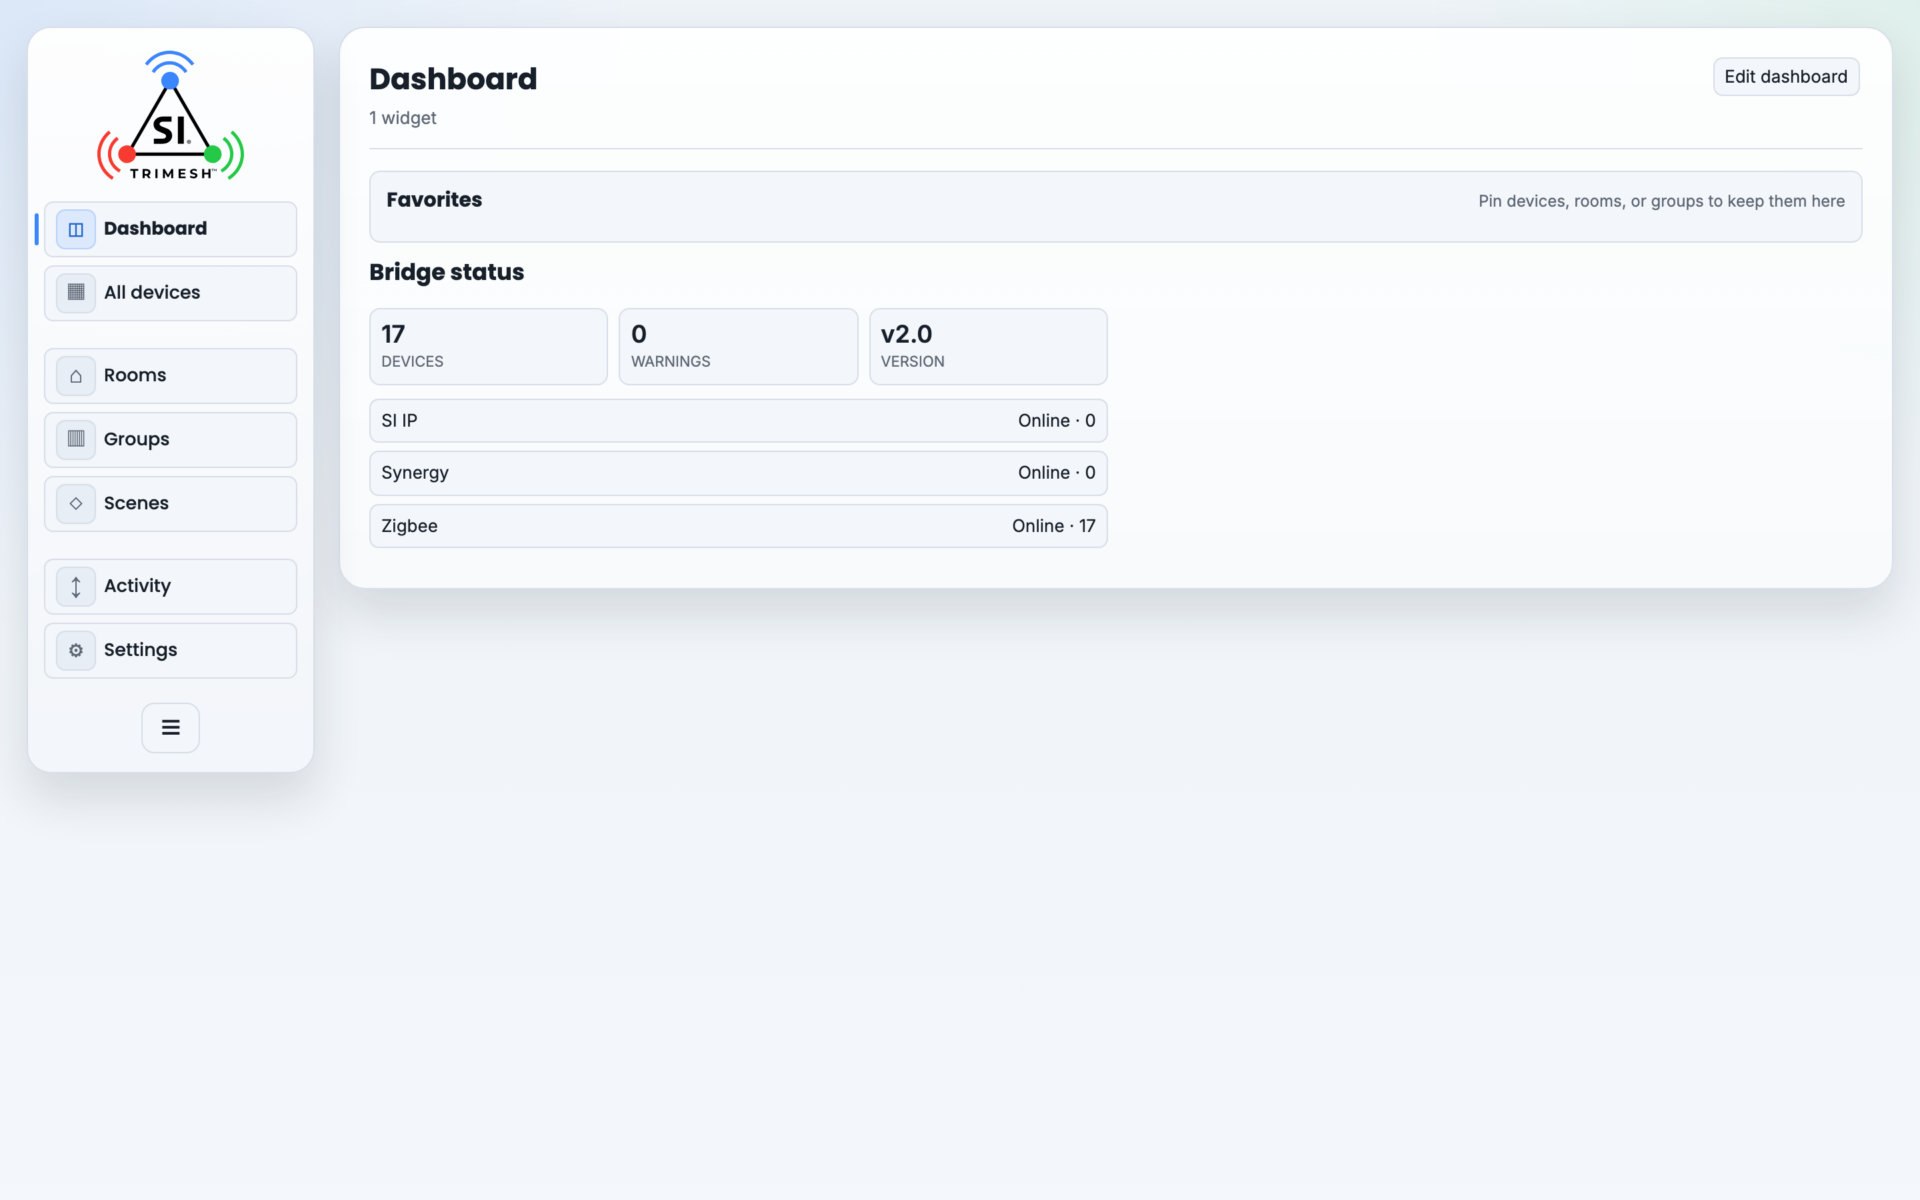
The homeowner’s Dashboard in Simple view.
Coming back to an existing system #
Upgrading an IP Bridge already in service to TriMesh. TriMesh is a firmware upgrade to the existing SI IP Bridge. Take the site file first, run the update as in Step 2, and check the PoE shades are still listed. Then continue from Advanced view and Step 3 to add the wireless side. Existing TRO.Y imports of the PoE shades keep working.
Updating firmware on a working system. Take the Step 14 backups first. Update as in Step 2. Afterwards reload and check: shades still listed, groups and scenes still present, channel unchanged, Time & Location still set. If a shade does not answer afterwards, treat it as a join issue (Step 6).
Replacing a Zigbee shade. In the old shade’s control panel, Zigbee device removal → Remove device. If the old motor never answers, tick Force delete and remove it again. Open pairing and join the new shade — note that a Somfy Nano that has just left a network usually drops into pairing mode by itself; give it a minute before touching the button, while an SI Nino always needs the two-jog hold. Give it exactly the same name and room so the homeowner’s scenes, dashboard and any app keep working. Limits live in the motor and do not carry over — set them again (Step 7), then re-add it to its groups.
If something is not working #
What you see | Most likely, in order | Where |
|---|---|---|
Cannot reach the bridge’s page | Port not delivering PoE (no light = no power); laptop on a different network. Fall back to the IP from the router’s client list | Step 1 |
Coordinator never appears | It answers nothing for the first minute or two — wait; then reseat the cable; then a port beside the bridge | Step 3 |
Airwaves scan refused: “ApiPassword is missing” | No coordinator login stored — Auto-provision | Steps 3–4 |
Airwaves scan refused: “Unauthorized” | A stored login is wrong — retype it and Save | Steps 3–4 |
Coordinator firmware page will not accept the password | The bridge’s stored password and the coordinator’s own do not match — reveal the bridge’s with the eye button, or type yours into the bridge and Save | Step 3 |
Device will not join | Released after the first jog (hold through two); pressed again during the 10–20 second wait — wait it out; belongs to another system — reset the motor; too far from anything powered; the pairing countdown had run out — re-open it | Step 5 |
Pairing seems to close on its own | A pairing window opened on another coordinator closes this one — one window at a time | Step 5 |
Plug or outlet “did not discover” | It is listed as type switch, not motor | Step 5 |
Shade arrived as a code like 0x7cc6… | A placeholder — rename it now | Step 6 |
Identify gives no jog | Battery shades check in periodically — wait a few seconds and try again; confirm you are on the row you think you are | Step 6 |
Shade refuses to travel past a point | It is obeying an old stored limit — clear that boundary, then re-set | Step 7 |
Limit “did not save” | Shade was still settling; or the boundary already held a limit (Clear first); or the wrong end was selected | Step 7 |
Shade with one limit set acts like it has none | Normal — nothing is enforced until both ends are set | Step 7 |
No Saved Positions control on a shade | Zigbee shades do not offer them on this firmware — PoE families do | Step 8 |
One shade is slow or misses commands | Check its link on the network map, then add a Smart Plug between it and the coordinator | Step 9 |
New group shows no members | Member-add lags creation — reload and add in Edit; do not create it again | Step 10 |
Group is missing certain shades | Those shades are on a different coordinator — a group lives on one network | Step 10 |
Schedule fired at 3 AM | The clock is 24-hour — 15:00 is 3 PM | Step 11 |
Schedule never fires | No days were ticked — it was silently dropped on save; rebuild it. Or Time & Location incomplete, or “Clock not synchronized” — a few minutes of internet fixes the clock | Step 11 |
Remote joined but its buttons do nothing | Nothing was bound — nothing is pre-ticked in the binding panel. Wake the remote, tick the three clusters, Bind | Step 12 |
A 5-channel remote will not fire a scene | Not supported on this firmware — multi-channel remotes cannot be scene triggers | Step 12 |
Shades missing on the TRO.Y | Run the TRO.Y’s 485 discovery; Commit; check the cable (swap the data pair, other Bus Out); press Re-launch IP discovery on the bridge | Step 13 |
Two shades read identically in Control4 | TRO.Y names truncate at 16 characters — keep the first 16 unique, re-Commit | Steps 6, 13 |
Install Report shows “Yes / unknown” everywhere | Normal for Zigbee — the bridge does not poll sleeping devices | Step 14 |
Install Report has blanks in Raw LQI | Not measured, or a coordinator, which has no link to itself | Step 14 |
Keeps logging me out | Something else is connected — another tab or a phone. One connection at a time | Before you start |
Logged out after a break | Normal: the page signs out after about two hours idle. Log back in | Before you start |
A device joined but behaves oddly | Advanced view, in its panel: Device setup → Re-interview, then Re-configure. Wake a battery device first | Step 6 |
A rename or setting did not stick | “ok” means accepted, not applied — reload, repeat, check | Before you start |
Locked out of the bridge | Hold B for 4 seconds, set a new password. Shades, rooms, scenes are kept | Step 1 |
Getting help #
Ask ATEN first — SI’s AI support assistant, at siagent.screeninnovations.com or from the bridge at Settings → Support, where its logo is the one tile on the card. It is available all the time and it has read SI’s product documentation and training material. Give it the detail you would give a person on the phone:
What you are working on and what happened, in ordinary words. “Two Zigbee shades in one room stopped answering after I changed the channel” gets a better answer than “shade not working”.
Which product and protocol: TriMesh bridge, battery or PoE shade, TRO.Y, Zigbee or wired.
Quote the screen. If the bridge printed a message or a warning, paste it in exactly.
What you already tried, so it does not send you back through it.
If it cannot resolve the problem, ask it to raise a support case and it will pass the conversation to SI Support rather than making you start again.
The SI support library (support.screeninnovations.com) is the same documentation to browse and search yourself, in a web browser.
When you contact SI Support, send these four things with the first message and you will usually skip a round of questions:
The Install Report as a file — not a screenshot of it. Settings → Install Report; HTML is easiest to read, JSON is the most complete. SI Support can read the file directly and see the whole system at once.
The bridge version, from the build line at the bottom of the left menu.
A Network Trace capture of the failure if you can reproduce it (Settings → Network Trace → Export Visible).
What you expected, what happened, on which device, and whether it ever worked.
Do not send the site file or a coordinator backup unless SI Support asks for them. Both contain administrator credentials and your Zigbee network keys.
Quick Start Guide version 1.2, 2026-09-21. Written against bridge firmware v1.2 (build 2026-09-17) and verified against a live bridge. When your bridge and this guide disagree, believe the bridge — and tell SI Support, because one of the two needs correcting.



